Homemade Mozzarella Sticks: From Curd to Crunch
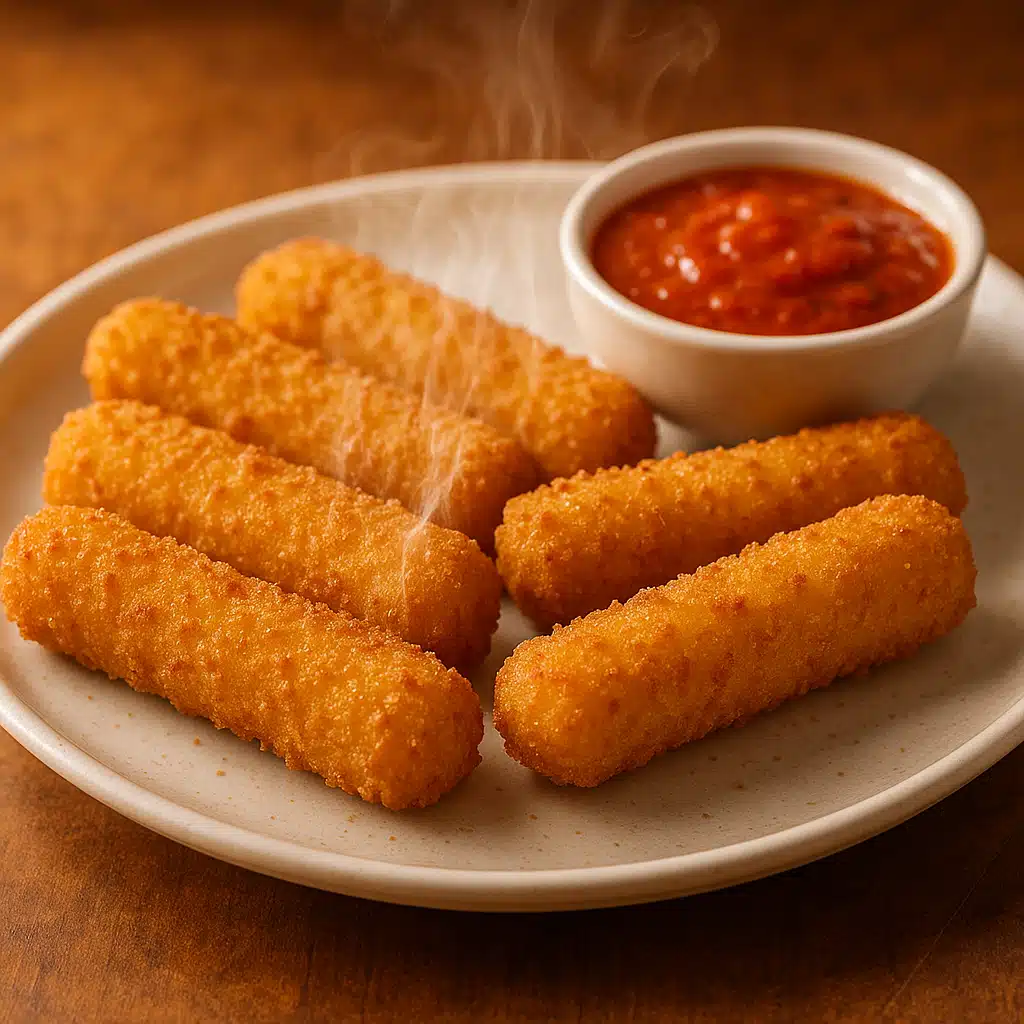
Welcome to the irresistible world of homemade mozzarella sticks! If you’ve ever craved that perfect combination of melted, stretchy cheese wrapped in a crispy, golden coating, you’re about to discover how simple and rewarding it is to create this beloved appetizer in your own kitchen. This comprehensive guide will walk you through every step of the process, from selecting your ingredients to achieving that ideal crunch, ensuring perfect results every time.
Mozzarella sticks have become a globally loved comfort food, enjoyed in homes and restaurants around the world. While they’re readily available frozen or on restaurant menus, nothing compares to the flavor, texture, and satisfaction of making them fresh at home. Whether you’re preparing snacks for a gathering, creating appetizers for a family dinner, or simply indulging in a cheesy treat, homemade mozzarella sticks deliver an unbeatable combination of quality and taste.
Why Make Your Own Mozzarella Sticks?
Creating mozzarella sticks from scratch offers numerous advantages that extend far beyond simple cost savings. When you make them yourself, you gain complete control over every aspect of the recipe, from ingredient quality to customization options that suit your specific preferences and dietary needs.
Quality Control: Homemade versions allow you to select premium ingredients, avoiding preservatives, artificial additives, and excessive sodium often found in commercial frozen products. You can choose high-quality cheese that melts beautifully and delivers authentic flavor.
Customization: Adjust every element to your liking—make them extra crispy, add herbs and spices to the breading, experiment with different cheese varieties, or modify the size and shape to suit your presentation needs.
Freshness: Nothing beats the taste and texture of mozzarella sticks prepared fresh. The cheese stays creamy and stretches perfectly, while the coating maintains its crispness without becoming soggy.
Cost-Effectiveness: Making large batches at home is significantly more economical than purchasing pre-made options, especially when serving groups or preparing multiple servings.
Satisfaction: There’s an undeniable sense of accomplishment in creating restaurant-quality appetizers in your own kitchen, impressing guests and family with your culinary skills.
Essential Ingredients and Tools
Before beginning your mozzarella stick journey, gathering the right ingredients and equipment will ensure smooth preparation and optimal results. Here’s everything you’ll need:
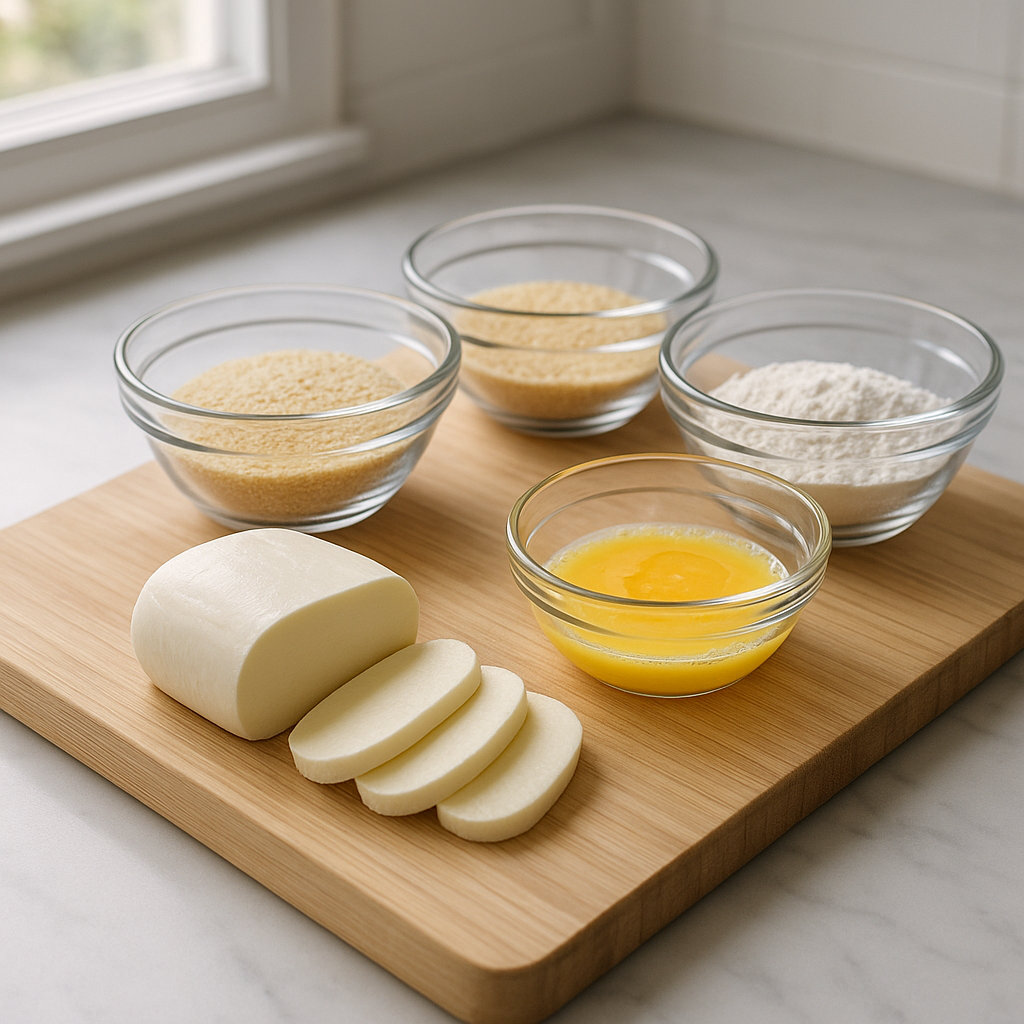
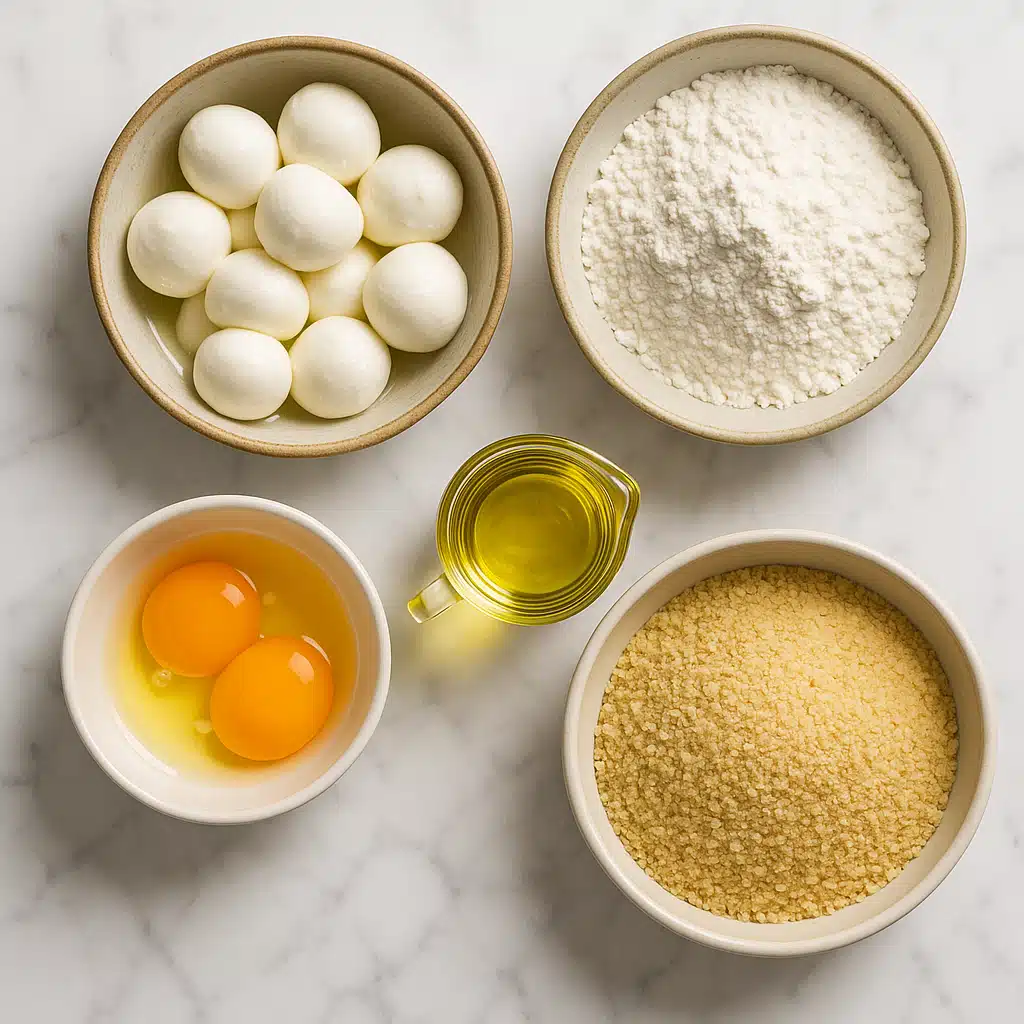
Ingredients
- Fresh Mozzarella (approximately 225-250g): Look for firm, low-moisture mozzarella rather than the soft, water-packed variety. Block-style mozzarella works best as it holds its shape during breading and frying.
- All-Purpose Flour (1 cup / 125g): Forms the foundation layer that helps subsequent coatings adhere to the cheese.
- Large Eggs (2): Creates the binding layer between flour and breadcrumbs, ensuring everything stays in place.
- Breadcrumbs (1 cup / 115g): Panko-style breadcrumbs deliver superior crunch and texture, though traditional fine breadcrumbs also work well.
- Salt and Pepper: Essential seasonings to enhance flavor throughout the breading.
- Cooking Oil: Neutral oils with high smoke points work best—vegetable oil, canola oil, or sunflower oil are excellent choices for frying.
- Optional Seasonings: Garlic powder, dried Italian herbs (basil, oregano, parsley), paprika, or cayenne pepper can add extra flavor dimension to your breading.
Equipment Needed
- Sharp knife for cutting cheese
- Three shallow dishes or plates for breading station
- Deep frying pan, pot, or deep fryer
- Cooking thermometer (helpful but optional)
- Slotted spoon or frying spider for removing sticks
- Paper towels or cooling rack for draining
- Baking sheet if freezing before frying
Step-by-Step Preparation Guide
Follow these detailed instructions to create perfect mozzarella sticks every time. Taking care with each step ensures the best texture, appearance, and flavor in your finished product.
Step 1: Prepare the Cheese
Begin by unwrapping your mozzarella and patting it completely dry with paper towels. Excess moisture is the enemy of good breading—it prevents proper adhesion and can cause the coating to separate during frying.
Using a sharp knife, cut the mozzarella into uniform sticks approximately 10cm long and about 1-1.5cm thick. Consistency in size ensures even cooking, with all pieces reaching the perfect golden color at the same time. If your cheese block is particularly large, you may cut it into rectangular pieces first, then slice those into stick shapes.
Pro Tip: For easier cutting and handling, place your mozzarella in the freezer for 15-20 minutes before slicing. This firms up the cheese slightly, making it easier to cut clean edges and reducing the likelihood of it becoming too soft during preparation.
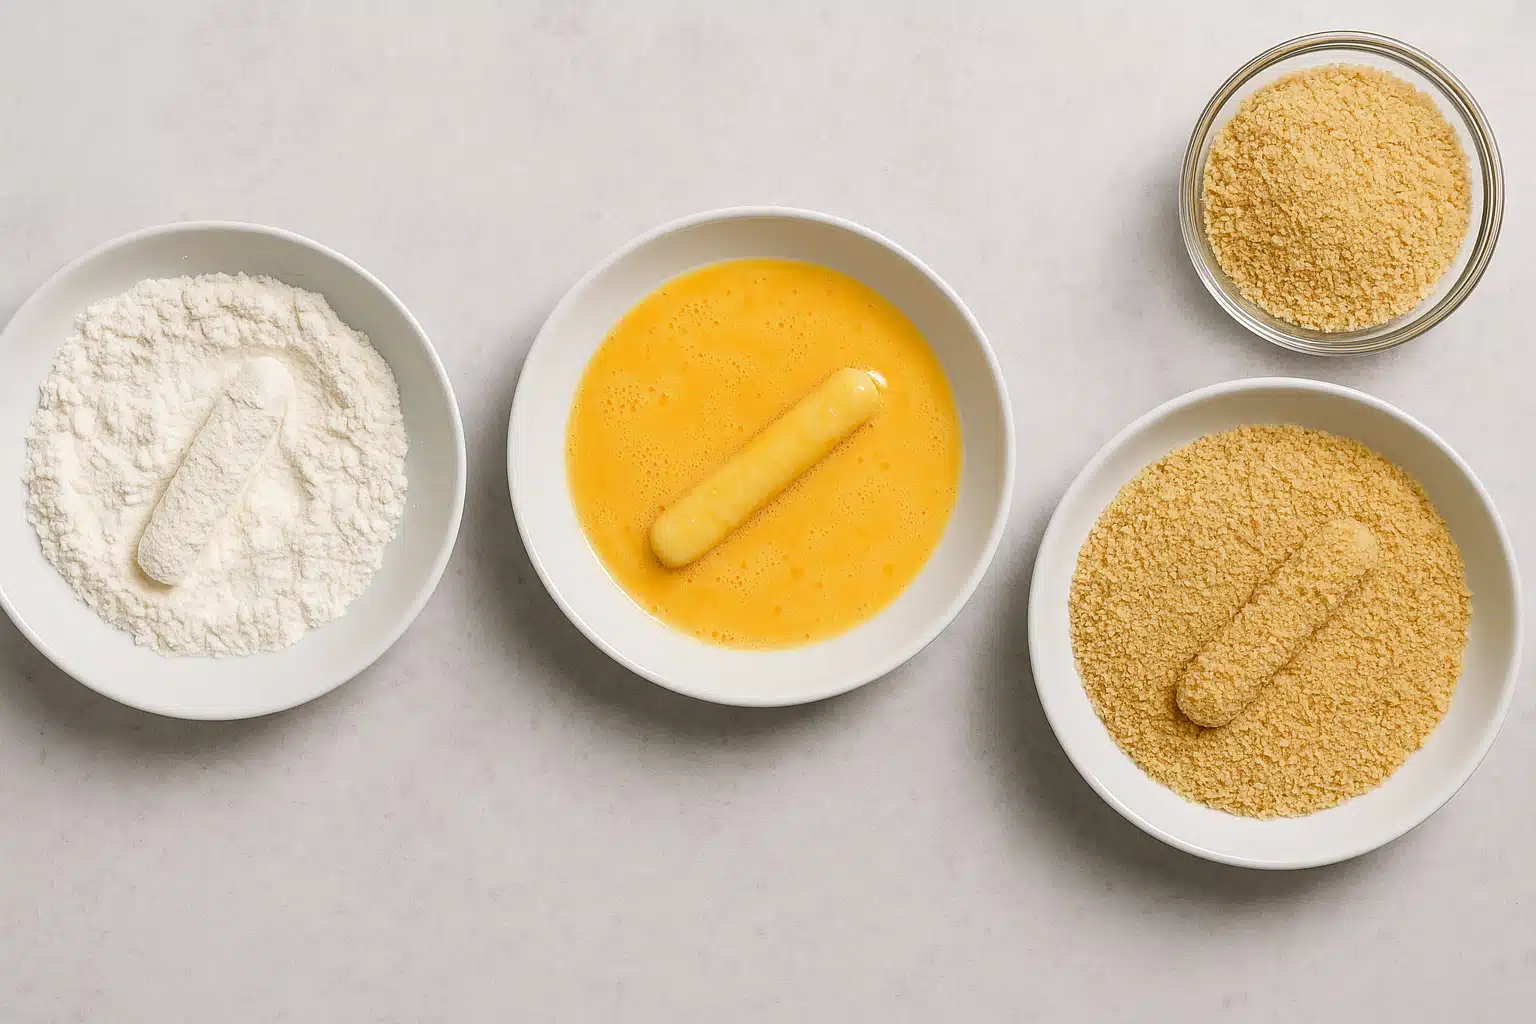
Step 2: Set Up Your Breading Station
Efficient preparation makes the breading process smooth and less messy. Arrange three shallow dishes or plates in a row on your work surface. This assembly-line approach streamlines the coating process.
- Station 1 – Flour: Place the all-purpose flour in the first dish. Add a pinch of salt and pepper, mixing well to distribute the seasoning evenly.
- Station 2 – Egg Wash: Crack the eggs into the second dish and whisk thoroughly until the yolks and whites are completely combined. Adding a tablespoon of water or milk can make the egg wash slightly thinner and easier to work with.
- Station 3 – Breadcrumbs: Spread the breadcrumbs in the third dish. This is where you can add additional seasonings—try mixing in garlic powder, dried herbs, grated hard cheese, or a pinch of cayenne for heat. Season generously, as this coating provides most of the flavor.
Organization Tip: Keep one hand designated for dry ingredients (flour and breadcrumbs) and the other for wet (egg wash) to minimize mess and prevent clumping on your fingers.
Step 3: Coat the Mozzarella Sticks
Now comes the crucial breading process. This triple-coating technique creates a protective barrier that keeps the cheese contained while creating that signature crispy exterior.
Take one mozzarella stick and follow this sequence:
- Flour Coating: Roll the stick in flour, ensuring all surfaces are covered. Shake off any excess—you want a light, even coating, not clumps of flour.
- Egg Wash: Dip the floured stick into the beaten eggs, turning to coat all sides. Allow excess egg to drip back into the bowl.
- Breadcrumb Coating: Roll the stick in breadcrumbs, pressing gently to help them adhere. Ensure complete coverage with no gaps where cheese might escape.
- Double Coat (Optional but Recommended): For extra security and crunch, repeat the egg and breadcrumb steps. This second layer significantly reduces the risk of cheese leakage and creates a thicker, more satisfying crust.
Place each completed stick on a clean plate or baking sheet. Once all sticks are breaded, they need to rest before frying.
Step 4: Freeze Before Frying (Critical Step)
This step separates mediocre mozzarella sticks from exceptional ones. Place your breaded sticks on a baking sheet lined with parchment paper, ensuring they don’t touch each other. Freeze for at least 30 minutes, though 1-2 hours is ideal.
Freezing serves multiple purposes: it firms up the cheese so it melts more slowly, allowing the coating to crisp up before the cheese liquefies; it helps the breading adhere better; and it reduces the likelihood of catastrophic cheese explosions during frying.
Make-Ahead Advantage: You can freeze breaded mozzarella sticks for up to three months. Once frozen solid, transfer them to freezer bags or airtight containers. Fry directly from frozen when needed, adding just 30-60 seconds to the cooking time.
Step 5: Frying to Perfection
Proper frying technique determines whether you achieve golden, crispy perfection or disappointing, greasy results. Temperature control is absolutely essential.
Pour oil into a deep, heavy-bottomed pan or pot to a depth of at least 5-7cm. Heat the oil over medium-high heat to approximately 175-180°C (350-360°F). If you don’t have a thermometer, test by dropping a small piece of bread into the oil—it should sizzle immediately and turn golden brown within 30-40 seconds.
Working in small batches (3-4 sticks at a time, depending on pan size), carefully lower the frozen mozzarella sticks into the hot oil using a slotted spoon or tongs. Avoid overcrowding, which drops the oil temperature and results in greasy, unevenly cooked sticks.
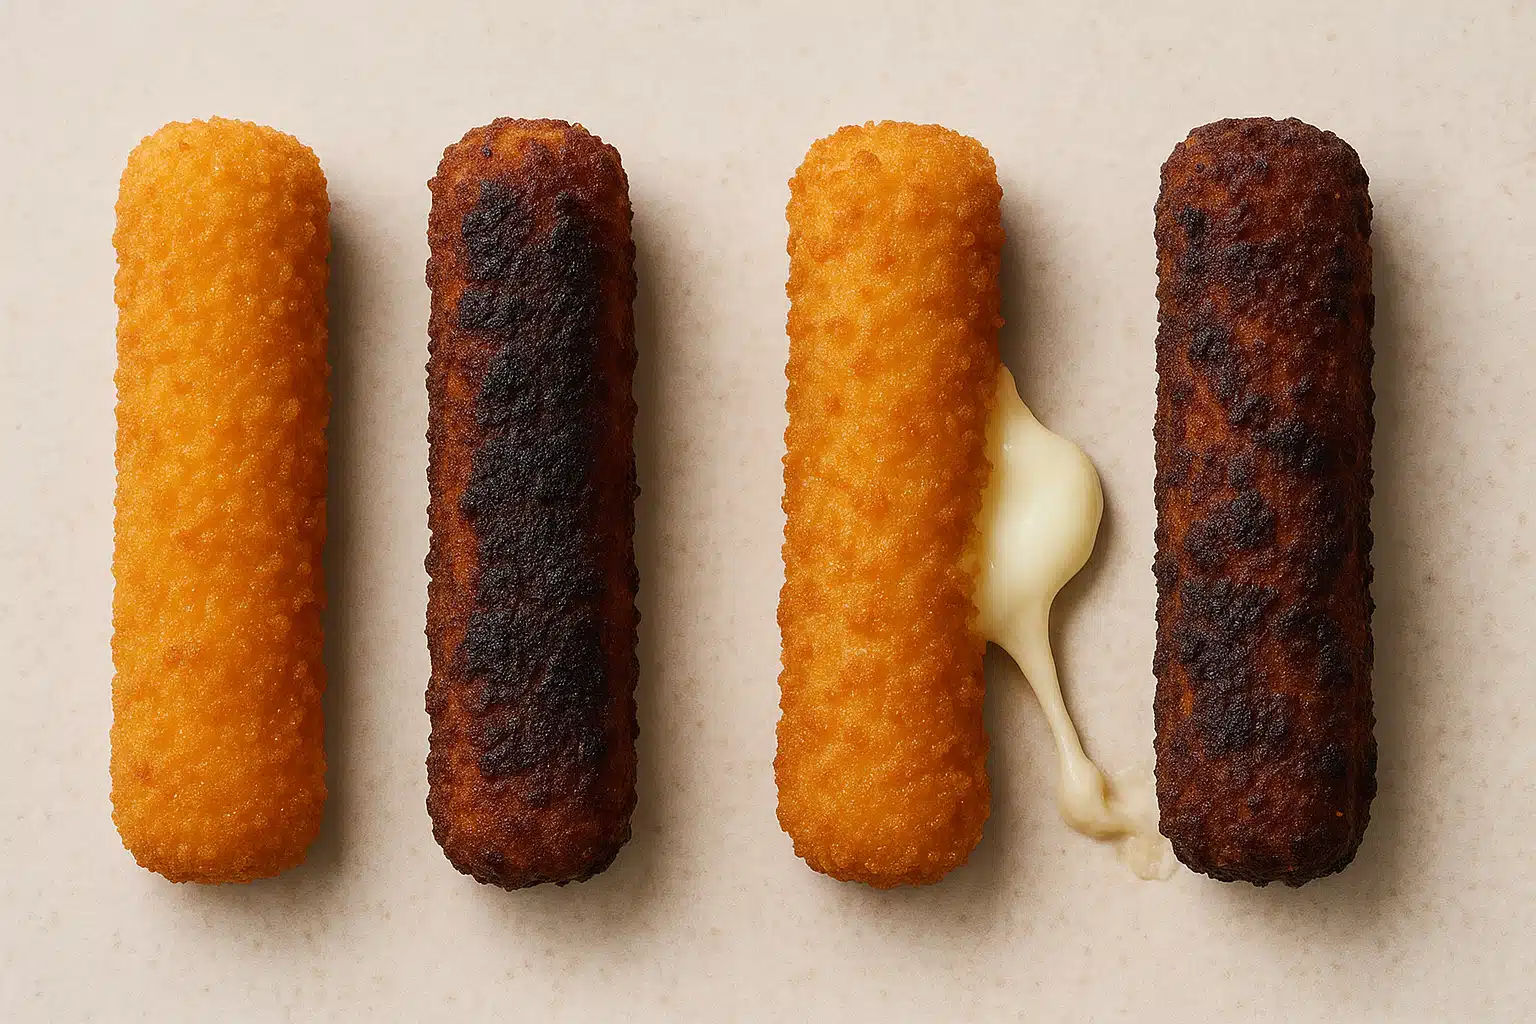
Fry for 2-3 minutes, turning occasionally with tongs or a slotted spoon to ensure even browning on all sides. Watch for a deep golden brown color—this indicates the coating is properly crisped. If you notice any cheese beginning to leak, remove the sticks immediately.
Using your slotted spoon or frying spider, transfer the finished sticks to a plate lined with paper towels to drain excess oil. Alternatively, use a wire cooling rack set over a baking sheet to keep the bottoms crispy.
Temperature Management: Allow the oil to return to proper temperature between batches. If the oil is too cool, the coating absorbs excess oil and becomes soggy. If too hot, the outside burns before the cheese melts properly.
Alternative Cooking Method: Oven-Baked
For a lighter option with less oil, you can bake mozzarella sticks. While they won’t achieve quite the same level of crispness as fried versions, properly baked sticks still deliver excellent results.
Preheat your oven to 220°C (425°F). Arrange frozen, breaded sticks on a baking sheet lined with parchment paper, spacing them apart. Lightly spray or brush the tops with oil to promote browning. Bake for 10-12 minutes, flipping halfway through, until golden brown and crispy. Watch carefully to prevent cheese leakage.
Common Mistakes and How to Avoid Them
Even experienced cooks encounter challenges when making mozzarella sticks. Understanding these common pitfalls and their solutions helps ensure success every time.
Cheese Explosions
Problem: The cheese melts and escapes through the breading, leaving you with hollow, crispy shells and a mess in your oil.
Solutions: Always freeze breaded sticks thoroughly before frying (minimum 30 minutes). Ensure your breading has no gaps or thin spots—consider double-breading for extra security. Maintain proper oil temperature; oil that’s too hot cooks the outside before the inside is ready. Don’t leave sticks in the oil too long; remove them as soon as they reach golden brown.
Soggy or Greasy Coating
Problem: Instead of crispy crunch, your mozzarella sticks have a limp, oil-soaked exterior.
Solutions: Check your oil temperature—too low, and the coating absorbs oil instead of crisping. Don’t overcrowd the pan, which drops the temperature. Use fresh oil or oil that hasn’t been overused. Drain properly on paper towels or a wire rack immediately after frying. Panko breadcrumbs create a crispier texture than fine breadcrumbs.
Breading Won’t Stick
Problem: The coating slides off during frying or doesn’t adhere properly during breading.
Solutions: Ensure your mozzarella is completely dry before beginning—pat with paper towels to remove all moisture. Press breadcrumbs firmly onto the sticks. Let breaded sticks rest in the refrigerator or freezer before frying; this helps the coating set. Make sure each layer is complete before moving to the next.
Uneven Cooking
Problem: Some sticks are perfectly golden while others are pale or burnt.
Solutions: Cut all sticks to uniform size for consistent cooking. Turn sticks during frying to brown all sides evenly. Maintain steady oil temperature throughout cooking. Fry in small batches rather than overloading the pan.
Bland Flavor
Problem: The mozzarella sticks taste flat or lack depth despite proper texture.
Solutions: Season every layer—add salt and pepper to the flour, mix seasonings into the breadcrumbs. Don’t be shy with herbs and spices in the breading. Use quality cheese with good flavor. Season immediately after frying while still hot. Serve with flavorful dipping sauces.
Serving Suggestions and Pairings

Presentation and accompaniments elevate homemade mozzarella sticks from simple snack to memorable appetizer. Here are creative serving ideas that enhance both visual appeal and flavor experience.
Classic Dipping Sauces
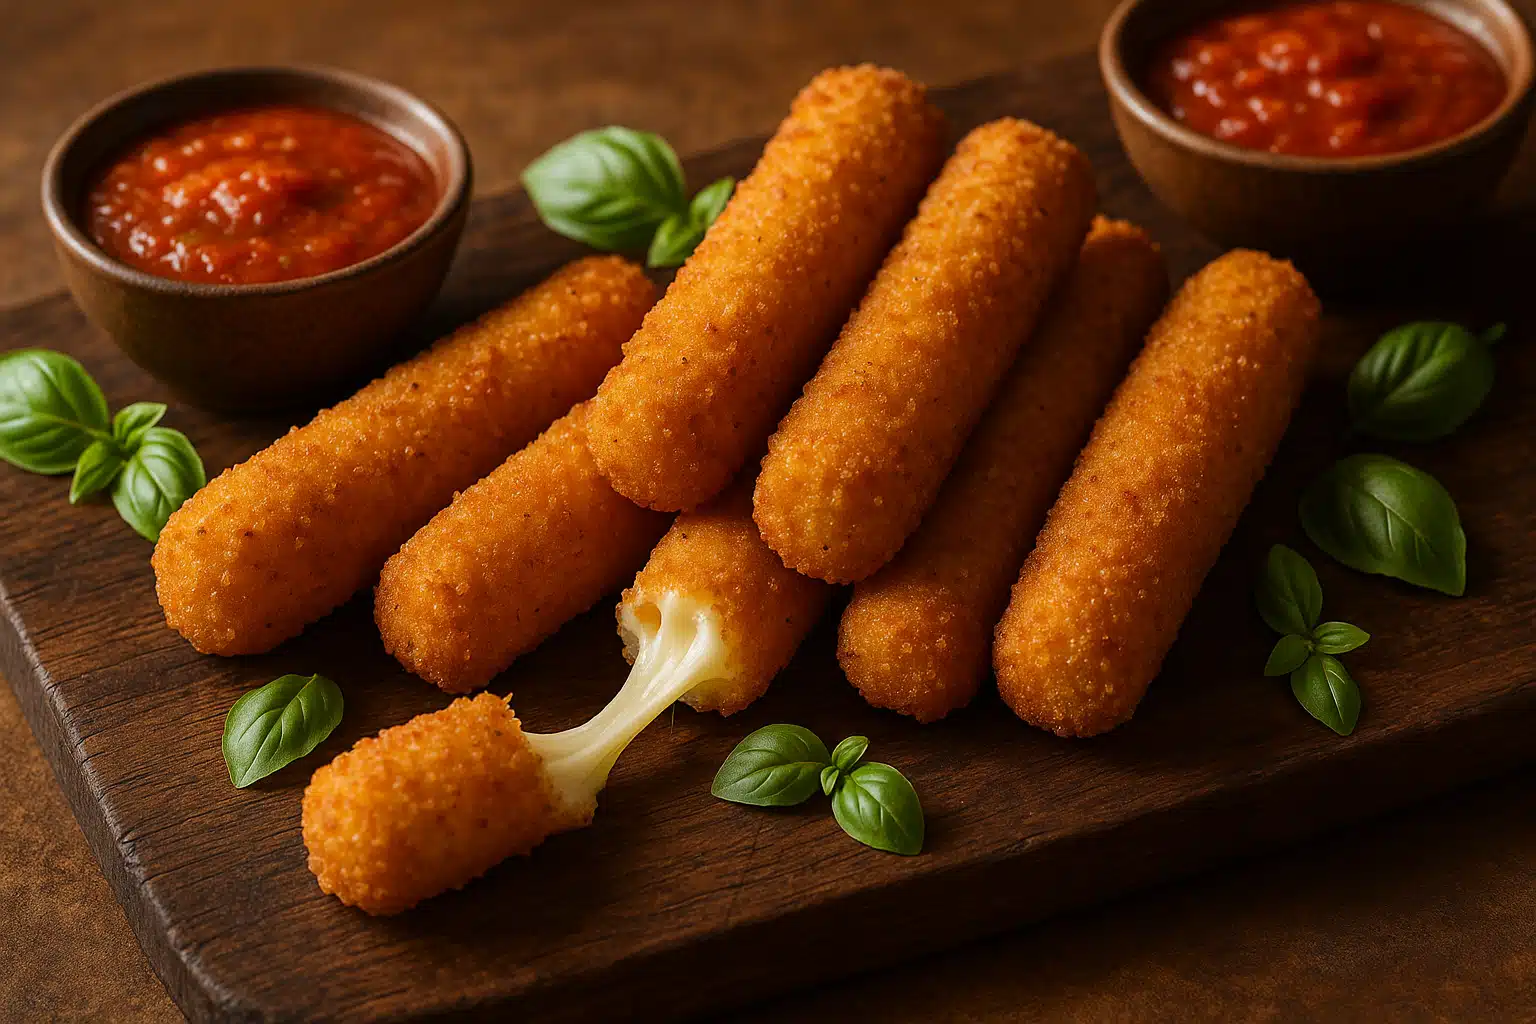
- Marinara Sauce: The traditional choice, offering sweet tomato flavor that complements the rich cheese. Warm it slightly for the best experience.
- Ranch Dressing: Creamy, tangy, and herbaceous, ranch provides a cooling contrast to the hot, crispy exterior.
- Garlic Aioli: Smooth, garlicky, and sophisticated, this elevates mozzarella sticks to restaurant-quality status.
- Spicy Sriracha Mayo: Mix hot sauce with mayonnaise for a creamy-spicy combination that adds excitement.
- Honey Mustard: The sweet-tangy profile offers an interesting flavor dimension.
- Pesto: Fresh basil pesto brings herbaceous brightness and Mediterranean flair.
Creative Presentation Ideas
- Arrange sticks upright in a glass or jar with dipping sauce at the base for individual servings
- Create a sharing platter with multiple sauce options in small bowls surrounded by mozzarella sticks
- Garnish with fresh herbs like basil or parsley for color and freshness
- Serve on a wooden board with lemon wedges and cherry tomatoes for visual interest
- Dust lightly with grated hard cheese and fresh herbs immediately after frying
Pairing Suggestions
Mozzarella sticks work beautifully as part of a larger appetizer spread. Consider pairing them with:
- Fresh vegetable crudités for textural contrast
- Other finger foods like chicken tenders or onion rings
- Fresh salad to balance the richness
- Crisp beverages—sparkling water with lemon, iced tea, or your preferred cold drink
Customization and Variations
Once you’ve mastered the basic technique, experiment with these creative variations to keep your mozzarella stick repertoire exciting and diverse.
Cheese Variations
- Cheddar Sticks: Use firm cheddar for a sharper, more pronounced flavor
- Pepper Jack: Adds spicy kick to the creamy interior
- Provolone: Offers mild, slightly smoky notes
- String Cheese: Pre-portioned and easy to work with, though slightly less flavorful
- Combination Sticks: Wrap mozzarella around a thin slice of cheddar or other cheese for complex flavor
Breading Enhancements
- Italian-Style: Add dried basil, oregano, parsley, and garlic powder to breadcrumbs
- Spicy Kick: Mix cayenne pepper, paprika, or chili flakes into the coating
- Cheesy Crust: Blend grated Parmesan or other hard cheese into the breadcrumbs
- Everything Bagel: Use everything bagel seasoning in the breading for savory complexity
- Pretzel-Coated: Crush pretzels finely and use instead of breadcrumbs for unique texture and flavor
Stuffed Variations
- Press a fresh basil leaf onto the cheese before breading
- Add a thin slice of pepperoni or salami inside for pizza-inspired flavor
- Spread a thin layer of pesto on the cheese before coating
- Insert a strip of roasted red pepper for sweet, smoky notes
Storage and Reheating
Proper storage extends the life of your mozzarella sticks and ensures they remain delicious even when enjoyed later.
Before Cooking
Breaded, uncooked mozzarella sticks freeze exceptionally well. After breading and initial freezing on a baking sheet, transfer frozen sticks to freezer bags or airtight containers, separating layers with parchment paper. They’ll keep for up to three months. Fry directly from frozen, adding 30-60 seconds to cooking time.
After Cooking
Leftover cooked mozzarella sticks (though rare!) can be refrigerated in an airtight container for 2-3 days. Reheat in the oven at 190°C (375°F) for 8-10 minutes to restore crispness—microwaving makes them soggy. An air fryer also works beautifully for reheating, taking just 3-4 minutes at 180°C (350°F).
Troubleshooting Guide
Quick reference for solving common issues:
- If cheese leaks: Freeze longer, check for breading gaps, reduce oil temperature slightly
- If coating is pale: Increase oil temperature, fry longer, ensure oil is fresh
- If too dark: Lower oil temperature, reduce cooking time, use lighter-colored breadcrumbs
- If coating falls off: Dry cheese thoroughly, press breading firmly, let coating set before frying
- If cheese doesn’t melt: Increase frying time slightly, ensure sticks aren’t too thick, let them rest briefly after frying
Nutritional Considerations
While mozzarella sticks are undeniably indulgent, understanding their nutritional profile helps you enjoy them mindfully as part of a balanced diet.
Mozzarella provides valuable protein and calcium, essential for bone health and muscle function. However, the cheese and frying process add significant calories and fat. A typical serving of 3-4 sticks contains approximately 300-400 calories, 15-20g of fat, 25-30g of carbohydrates, and 12-15g of protein.
To make lighter versions:
- Use part-skim mozzarella to reduce fat content
- Bake instead of frying to eliminate most of the oil
- Use whole wheat breadcrumbs for added fiber
- Serve smaller portions alongside vegetables
- Choose lighter dipping sauces or use them sparingly
Final Tips for Success
Keep these key principles in mind for consistently excellent results:
- Preparation is Key: Set up your workspace completely before starting—organized prep prevents mistakes
- Don’t Rush: Proper freezing time makes the difference between success and cheese explosions
- Quality Ingredients: Better cheese and fresh breadcrumbs produce noticeably superior results
- Temperature Matters: Invest in a thermometer if you make fried foods regularly
- Practice Makes Perfect: Your first batch might not be perfect, but you’ll improve with each attempt
- Serve Immediately: Mozzarella sticks are best enjoyed hot and fresh from the fryer
Conclusion
Creating homemade mozzarella sticks transforms a simple concept—cheese, breading, heat—into an incredibly satisfying culinary achievement. While the process requires attention to detail and patience, the rewards far exceed the effort. From that first bite through the golden, crispy exterior into the stretchy, melted cheese, you’ll taste the difference that fresh, homemade preparation makes.
Whether you’re preparing appetizers for a celebration, creating snacks for family movie night, or simply indulging a cheese craving, mastering this technique opens up endless possibilities for customization and creativity. The fundamental skills you develop—proper breading technique, temperature control, and timing—transfer to countless other fried foods, expanding your cooking repertoire significantly.
Don’t be discouraged if your first attempt isn’t perfect. Even experienced cooks occasionally deal with cheese explosions or uneven browning. Learn from each batch, adjust your technique, and soon you’ll be producing restaurant-quality mozzarella sticks with confidence and consistency.
Gather your ingredients, set up your breading station, and embark on your mozzarella stick journey today. The satisfaction of serving homemade appetizers that rival or surpass any restaurant version is within your reach. Your friends and family will be amazed by your culinary skills, and you’ll enjoy the pride that comes from creating something truly delicious from scratch.
So what are you waiting for? Start your cheese-making adventure and discover just how rewarding homemade mozzarella sticks can be!