Understanding Fresh Cheese: A Beginner’s Guide
Have you ever experienced the delicate texture and mild flavor of fresh, unaged cheese that crumbles beautifully over your favorite dishes? This type of cheese represents one of the most accessible and rewarding introductions to the art of home cheese making. Fresh cheese requires no aging process, minimal equipment, and can be prepared in your own kitchen within just a few hours. In this comprehensive guide, we’ll explore the fundamentals of making fresh cheese at home, explain why this culinary skill is worth developing, and provide you with everything you need to create delicious homemade cheese that will elevate your cooking.
What is Fresh Unaged Cheese?
Fresh cheese refers to soft, mild cheese varieties that are ready to eat immediately after preparation, without requiring any aging or maturation period. Unlike aged cheeses that develop complex flavors and firmer textures over weeks, months, or even years, fresh cheese maintains a soft, moist consistency and delicate taste that makes it incredibly versatile in the kitchen.
This category of cheese is found in cuisines around the world, from Mediterranean regions to Latin America, Asia, and beyond. Each culture has developed its own variations, but they all share common characteristics: mild flavor, soft texture, high moisture content, and quick preparation time. These qualities make fresh cheese an excellent starting point for anyone interested in learning the fundamentals of cheese making without investing in specialized equipment or waiting extended periods to enjoy the results.
Benefits of Making Fresh Cheese at Home
Creating fresh cheese in your own kitchen offers numerous advantages that extend beyond simply having cheese available. Understanding these benefits can help motivate your cheese-making journey:
- Superior Freshness: Homemade cheese offers unmatched freshness compared to store-bought alternatives. The flavor is brighter, the texture is creamier, and you control exactly when it’s made and consumed for optimal quality.
- Complete Customization: When you make cheese yourself, you have complete control over the ingredients, salt levels, and flavor additions. Experiment with fresh herbs, spices, or other seasonings to create unique varieties tailored to your preferences.
- Simple and Accessible Process: Fresh cheese requires only a few basic ingredients—primarily milk and an acidifying agent—and can be made with common kitchen equipment. No specialized tools or extensive technical knowledge is necessary to get started.
- Cost-Effective: Making cheese at home can be more economical than purchasing artisan fresh cheeses, especially if you make it regularly or in larger quantities.
- Educational and Rewarding: Learning to make cheese helps you understand food science principles and gives you a tangible, delicious result that provides genuine satisfaction and accomplishment.
- Ingredient Control: You know exactly what goes into your cheese, allowing you to avoid preservatives, additives, or other ingredients you prefer to eliminate from your diet.
Essential Ingredients for Fresh Cheese Making
One of the most appealing aspects of fresh cheese making is the minimal ingredient list. You’ll need only a few basic components, most of which you may already have in your kitchen:
Milk: The foundation of any cheese, milk quality directly impacts your final product. Whole milk produces the creamiest, richest cheese with the best texture. You can use milk with lower fat content, but the resulting cheese will be less creamy and may have a slightly different texture. Avoid ultra-pasteurized milk when possible, as the high-heat processing can interfere with proper curd formation. Fresh, pasteurized milk from your local market works excellently for cheese making.
Acidifying Agent: To separate milk into curds (solids) and whey (liquid), you need an acid. Common options include white vinegar, lemon juice, or lime juice. Each imparts a slightly different subtle flavor to the finished cheese. Some traditional methods use cultured buttermilk or specific cheese cultures, but simple acids work perfectly for beginners and produce excellent results.
Salt: Salt enhances flavor and acts as a preservative. Use fine sea salt or kosher salt, adding it to taste after the curds have formed. The amount can be adjusted based on personal preference and how you plan to use the cheese.
Step-by-Step Fresh Cheese Recipe
Follow this straightforward recipe to create your first batch of homemade fresh cheese. The process is simple enough for complete beginners yet produces professional-quality results:
Ingredients:
- 4 liters (approximately 1 gallon) of whole milk or 2% milk
- 60 milliliters (1/4 cup) white vinegar or fresh lemon juice
- Salt to taste (approximately 1-2 teaspoons)
Instructions:
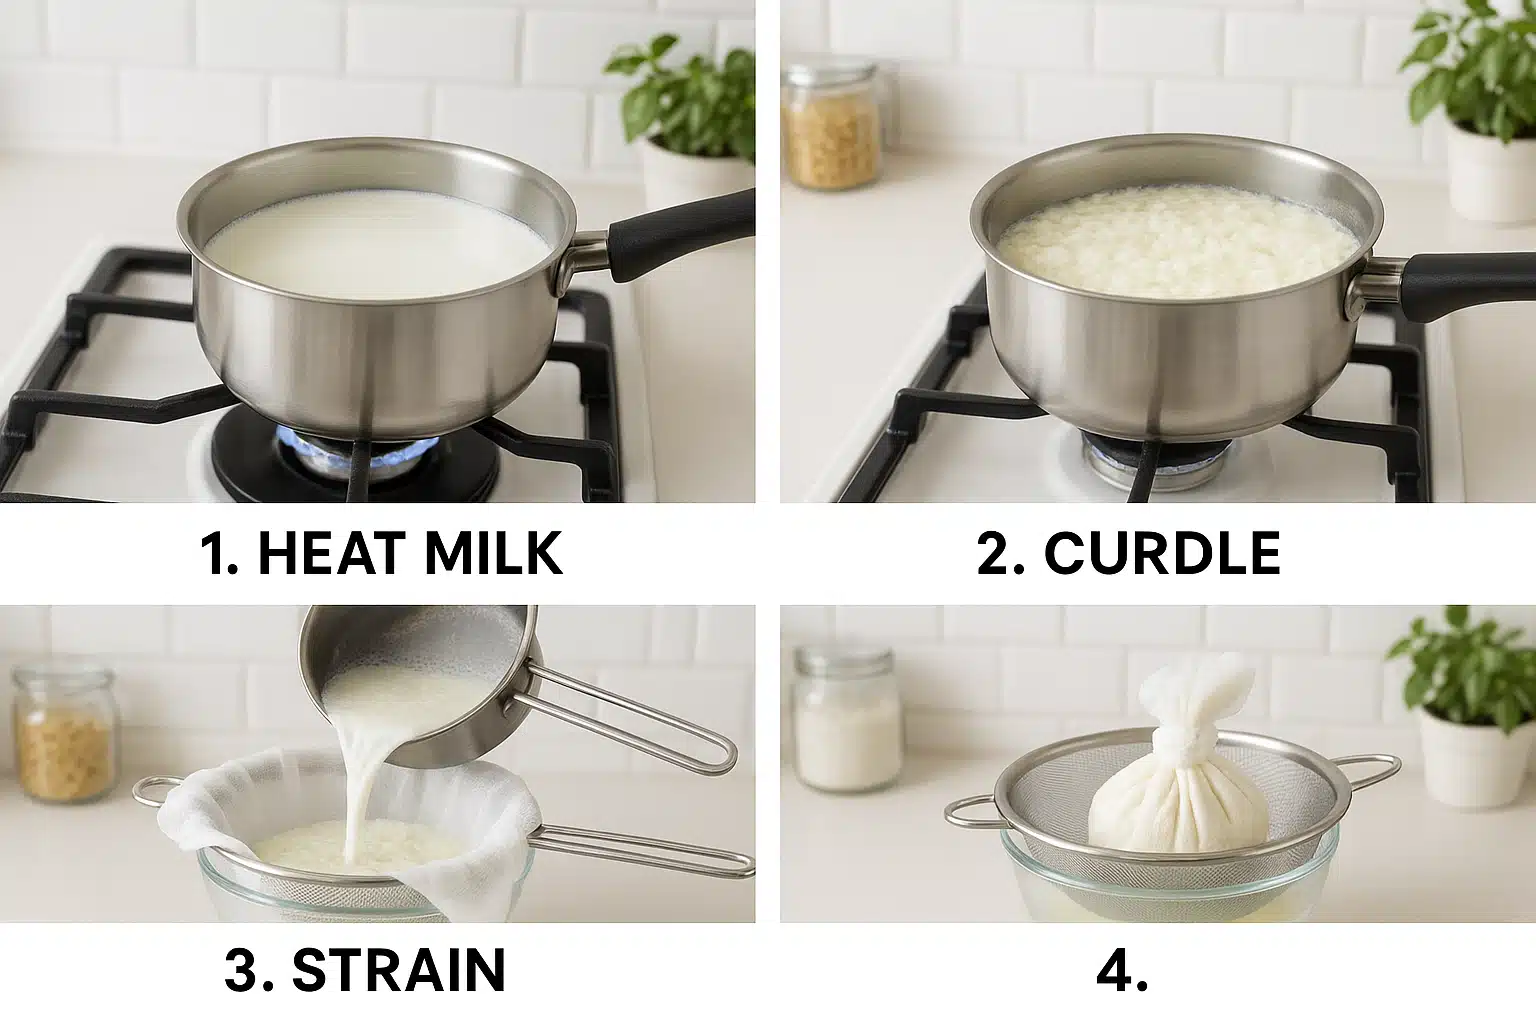
- Heat the Milk: Pour the milk into a large, heavy-bottomed pot. Place over medium heat and warm gradually, stirring occasionally to prevent scorching on the bottom. Heat until the milk reaches approximately 85-90°C (185-195°F), just below boiling point. You’ll see small bubbles forming around the edges and steam rising from the surface.
- Add the Acid: Remove the pot from heat immediately once the milk reaches temperature. Slowly pour in the vinegar or lemon juice while gently stirring with a wooden spoon or silicone spatula. You’ll notice the milk beginning to separate almost immediately into white curds and yellowish-clear whey.
- Allow Separation: Stop stirring and let the mixture sit undisturbed for 10-15 minutes. This resting period allows the curds to fully form and firm up slightly, making them easier to handle in subsequent steps.
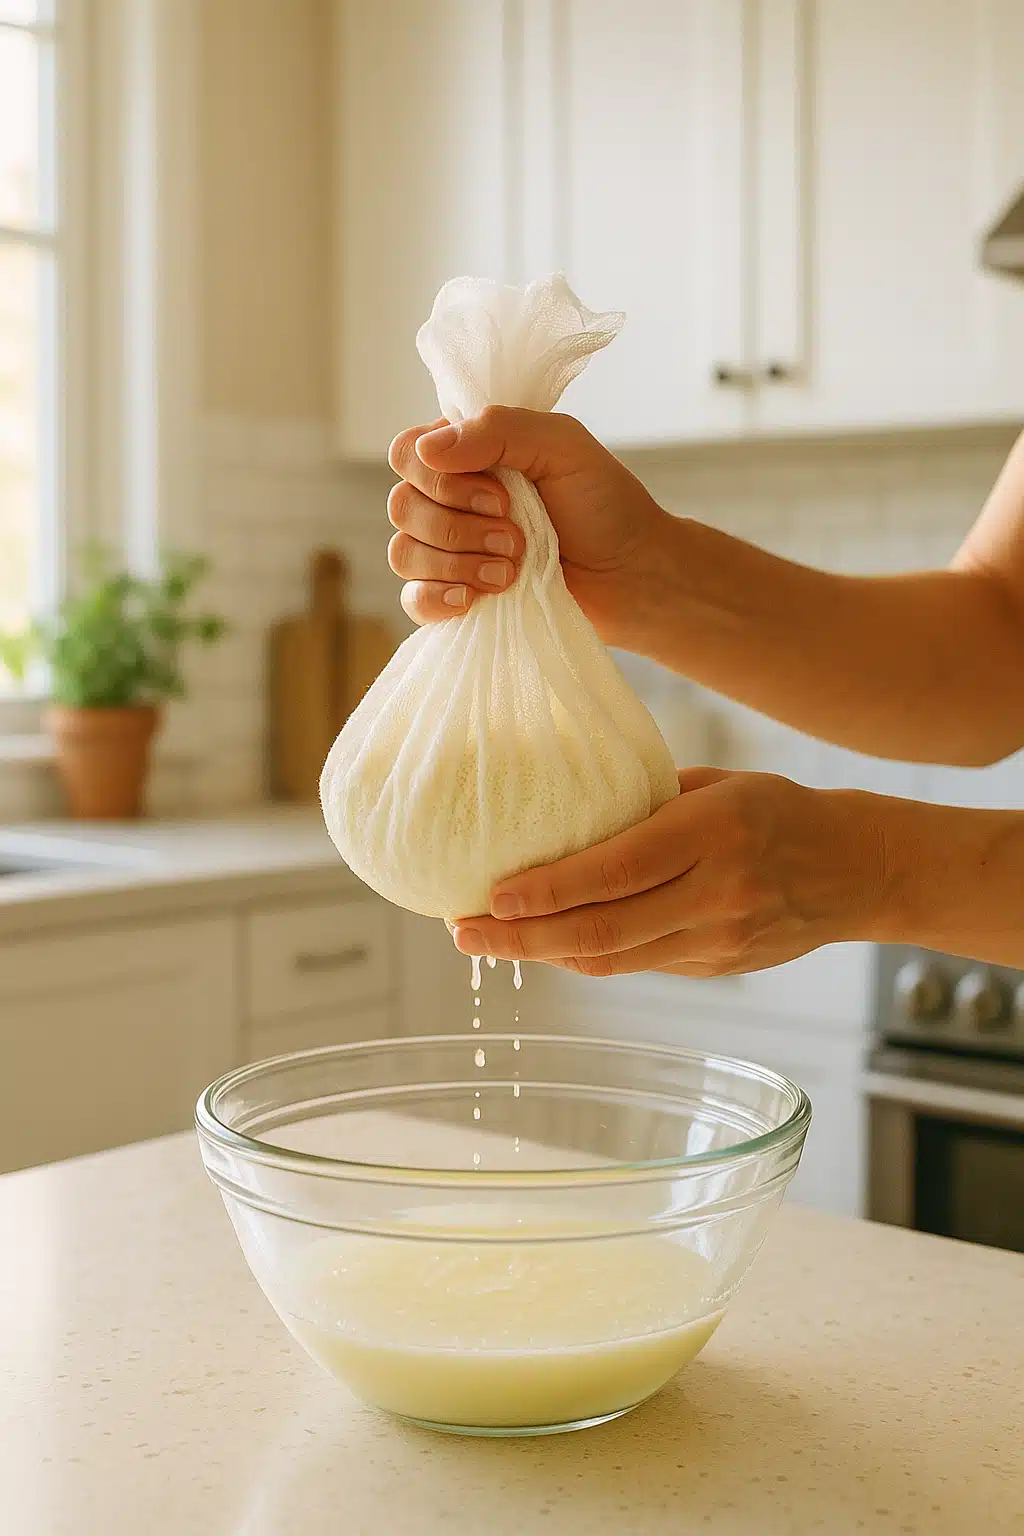
- Prepare for Draining: Line a large colander or strainer with several layers of cheesecloth (or a clean, thin kitchen towel). Position the colander over a large bowl to catch the whey, which can be saved for other culinary uses if desired.
- Drain the Curds: Carefully pour the curds and whey into the prepared colander. Allow the whey to drain naturally for 2-3 minutes, then gently rinse the curds with cool water to remove excess acid and stop the cooking process. This rinsing step results in milder-flavored cheese.
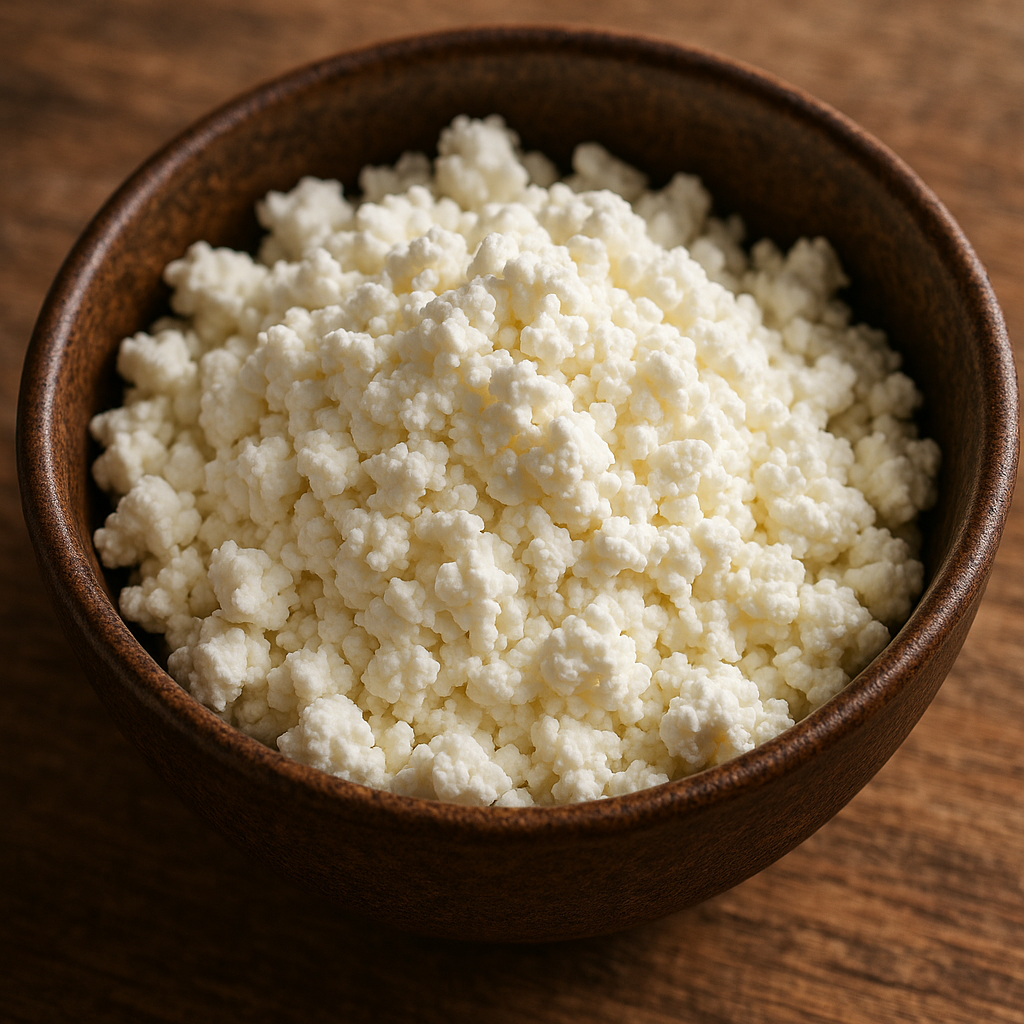
- Remove Excess Moisture: Gather the corners of the cheesecloth and gently squeeze to remove additional liquid. Don’t squeeze too aggressively, as you want to retain some moisture for a creamy texture. The cheese should be moist but not dripping wet.
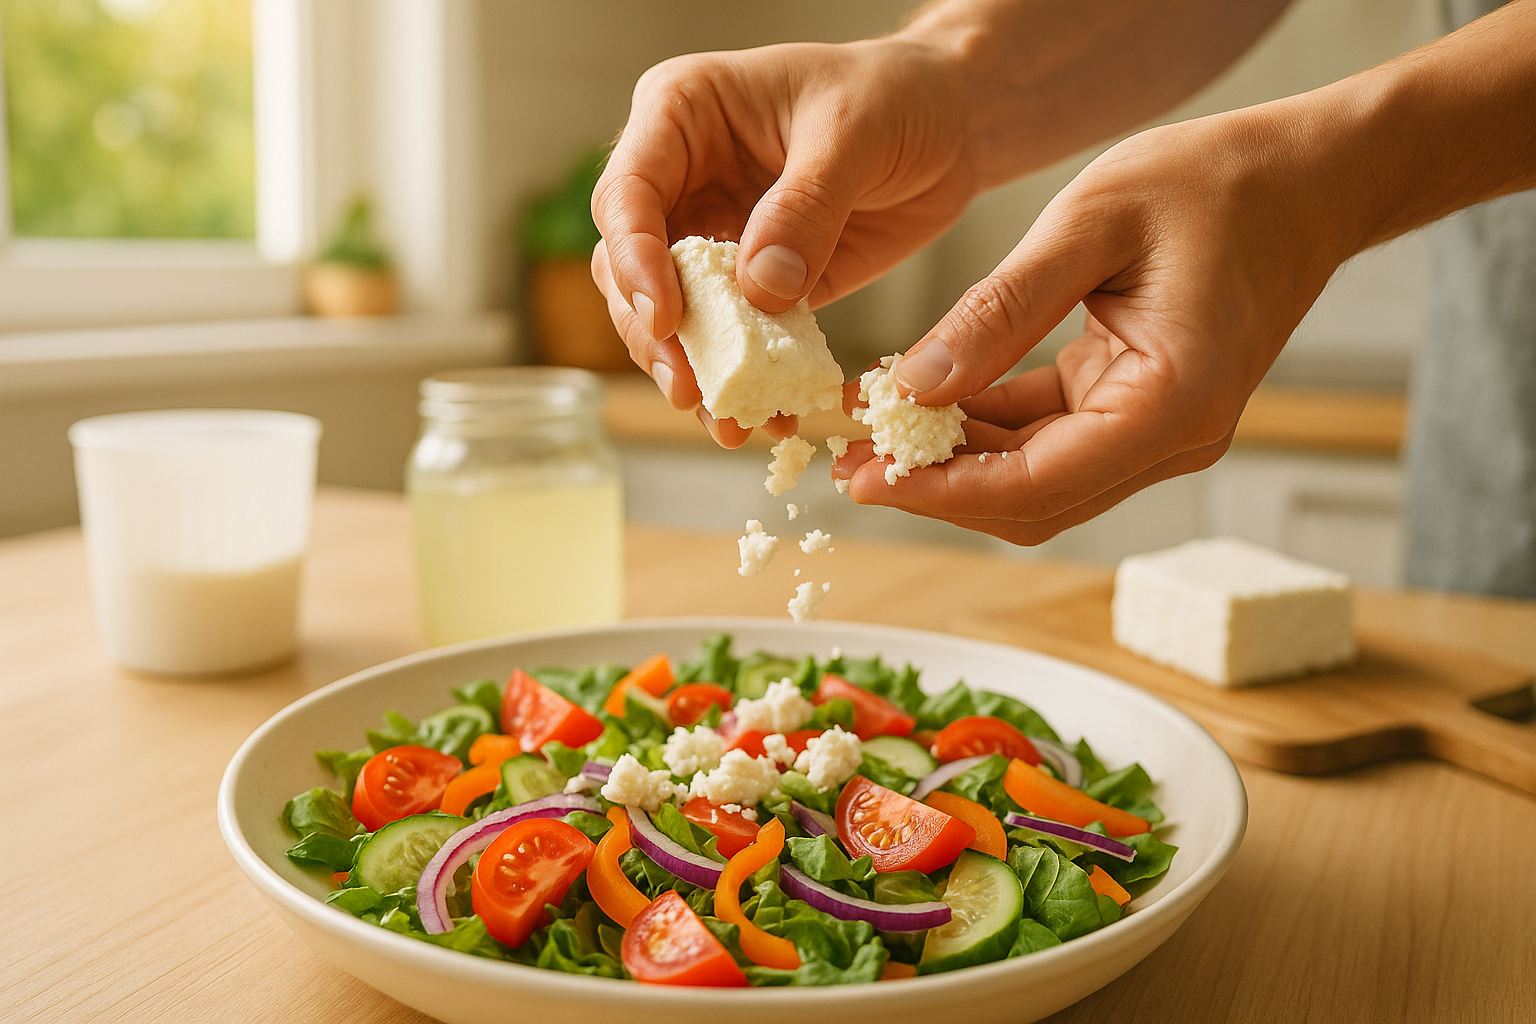
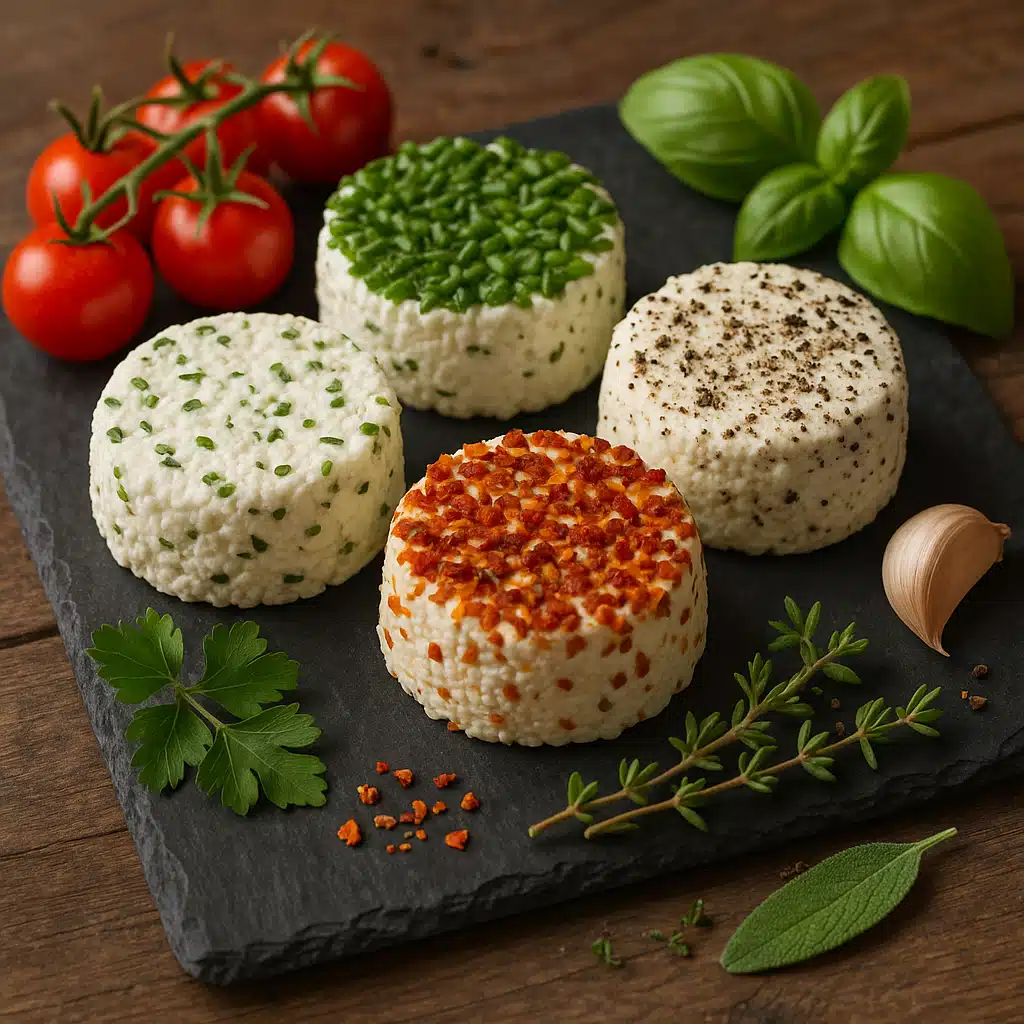
- Season and Shape: Transfer the cheese to a bowl and break it up slightly with a fork. Add salt gradually, tasting as you go, and mix thoroughly. At this point, you can also add herbs, spices, or other flavorings if desired.
- Store and Chill: Transfer the finished cheese to an airtight container and refrigerate. The cheese is ready to eat immediately but benefits from chilling for at least an hour, which helps the texture firm up slightly and flavors meld together.
Troubleshooting Common Issues
Even with a simple process, beginners sometimes encounter challenges. Here are solutions to the most common fresh cheese making problems:
Curds Not Forming Properly
If your milk doesn’t separate into distinct curds and whey, several factors might be responsible. First, ensure your milk reached sufficient temperature—it should be steaming hot but not boiling. Second, verify that your acid is fresh and potent; old vinegar or lemon juice may have reduced acidity. Third, avoid ultra-pasteurized milk, which has been heat-treated in a way that can prevent proper curd formation. If curds still don’t form, try adding slightly more acid, one tablespoon at a time, while gently stirring.
Cheese Too Dry or Crumbly
Overly dry cheese typically results from excessive draining or squeezing. When removing whey, be gentle and don’t over-compress the curds. The cheese should retain enough moisture to stay soft and slightly creamy. If your cheese turned out too dry, you can mix in a small amount of cream or milk to restore moisture and improve texture.
Cheese Too Wet or Mushy
If your cheese seems too wet, it simply needs additional draining time. Leave it in the cheesecloth-lined colander for longer, or hang the cheesecloth bundle over a bowl to allow gravity to remove more whey. The longer draining time will result in a firmer, drier cheese. You can also gently press the cheese with your hands to expel more liquid.
Cheese Has Strong Acidic Taste
A pronounced acidic or sour flavor indicates that you either used too much acid or didn’t rinse the curds sufficiently. Always rinse your drained curds with cool water to wash away excess acid. If the finished cheese is too acidic, you can soak it briefly in cool water, then re-drain to mellow the flavor.

Storing and Using Fresh Cheese
Proper storage extends the life of your homemade cheese and maintains its quality. Fresh cheese should always be kept refrigerated in an airtight container. Unlike aged cheeses, fresh varieties have high moisture content and no preservatives, making them more perishable. Consume homemade fresh cheese within 5-7 days for best quality and food safety.
The culinary applications for fresh cheese are virtually endless. Its mild flavor and soft texture make it incredibly versatile:
- As a Topping: Crumble over salads, grain bowls, soups, or roasted vegetables for added protein and creamy texture
- In Cooked Dishes: Incorporate into pasta, stuff into peppers or mushrooms, or layer in casseroles and baked dishes
- For Breakfast: Spread on toast, mix into scrambled eggs, or serve alongside fresh fruit
- In Appetizers: Serve with crackers, include on cheese boards, or stuff into pastries
- In Desserts: Use as a base for cheesecake-style desserts or serve with honey and nuts
Flavor Variations and Customization
Once you’ve mastered the basic recipe, experiment with flavor additions to create unique variations. Add seasonings during the final mixing stage, after draining and before storing:
- Herb Varieties: Fresh or dried herbs like basil, cilantro, parsley, dill, or chives add aromatic freshness
- Spiced Versions: Black pepper, crushed red pepper flakes, smoked paprika, or cumin provide warmth and complexity
- Garlic and Onion: Minced fresh garlic, roasted garlic, or finely chopped green onions create savory depth
- Citrus Zest: Lemon or lime zest adds bright, fresh notes perfect for lighter dishes
- Sweet Variations: Mix in honey, maple syrup, or vanilla extract with a reduced salt amount for dessert applications
Frequently Asked Questions
Can I use plant-based milk alternatives?
Traditional fresh cheese requires dairy milk because the proteins in cow, goat, or sheep milk respond to heat and acid in specific ways that create curds. Plant-based milks have different protein structures and typically won’t form proper curds using this method. However, specialized recipes exist for plant-based cheese alternatives that use different techniques and ingredients.
Is goat or sheep milk an option?
Absolutely! This recipe works beautifully with goat milk or sheep milk, producing cheese with distinctly different flavor profiles. Goat milk cheese tends to be tangier and slightly earthy, while sheep milk creates exceptionally rich, creamy cheese. The process remains identical regardless of which type of milk you choose.
What should I do with leftover whey?
Whey is highly nutritious and shouldn’t be discarded. Use it in baking as a substitute for water or milk in bread recipes, add it to smoothies for extra protein, use it to cook grains like rice or quinoa for added nutrition, or even use it as a base for soups. Whey can be refrigerated for several days or frozen for longer storage.
Can I freeze fresh cheese?
While freezing is possible, it significantly affects the texture of fresh cheese due to its high moisture content. Frozen and thawed fresh cheese becomes crumbly and loses its creamy consistency. If you must freeze it, use the thawed cheese in cooked dishes rather than as a fresh topping where texture is more noticeable.
How can I make the cheese firmer?
For firmer cheese, drain it longer to remove more whey, press the drained cheese gently with weights to expel additional moisture, or hang it in cheesecloth for several hours to achieve a drier, more crumbly texture similar to farmer’s cheese or paneer.
Advancing Your Cheese-Making Skills
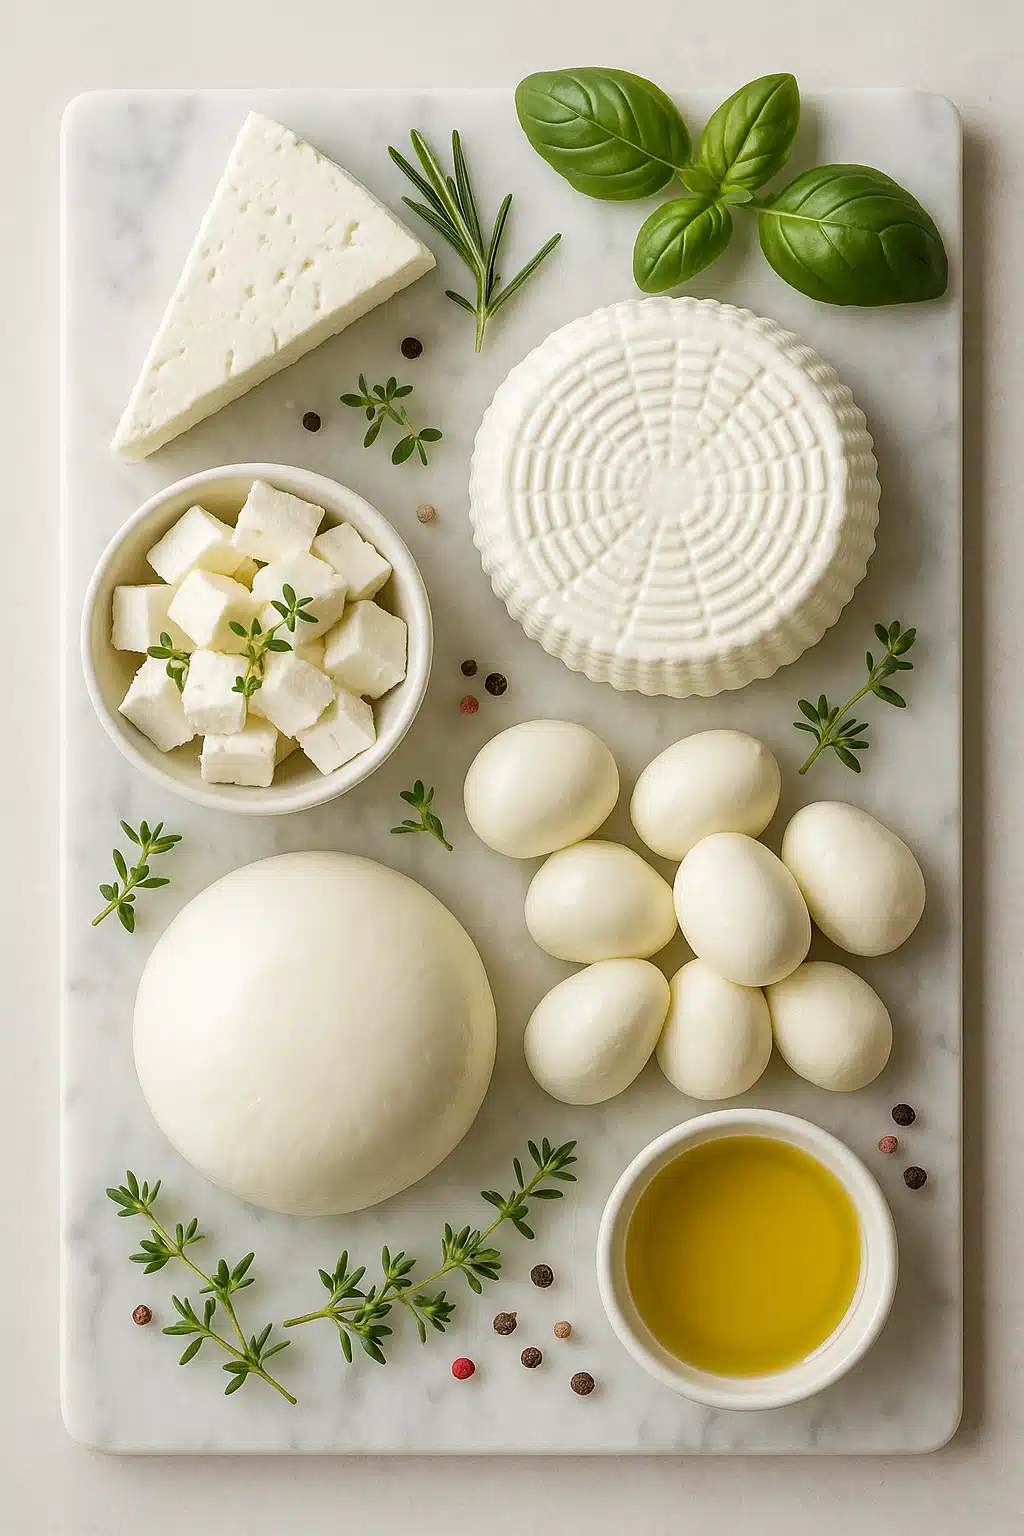
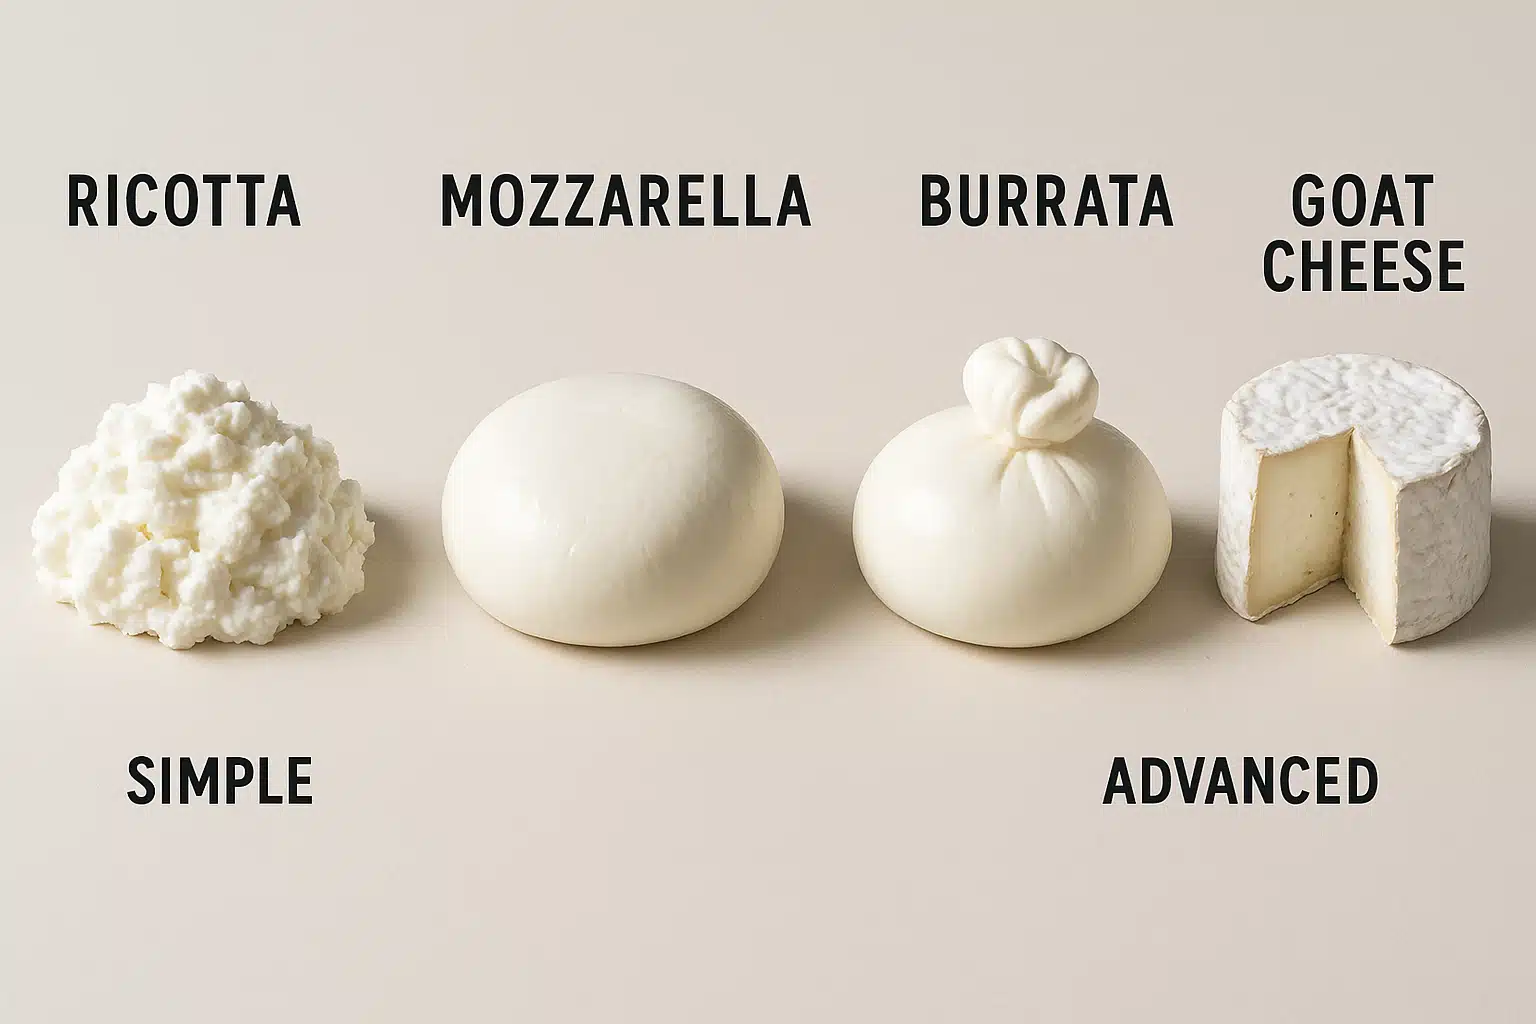
Once you’re comfortable making basic fresh cheese, you can explore more complex varieties that still don’t require aging. Consider trying ricotta, which uses a similar process with slightly different temperatures; mascarpone, which requires cream instead of milk; or paneer, an Indian fresh cheese that’s pressed into a firm block suitable for frying or grilling.
These intermediate cheeses build on the same fundamental principles you’ve learned with basic fresh cheese but introduce slight variations in technique. As your confidence grows, you might eventually explore cultured cheeses, mozzarella, or even aged varieties, but fresh cheese will always remain a quick, satisfying option that delivers delicious results with minimal effort.
Conclusion: Begin Your Cheese-Making Journey
Making fresh cheese at home represents one of the most accessible and rewarding culinary skills you can develop. With just a few simple ingredients, basic kitchen equipment, and a couple of hours, you can create delicious, creamy cheese that surpasses many store-bought options in both flavor and freshness. The process teaches valuable lessons about food science, gives you complete control over ingredients and flavors, and provides the genuine satisfaction of creating something delicious from scratch.
Whether you crumble your homemade cheese over salads, incorporate it into cooked dishes, spread it on morning toast, or simply enjoy it fresh with crackers and fruit, you’ll appreciate the superior quality and taste. The versatility of fresh cheese makes it valuable for countless recipes across different cuisines and meal types.
Start with the basic recipe provided here, gain confidence through practice, then begin experimenting with flavors and variations to create cheeses uniquely suited to your preferences. Before long, you’ll wonder why you ever relied solely on store-bought options. The world of cheese making awaits—your kitchen is the perfect place to begin this delicious journey!