Crafting Artisan Blue Cheese at Home: A Complete Guide for Beginners
Blue cheese is celebrated worldwide for its bold, complex flavors and distinctive marbled appearance. While many home cooks assume that creating this gourmet delicacy is reserved for professional cheesemakers, the truth is far more encouraging. With the right tools, quality ingredients, and proper guidance, anyone can successfully craft authentic blue cheese in their own kitchen. This comprehensive guide will demystify the process and empower you to create restaurant-quality blue cheese from the comfort of your home.
Understanding the Science: Penicillium Roqueforti Explained
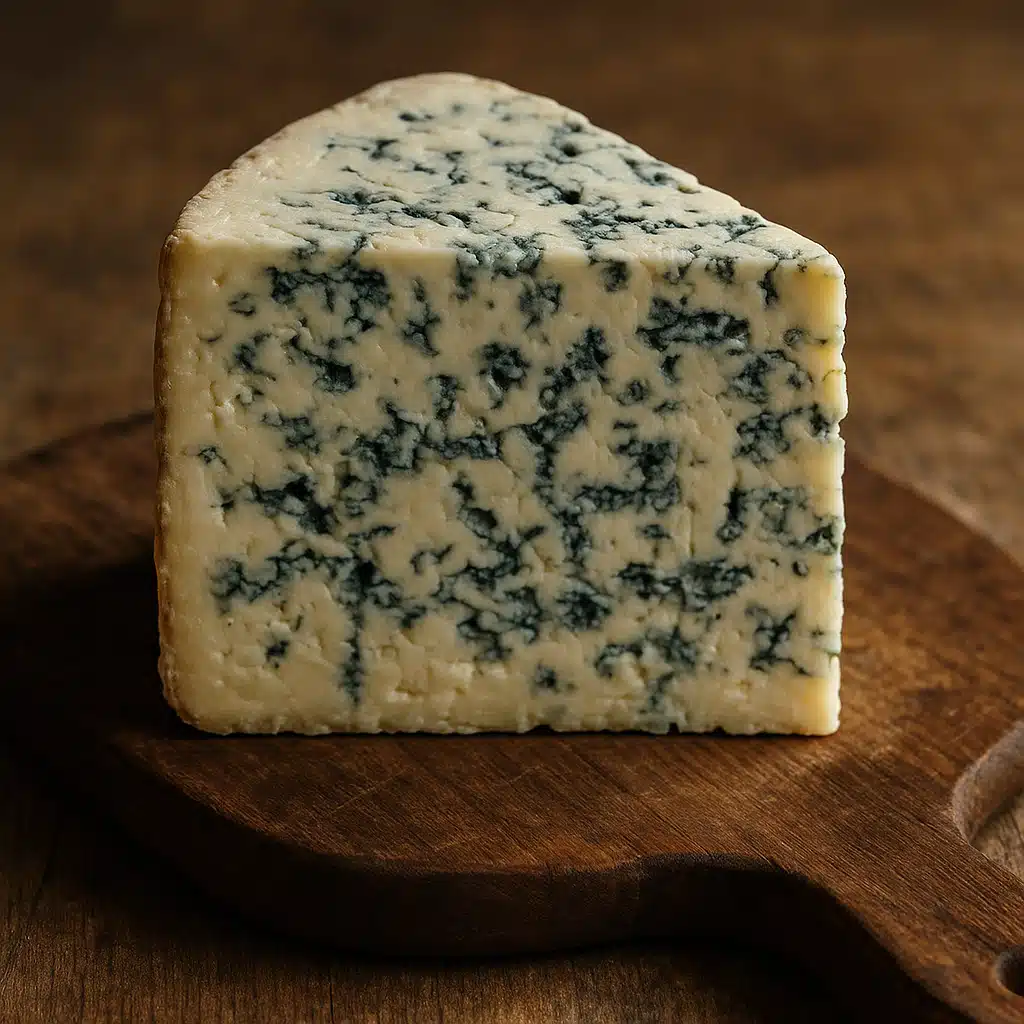
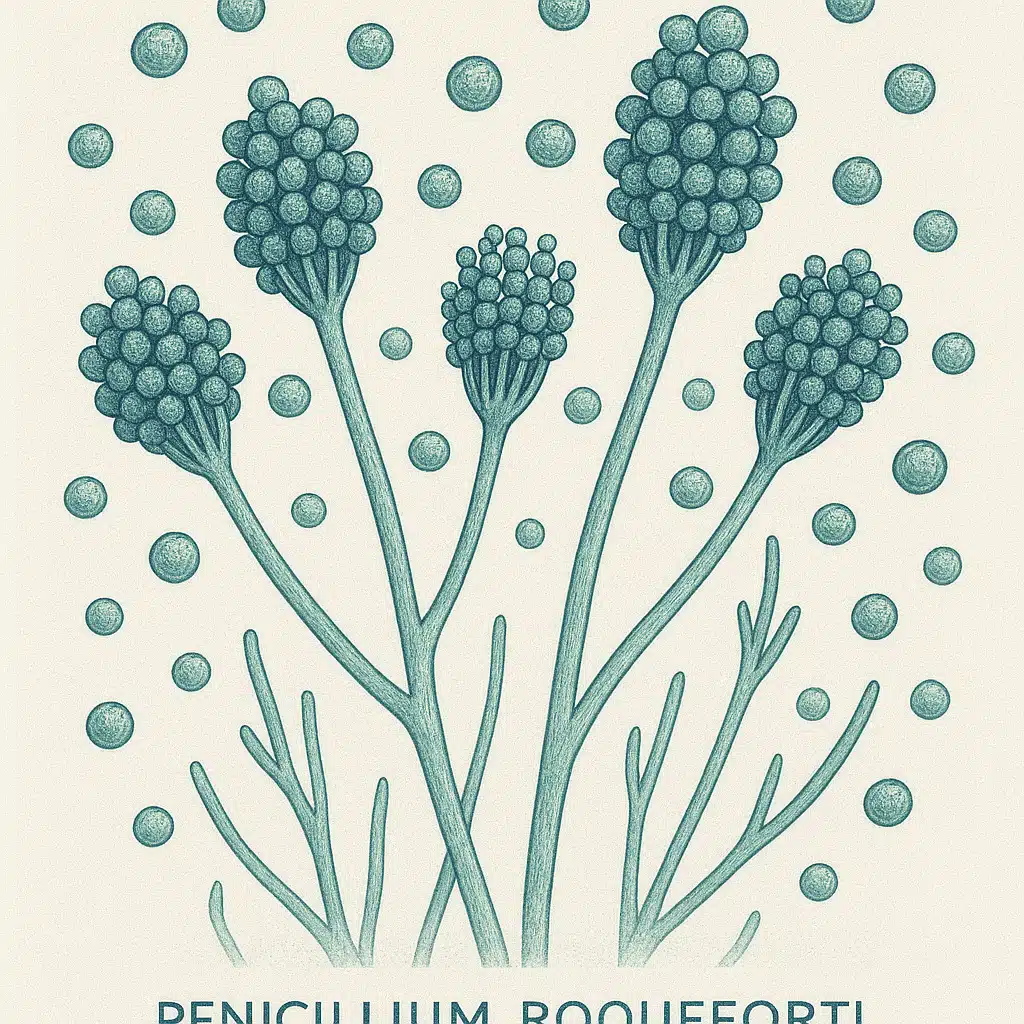
The distinctive character of blue cheese comes from a specially cultivated mold called Penicillium roqueforti. This beneficial fungus is the same family as the penicillin antibiotic, but it serves an entirely different culinary purpose. When introduced to cheese curds under controlled conditions, this mold develops the signature blue-green veins and produces the tangy, slightly sharp flavor profile that defines quality blue cheese.
Understanding how P. roqueforti works is fundamental to successful home cheesemaking. The mold requires oxygen to grow, which is why blue cheese is typically pierced with needles during the aging process—creating air channels that allow the culture to flourish throughout the cheese. The controlled environment, proper humidity levels, and adequate aging time all contribute to developing the perfect balance of flavor and texture.
The Benefits of Making Blue Cheese at Home
Embarking on the journey of home cheesemaking offers numerous advantages that extend beyond simple cost savings. Understanding these benefits can help you appreciate the value of this culinary craft:
Complete Ingredient Control
When you make blue cheese at home, you have total control over every ingredient that goes into your final product. You can select premium-quality milk from trusted sources, choose organic options if preferred, and avoid any additives or preservatives commonly found in commercial products. This level of control is particularly valuable for those with dietary sensitivities or those who simply prefer knowing exactly what they’re consuming.
Customization and Experimentation
Home production allows you to tailor the cheese to your exact preferences. You can adjust the intensity of the blue veining by controlling inoculation levels and aging time, experiment with different milk types (cow, goat, or sheep), and even create unique flavor profiles by varying salt content or aging conditions. This creative freedom transforms cheesemaking from a simple task into an artisanal craft.
Economic Value
Artisan blue cheeses command premium prices at specialty stores and markets. By making your own, you can enjoy gourmet-quality cheese at a fraction of the retail cost. While there’s an initial investment in equipment and cultures, these materials are reusable or last for multiple batches, making the per-unit cost remarkably affordable over time.
Educational and Rewarding Experience
The cheesemaking process teaches valuable lessons about fermentation, food science, and traditional preservation methods. There’s immense satisfaction in transforming simple milk into a complex, aged cheese through your own efforts. This hands-on experience connects you with centuries of culinary tradition and develops skills that can be applied to other fermentation projects.
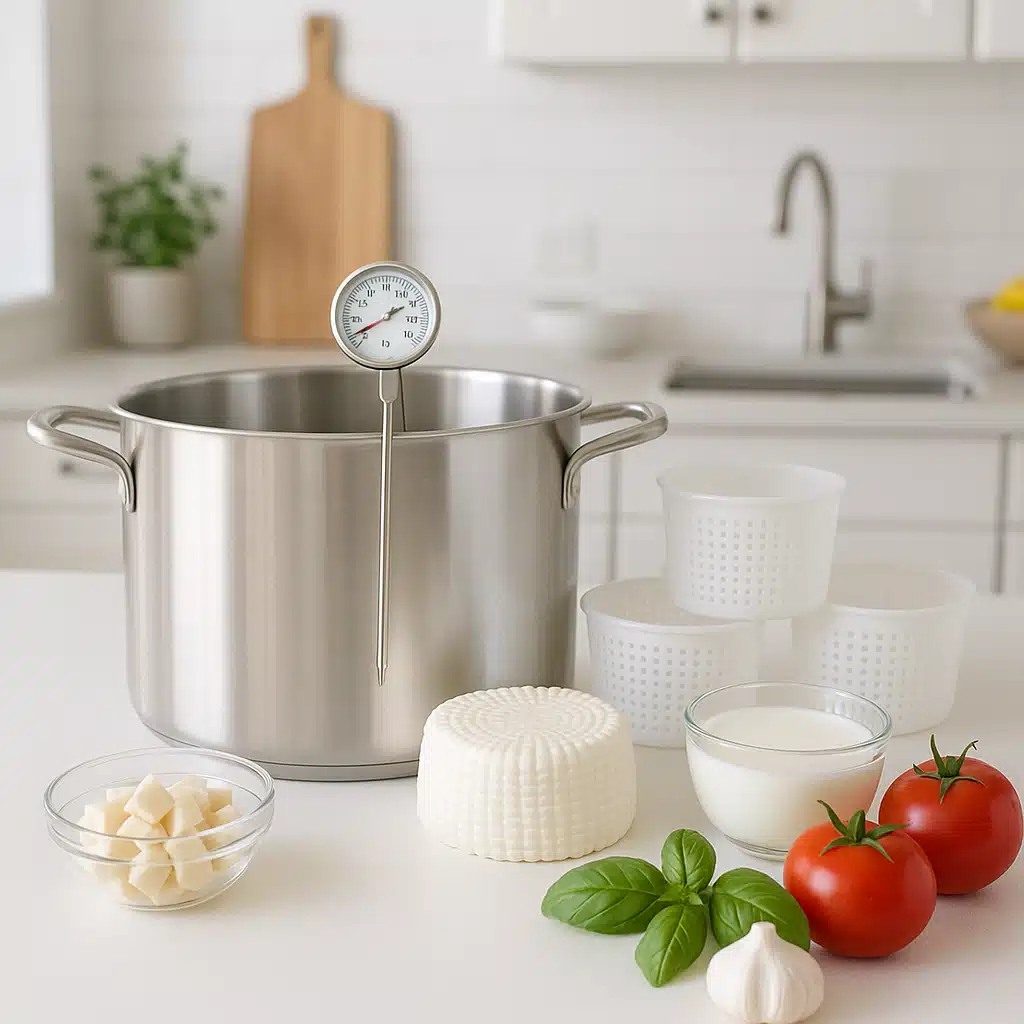
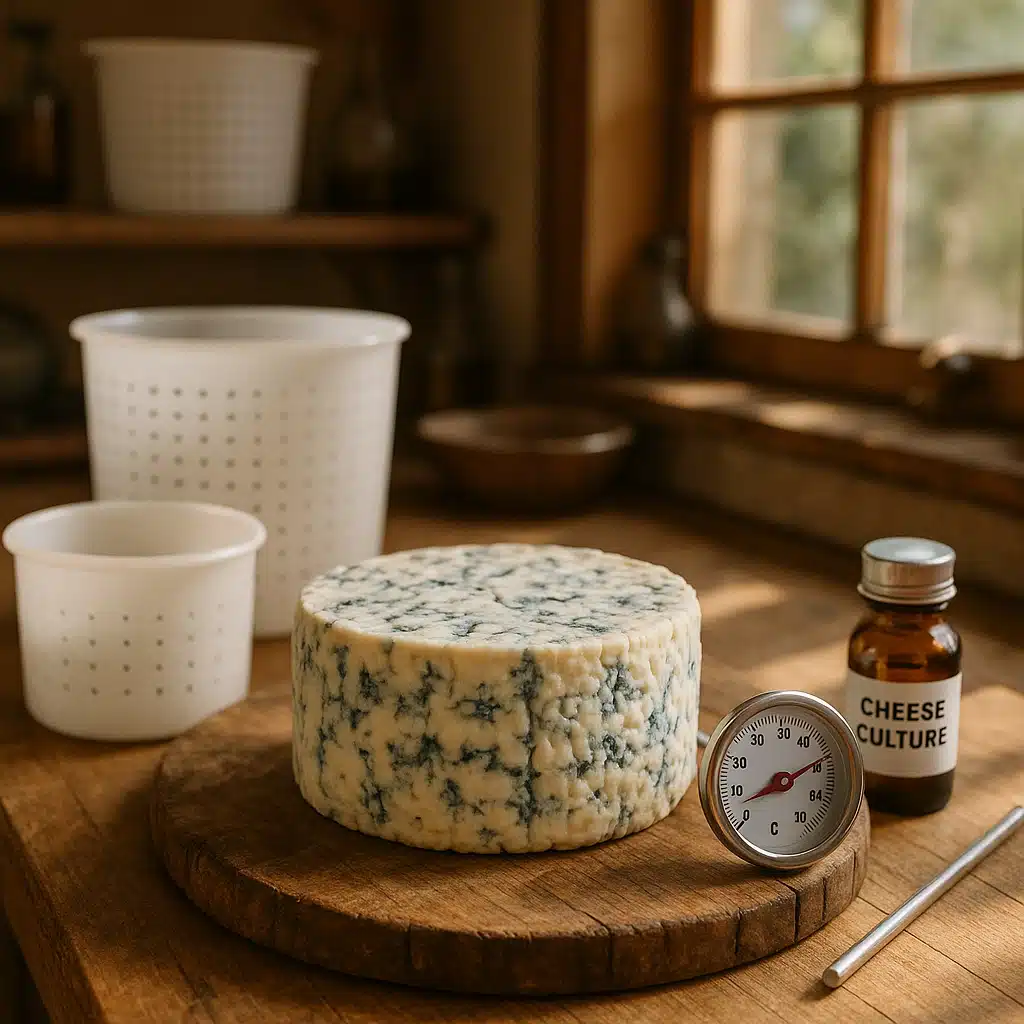
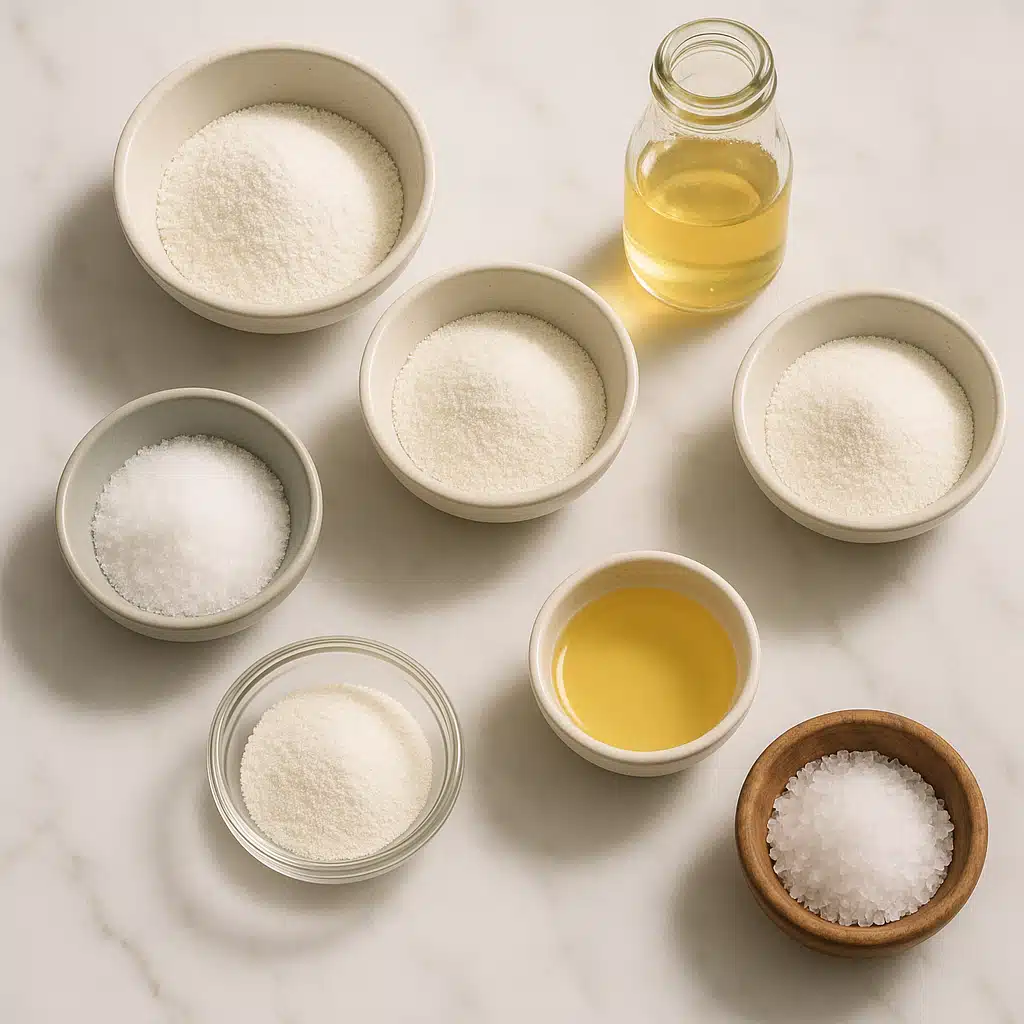
Essential Equipment and Ingredients
Before beginning your blue cheese journey, you’ll need to gather the proper equipment and ingredients. Having everything prepared in advance ensures a smooth, successful process.
Required Equipment
- Large stainless steel pot: For heating and processing milk (minimum 4-liter capacity)
- Accurate thermometer: Digital or dial type that reads between 20-100°C (68-212°F)
- Long knife or curd cutter: For cutting formed curds
- Slotted spoon or ladle: For stirring and transferring curds
- Cheese molds: Cylindrical molds with drainage holes
- Cheese cloth or butter muslin: Fine-weave fabric for draining
- Draining mat or rack: To elevate cheese during draining and aging
- Sterilized needles or skewers: For piercing cheese to introduce oxygen
- Aging container or cheese cave: Controlled environment for maturation
Key Ingredients
- Fresh milk: High-quality whole milk (pasteurized but not ultra-pasteurized)
- Mesophilic starter culture: Bacteria that acidify the milk
- Penicillium roqueforti culture: The essential blue mold spores
- Liquid rennet or rennet tablets: Enzyme that coagulates milk proteins
- Non-iodized salt: For salting and flavor development
- Calcium chloride: Optional but recommended for pasteurized milk
Step-by-Step Blue Cheese Making Process
Creating blue cheese at home follows a methodical process that spans several weeks. While it requires patience, each step is straightforward and manageable for beginners.
Step 1: Milk Preparation and Acidification
Begin by gently heating your milk in a stainless steel pot to approximately 30°C (86°F). Use your thermometer to maintain accuracy, as temperature control is critical throughout the process. Once the target temperature is reached, sprinkle the mesophilic starter culture over the milk surface and allow it to rehydrate for 2-3 minutes before stirring it in thoroughly. This culture begins the acidification process that develops flavor and prepares the milk for coagulation.
If using pasteurized milk, this is the time to add diluted calcium chloride, which helps restore minerals lost during pasteurization and improves curd formation. Allow the inoculated milk to ripen for 45-60 minutes, maintaining the target temperature throughout this period.
Step 2: Adding Penicillium Roqueforti and Rennet
After the ripening period, add the Penicillium roqueforti culture according to package directions—typically a small pinch or several drops if using liquid culture. Stir gently to distribute evenly throughout the milk. Next, add diluted rennet, stirring with an up-and-down motion for about one minute to ensure even distribution. Cover the pot and allow it to sit undisturbed for 45-90 minutes until a firm curd forms.
To test for proper coagulation, insert a knife at an angle and lift gently. The curd should break cleanly with clear whey in the cut. If the break is too soft or milky, allow more time for setting.
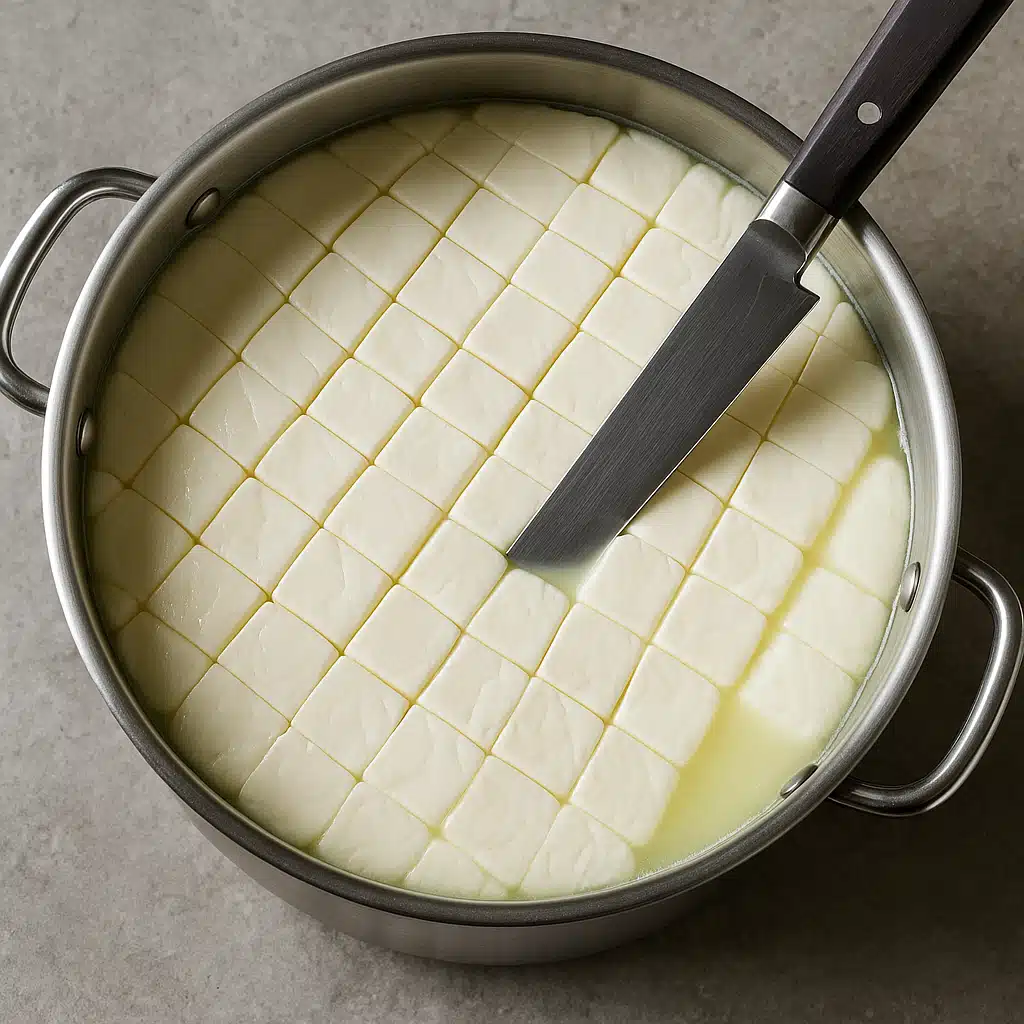
Step 3: Cutting and Stirring the Curd
Once proper coagulation is achieved, cut the curd into approximately 1.5-2 cm (half to three-quarter inch) cubes using a long knife or curd cutter. Make vertical cuts in one direction, then perpendicular cuts, and finally angled cuts to create uniform pieces. Allow the cut curds to rest for 5 minutes, then gently stir for 15-20 minutes to release whey and firm the curds slightly.
The stirring process is gentle but important—it expels moisture and creates the proper texture for blue cheese. The curds will shrink noticeably and the whey will become more apparent during this phase.
Step 4: Draining and Molding
Line your cheese molds with dampened cheesecloth and place them on a draining rack. Gently ladle the curds into the molds, distributing them evenly. Allow the curds to drain naturally for 15-20 minutes, then begin flipping the molds every 30 minutes for the next 4-6 hours. Each flip helps expel more whey and creates an even texture throughout the cheese.
The cheese will gradually consolidate and take the shape of the mold. Continue this process until the cheese feels firm and holds its shape when the mold is removed. This typically occurs when the cheese has reduced to roughly half its original height in the mold.
Step 5: Salting
Remove the cheese from the mold and cheesecloth. Rub all surfaces generously with non-iodized salt, which serves multiple purposes: it draws out additional moisture, inhibits unwanted bacteria, develops flavor, and forms a protective rind. Allow the salted cheese to rest on the draining rack for 12-24 hours, flipping once halfway through.
Some moisture will continue to be released during this period. The surface should feel slightly dry but not completely desiccated before moving to the next step.
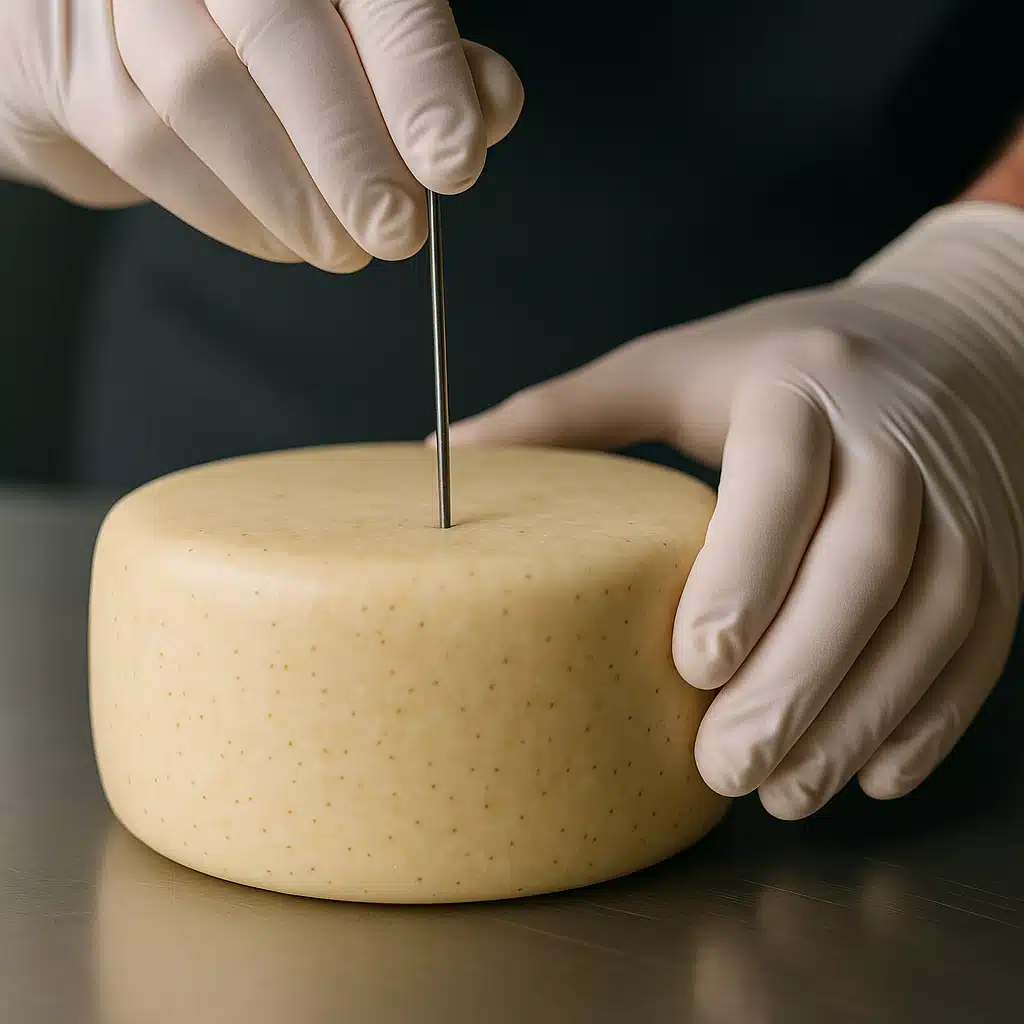
Step 6: Piercing and Initial Aging
After salting, the cheese needs to be pierced to create air channels for the blue mold to develop. Using sterilized needles or thin skewers, pierce the cheese from top to bottom at regular intervals, creating approximately 20-30 holes throughout. These channels allow oxygen to reach the interior, where the Penicillium roqueforti will grow and create the characteristic blue veining.
Place the pierced cheese in your aging environment—ideally a space maintained at 10-13°C (50-55°F) with 85-95% humidity. A dedicated cheese cave, wine refrigerator with humidity control, or even a modified cooler can serve this purpose. The cheese should be placed on a mat or rack that allows air circulation on all sides.
Step 7: Aging and Development
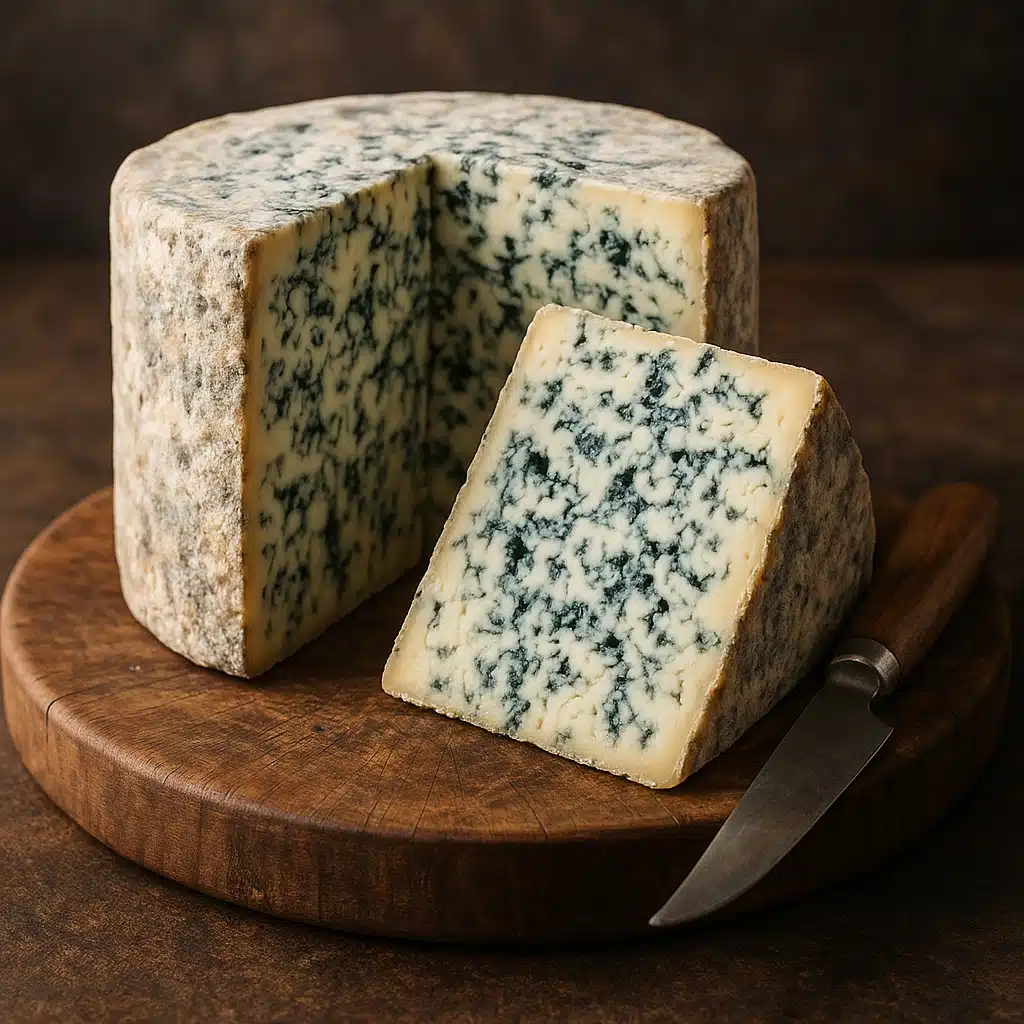
During the first week of aging, blue-green mold will begin appearing on the surface and within the piercing holes. This is exactly what you want to see. Flip the cheese daily to ensure even moisture distribution and mold development. After the first week, you can reduce flipping to every 2-3 days.
If excessive moisture accumulates, gently pat the surface with a clean cloth. If the surface develops other colored molds (white, pink, or black), carefully wipe them away with a cloth dampened with a mild brine solution. The blue-green mold should always be the dominant culture.
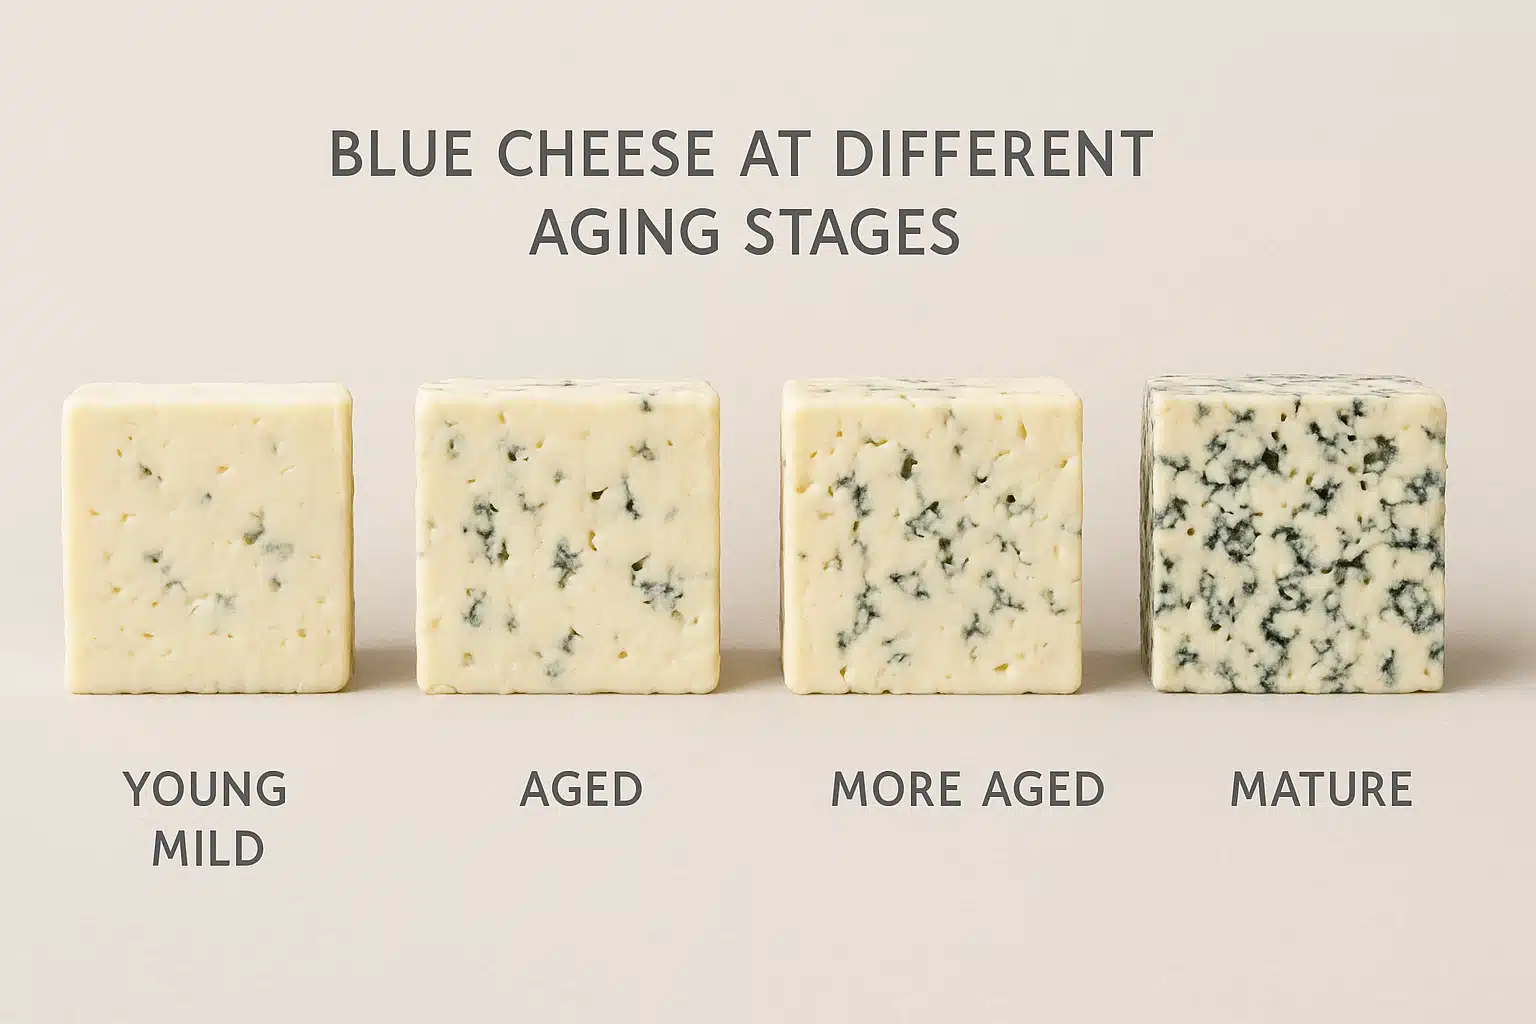
Blue cheese typically requires 2-4 months of aging to develop proper flavor. Younger cheese (2 months) will be milder and creamier, while longer aging (3-4 months) produces more intense, crumbly cheese with pronounced blue flavor. You can sample small portions to determine when the flavor profile matches your preference.
Step 8: Wrapping and Storage
Once the cheese reaches your desired flavor intensity, it’s time to slow the aging process. Wrap the cheese loosely in parchment paper or specialized cheese paper—never use plastic wrap directly against the cheese, as it prevents breathing and can create off-flavors. Store the wrapped cheese in the refrigerator, where it will continue to mature slowly.
Properly stored blue cheese will keep for several weeks in the refrigerator. Remove it from refrigeration 30-60 minutes before serving to allow the flavors to fully develop at room temperature.
Troubleshooting Common Issues
Even experienced cheesemakers encounter occasional challenges. Understanding common problems and their solutions will help you achieve consistent success.
Insufficient Blue Veining
If your cheese develops minimal blue mold, the issue typically relates to oxygen availability or environmental conditions. Ensure you’re piercing the cheese adequately and that your aging environment has sufficient air circulation. The temperature may also be too cold—blue mold develops best between 10-13°C (50-55°F). If conditions are correct but veining remains sparse, you may need to use more P. roqueforti culture in future batches.
Excessive Moisture or Sticky Surface
Overly moist cheese results from insufficient draining, inadequate salting, or excessive humidity during aging. If caught early, additional salt application and more frequent flipping can help. For future batches, ensure thorough draining before salting and monitor aging environment humidity carefully.
Undesirable Mold Growth
While blue-green mold is desired, other colors indicate unwanted contamination. White fuzzy mold is usually harmless and can be wiped away. Pink, black, or gray molds should be removed immediately by wiping with brine-dampened cloth. If unusual molds persist, the cheese may need to be discarded. Prevention involves proper sanitation of all equipment and maintaining correct aging conditions.
Crumbly or Dry Texture
Excessive dryness usually indicates over-salting, too-low humidity during aging, or extended aging time. While some crumbliness is normal in mature blue cheese, excessively dry cheese lacks the creamy texture that balances the flavor. Monitor humidity levels carefully and consider wrapping cheese slightly earlier in future batches.
Bitter or Off Flavors
Unpleasant flavors can result from contaminated equipment, old cultures, or improper aging temperatures. Always sanitize equipment thoroughly, use fresh cultures before their expiration date, and maintain consistent temperature control. If using raw milk, ensure it’s from a clean, reliable source.
Frequently Asked Questions About Home Blue Cheese Making
Is Blue Cheese Mold Safe to Eat?
Absolutely. The Penicillium roqueforti used in blue cheese production is a food-grade culture specifically cultivated for cheesemaking. It’s completely safe for consumption and is actually beneficial, contributing enzymes that break down proteins and fats to create the cheese’s distinctive flavor and texture. This controlled mold is entirely different from the random molds that grow on spoiled food.
Can I Make Blue Cheese Without Specialized Cultures?
While theoretically possible to rely on environmental molds, this approach is unreliable and potentially unsafe. Using commercial P. roqueforti culture ensures consistent results, proper flavor development, and food safety. The small investment in quality cultures is worthwhile for predictable, delicious outcomes.
What Type of Milk Works Best?
Whole cow’s milk is the most common choice and produces excellent results. Pasteurized milk is acceptable, but avoid ultra-pasteurized milk, as the high heat treatment damages proteins needed for proper curd formation. Some cheesemakers prefer raw milk for its natural enzyme content, though this requires careful sourcing. Goat’s milk and sheep’s milk also work well and produce distinctive flavor profiles.
How Long Does Homemade Blue Cheese Last?
Properly aged and stored blue cheese will keep for 3-4 weeks in the refrigerator after reaching maturity. The aging process continues slowly even when refrigerated, so flavor will intensify over time. If surface mold develops during storage, simply scrape it away—the interior remains perfectly edible. For longer storage, blue cheese can be frozen, though this may affect texture slightly.
Do I Need Special Equipment to Control Aging Conditions?
While dedicated cheese caves are ideal, they’re not essential for home production. Many successful home cheesemakers use modified refrigerators with humidity controls, wine coolers set to appropriate temperatures, or even basement spaces with naturally cool, humid conditions. A simple hygrometer and thermometer allow you to monitor conditions in any space you choose. Creative solutions often work as well as expensive specialized equipment.
Can People with Penicillin Allergies Eat Blue Cheese?
This is a common concern, but the Penicillium species used in blue cheese does not produce the same compounds as the penicillin antibiotic. Most people with penicillin allergies can safely consume blue cheese, though individuals with severe sensitivities should consult their healthcare provider before trying it. The proteins that trigger penicillin allergies are not present in cheese mold.
Exploring Variations and Advanced Techniques
Once you’ve mastered basic blue cheese production, numerous variations allow you to expand your skills and create unique products.
Different Milk Types
Experimenting with goat’s milk creates a tangier, more delicate blue cheese similar to certain French varieties. Sheep’s milk produces richer, creamier cheese with higher fat content. You can even blend milk types to create custom flavor profiles. Each milk type requires slight adjustments to technique, particularly in coagulation time and salt amounts.
Flavor Additions
Some cheesemakers incorporate additional ingredients during the molding stage. Cracked black pepper, herbs, or even truffle pieces can be mixed into curds before draining. These additions should be used sparingly to complement rather than overwhelm the blue cheese flavor.
Extended Aging
While 2-4 months produces excellent cheese, some varieties benefit from longer aging periods of 6-12 months. Extended aging creates more intense flavors, drier texture, and more pronounced crystallization. This requires careful monitoring and occasional surface maintenance but rewards patience with complex, sophisticated cheese.
Surface Treatment Variations
Traditional blue cheese is naturally rinded, but some makers prefer to scrape the exterior surface weekly during aging to maintain a clean appearance. Others occasionally brush the surface with diluted brine to encourage specific rind development. Each approach creates slightly different final characteristics.

Serving and Enjoying Your Homemade Blue Cheese
After months of careful work, properly presenting and serving your blue cheese allows you to fully appreciate your efforts.
Always serve blue cheese at room temperature—remove it from refrigeration 45-60 minutes before serving. Cold temperatures mute flavors and create an unpleasant firm texture. At room temperature, the fats soften, releasing the full aromatic profile.
Blue cheese pairs beautifully with sweet elements that balance its savory intensity. Honey, fresh or dried fruits (particularly pears, apples, and figs), and nuts create harmonious flavor combinations. For beverages, dessert wines, port, and robust red wines complement blue cheese excellently. Even certain beers, particularly stouts and strong ales, create interesting pairings.
Beyond cheese boards, homemade blue cheese elevates numerous dishes. Crumble it over salads, melt it into sauces for pasta or vegetables, incorporate it into savory pastries, or simply spread it on crusty bread. The culinary applications are virtually limitless, and using cheese you’ve crafted yourself makes every dish more meaningful.
Conclusion: Embracing the Art of Blue Cheese Making
Creating blue cheese at home transforms from an intimidating prospect to an achievable and rewarding craft once you understand the fundamental principles and techniques. While the process requires patience and attention to detail, no step is particularly complex or requires professional expertise. The key ingredients—quality milk, proper cultures, and time—are accessible to anyone willing to invest the effort.
The satisfaction of slicing into a wheel of blue cheese you’ve aged yourself, seeing the beautiful veining throughout, and tasting the complex flavors you’ve developed is incomparable. Beyond the practical benefits of cost savings and ingredient control, home cheesemaking connects you with traditional food crafts and develops skills that deepen your appreciation for artisan products.
Whether you’re a culinary enthusiast looking for a new challenge, a food lover seeking to understand how specialty products are made, or simply someone who appreciates quality cheese, making blue cheese at home offers a uniquely fulfilling experience. Don’t be intimidated by the blue—embrace it as the signature of a delicious cheese you’ve created with your own hands.
Start with a single batch, follow the guidelines carefully, and learn from the experience. Each subsequent attempt will refine your technique and deepen your understanding. Before long, you’ll have developed the confidence and skills to create exceptional blue cheese that rivals—or even surpasses—commercial alternatives. The journey from simple milk to complex, aged cheese is one of transformation, patience, and ultimately, delicious reward.