
Introduction: The Art of Homemade Camembert
Camembert cheese represents more than just a culinary delight—it’s a transformative experience that unfolds over the course of four weeks. Creating this luxurious, creamy, white-mold cheese in your own kitchen isn’t merely a cooking project; it’s an engaging journey filled with anticipation, learning, and ultimately, delicious reward. This comprehensive guide will walk you through the entire process of crafting authentic Camembert at home, exploring what makes this cheese so special, and explaining why thousands of home cheesemakers around the world have embraced this rewarding culinary adventure.
Whether you’re an experienced food enthusiast looking to expand your skills or a curious beginner eager to explore the world of artisan cheesemaking, homemade Camembert offers an accessible yet impressive entry point into the fascinating realm of fermented dairy products. The satisfaction of slicing into your own perfectly aged wheel of cheese, watching the creamy interior ooze onto your plate, is an experience that commercial products simply cannot replicate.

Understanding Camembert: History and Characteristics
Camembert is a soft-ripened cheese with a rich heritage dating back centuries to traditional European cheesemaking practices. This beloved cheese is characterized by its distinctive soft, creamy texture and its recognizable white, bloomy rind. The exterior’s velvety white coating is created by a specific mold culture called Penicillium candidum, which not only gives the cheese its signature appearance but also plays a crucial role in developing its complex flavor profile and luxurious texture.
The true magic of Camembert reveals itself during the aging process. As the cheese matures over several weeks, enzymes produced by the mold culture gradually break down proteins and fats from the outside in. This process, known as proteolysis, transforms the initially firm interior into the characteristic gooey, almost liquid center that cheese lovers cherish. The flavor evolves from mild and milky in its youth to rich, earthy, and complex as it reaches full maturity. The interplay between the tangy, mushroom-like notes from the rind and the buttery, savory core creates a sophisticated taste experience that has made this style of cheese internationally renowned.
Understanding these characteristics helps you appreciate what you’re creating and guides you through the aging process, allowing you to determine the perfect moment to enjoy your homemade creation.
Why Make Camembert at Home?
The decision to create Camembert in your own kitchen offers numerous benefits that extend far beyond the simple enjoyment of the final product. Home cheesemaking provides a unique opportunity to connect with traditional food crafts while exercising complete control over every aspect of the process.
Superior Freshness and Flavor
Homemade cheese offers a level of freshness that is difficult to achieve with commercially produced products. Store-bought cheese often travels considerable distances and sits in distribution channels for extended periods before reaching consumers. By making cheese at home, you control the timeline from milk to finished product, ensuring optimal freshness and flavor development. The taste difference is remarkable—homemade Camembert typically exhibits brighter, more vibrant flavors with a cleaner finish.
Complete Ingredient Control
When you make cheese at home, you select every ingredient that goes into your final product. This means you can choose high-quality milk from trusted sources, avoid unnecessary additives or preservatives commonly found in commercial products, and accommodate dietary preferences or restrictions. You can experiment with different milk types, adjust salt levels to your preference, and ensure that only natural, wholesome ingredients contribute to your cheese.
Educational and Rewarding Experience
Cheesemaking is fundamentally a lesson in food science, microbiology, and the art of fermentation. The process teaches you about enzyme activity, bacterial cultures, pH levels, temperature control, and how these factors interact to create specific textures and flavors. This knowledge deepens your appreciation for artisan foods and enhances your overall culinary understanding. Beyond the educational value, there’s an immense sense of accomplishment that comes from creating something as sophisticated as Camembert with your own hands.
Cost-Effectiveness
While there is an initial investment in equipment and cultures, making cheese at home becomes increasingly economical over time. A single batch of homemade Camembert typically costs a fraction of what you would pay for equivalent artisan cheese at specialty shops, especially when you factor in the premium prices commanded by high-quality soft-ripened cheeses.
Creative Expression
Once you master the basic technique, cheesemaking opens doors to creative experimentation. You can adjust aging times to achieve different textures, incorporate herbs or spices, or explore variations in technique to develop your own signature cheese style.
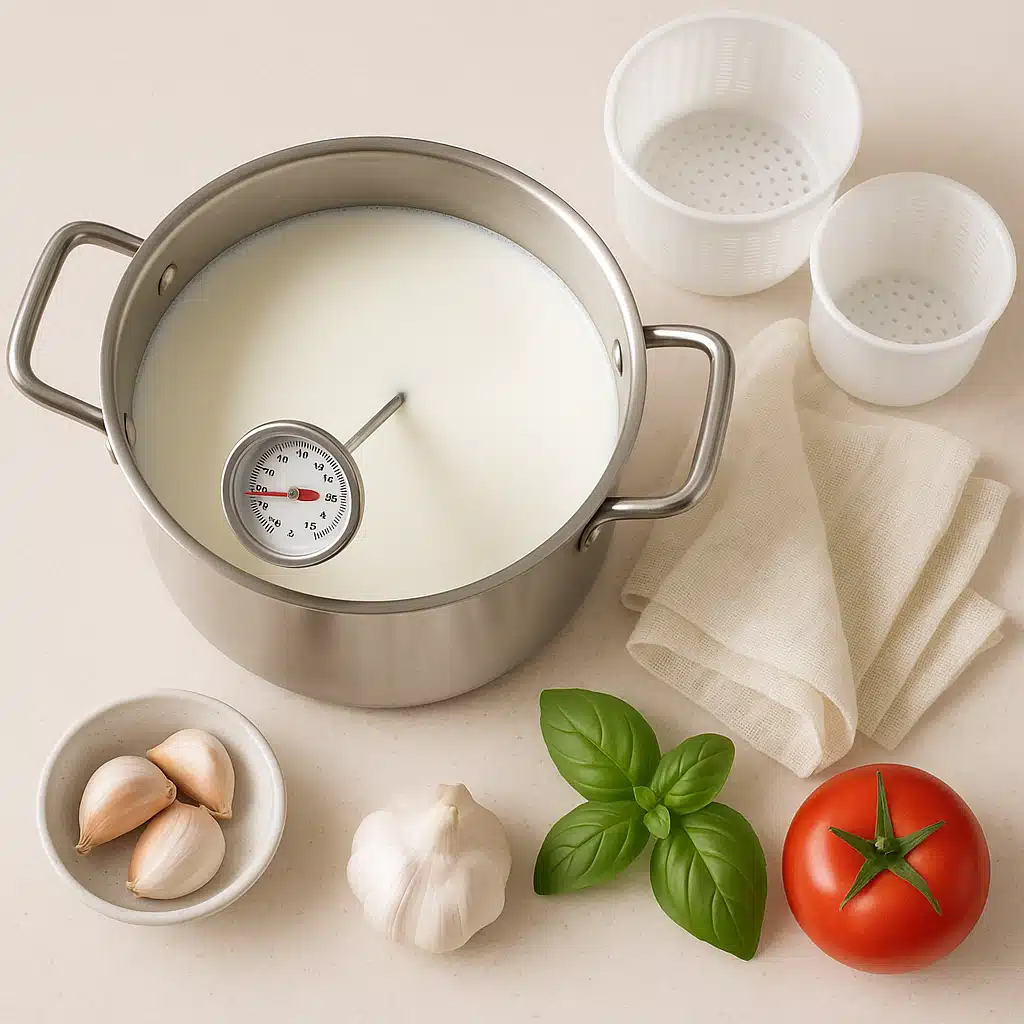
Essential Equipment and Ingredients
Before beginning your Camembert-making journey, you’ll need to gather the proper equipment and ingredients. Having everything prepared in advance ensures a smooth process and increases your chances of success.
Required Equipment
The equipment needed for making Camembert is relatively straightforward and much of it may already be in your kitchen:
- Large stainless steel pot (with a capacity of at least 4-5 liters for heating milk)
- Accurate thermometer (digital thermometers provide the most reliable readings)
- Long knife or curd cutter (for cutting curds to the proper size)
- Slotted spoon or ladle (for transferring curds to molds)
- Camembert molds (specialized cylindrical molds with drainage holes)
- Draining mat (allows whey to drain away from cheese)
- Cheese aging box or container (maintains proper humidity during ripening)
- Cheese paper or breathable wrapping (for storage during aging)
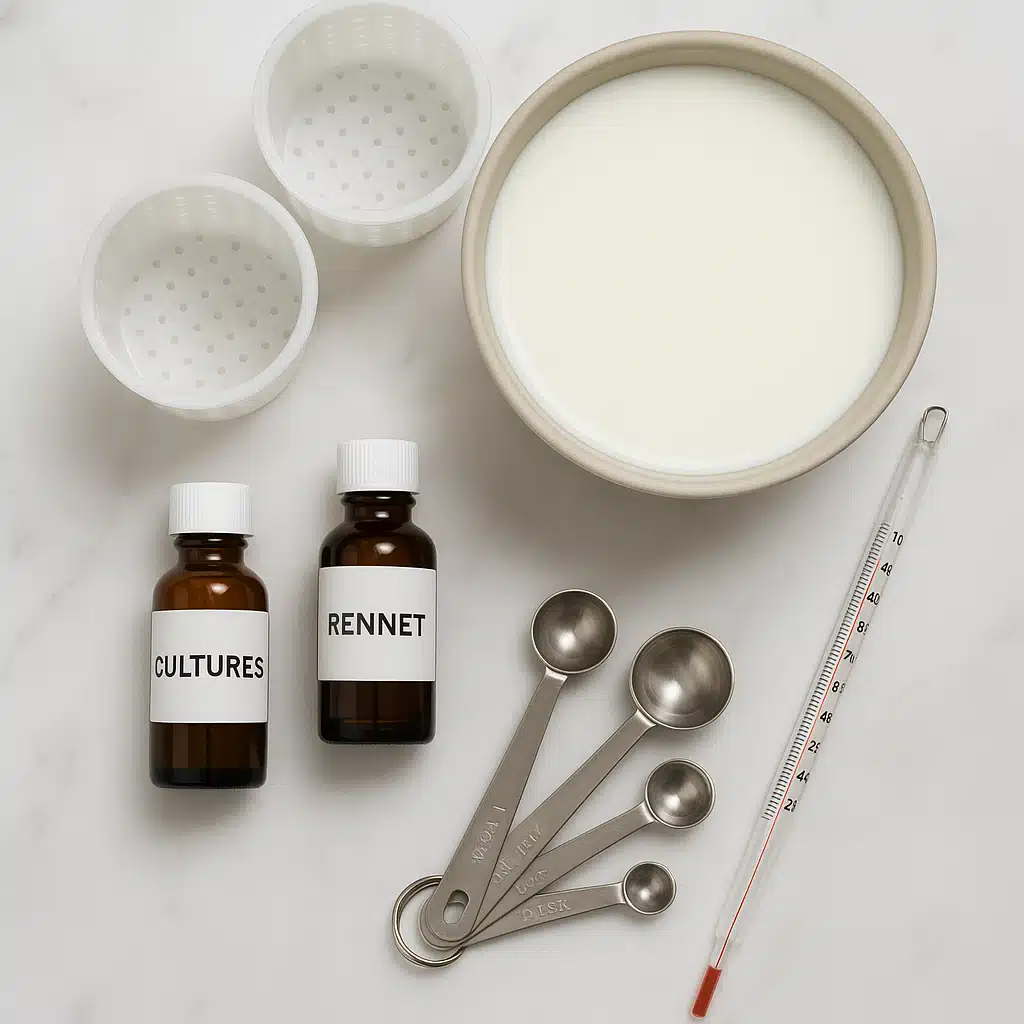
Essential Ingredients
The quality of your ingredients directly impacts the final result. Source the best available options within your means:
- Whole milk (approximately 4 liters per wheel of cheese; full-fat milk produces the creamiest results; non-homogenized or lightly pasteurized milk works best, though ultra-pasteurized milk should be avoided as it won’t set properly)
- Mesophilic or thermophilic starter culture (provides beneficial bacteria that acidify the milk and develop flavor)
- Penicillium candidum culture (the essential white mold that creates the characteristic rind and contributes to texture development)
- Liquid or tablet rennet (the coagulating enzyme that transforms liquid milk into solid curds)
- Non-iodized salt (iodine can interfere with beneficial bacteria; cheese salt or sea salt works well)
- Calcium chloride (optional but recommended if using pasteurized milk, as it helps achieve a firmer curd)
Most of these specialized ingredients can be obtained from cheesemaking supply companies or online retailers that cater to home food crafters.
The Four-Week Journey: Step-by-Step Process
Making Camembert is a multi-stage process that requires patience and attention to detail. Each week brings new developments as your cheese transforms from liquid milk to a creamy, sophisticated delicacy.
Week 1: Making the Cheese (Days 1-2)
The first stage involves transforming milk into cheese curds and forming them into the distinctive Camembert shape.
Preparing and Culturing the Milk
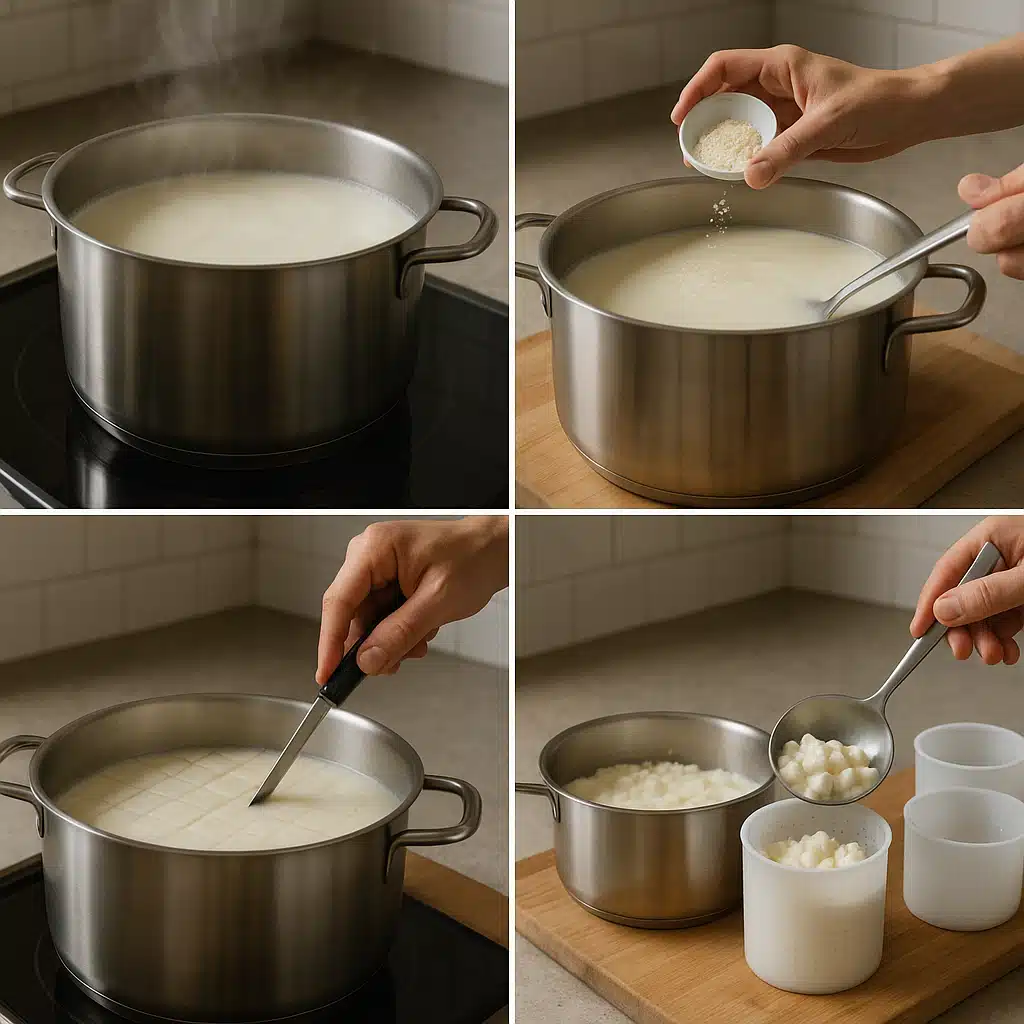
Begin by slowly heating your milk in a stainless steel pot to approximately 32°C (90°F). Use your thermometer to monitor the temperature closely, as accuracy is crucial at this stage. Once the milk reaches the target temperature, remove it from heat and sprinkle the starter culture over the surface. Allow it to rehydrate for a few minutes before gently stirring it in with an up-and-down motion to distribute it evenly throughout the milk.
Next, add the Penicillium candidum culture in the same manner. This white mold culture will eventually create the characteristic bloomy rind. If using calcium chloride (recommended for pasteurized milk), dilute it in a small amount of cool, non-chlorinated water and gently stir it into the milk.
Allow the milk to ripen for 30-60 minutes, maintaining the temperature as consistently as possible. This ripening period allows the cultures to begin their work, acidifying the milk and preparing it for coagulation.
Adding Rennet and Coagulation
After the ripening period, dilute your rennet in cool, non-chlorinated water according to the manufacturer’s instructions. Add it to the milk using gentle up-and-down strokes for about 30 seconds to distribute it evenly. Then stop stirring immediately and cover the pot. The milk must remain still and undisturbed for the rennet to work effectively.
Over the next 60-90 minutes, the milk will coagulate, forming a gel-like curd. You’ll know it’s ready when the curd breaks cleanly when cut with a knife, separating from the sides of the pot and showing clear yellowish whey in the break. This stage is called a “clean break” and indicates proper coagulation.
Cutting and Ladling Curds
Once you’ve achieved a clean break, use a long knife to cut the curd into approximately 2-centimeter cubes. Make parallel cuts in one direction, then perpendicular cuts, and finally angled cuts to create uniform pieces. Let the cut curds rest for 5 minutes to firm up slightly.
Place your Camembert molds on a draining mat over a tray to catch whey. Using a slotted ladle or skimmer, gently transfer the curds into the molds. For Camembert, the traditional method involves ladling curds in several layers with short rest periods between, allowing each layer to settle and drain before adding more. This gentle handling preserves the delicate curd structure and contributes to the final texture.
Fill the molds to the top, as the curds will compress significantly as whey drains out. Continue to add curds as space becomes available. The entire draining process typically takes 8-12 hours at room temperature.
Flipping and Initial Salting
After several hours, when the curds have consolidated enough to hold their shape, flip the cheese in its mold to ensure even drainage. You may need to flip it several times over the first 24 hours. Once the cheese has drained to about half its original height and feels firm enough to handle, remove it from the mold and sprinkle all surfaces lightly with non-iodized salt. The salt will begin to draw out additional moisture, form a skin, and begin developing flavor.
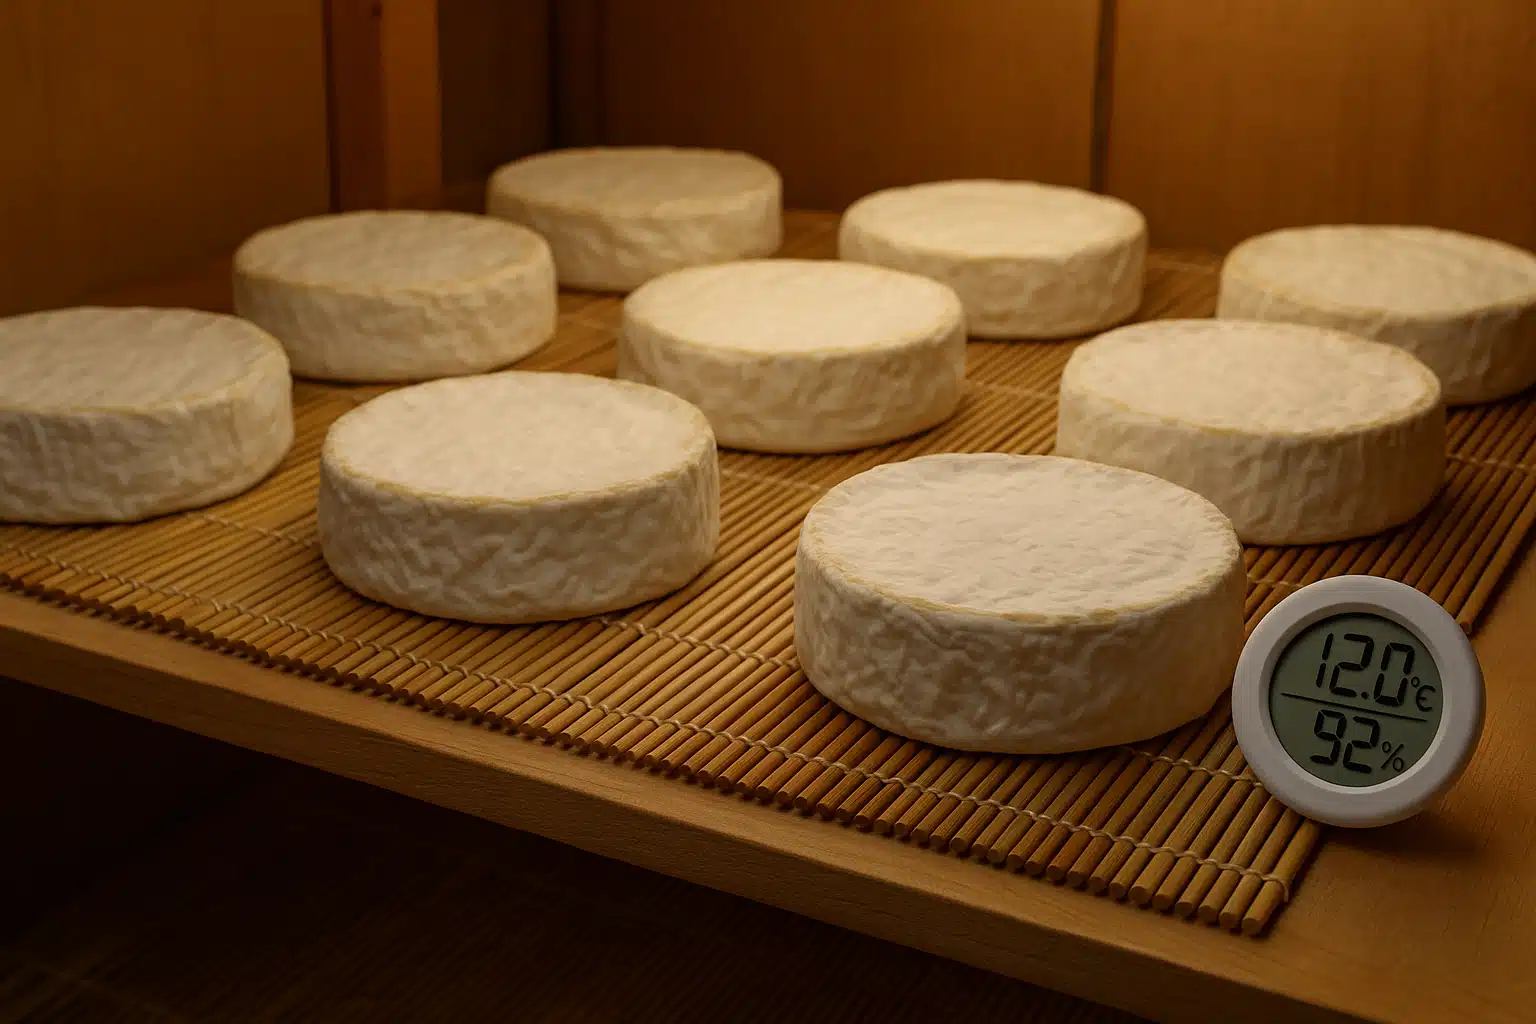
Week 2: Initial Aging and Rind Development (Days 3-10)
During the second week, your cheese begins its transformation as the Penicillium candidum culture establishes itself and starts creating the white rind.
Moving to Aging Environment
Transfer your salted cheese to a designated aging space. Ideal conditions for Camembert aging include temperatures between 10-13°C (50-55°F) and relative humidity around 85-90%. Many home cheesemakers use a modified refrigerator, a wine cooler, or a basement location with these conditions. If humidity is insufficient, place a small container of water in your aging space or use a humidity-controlled cheese cave or aging box.
Place the cheese on a mat that allows air circulation underneath. Proper air flow is essential for even mold development and prevents excess moisture accumulation.
Daily Maintenance
Flip your cheese daily during this period to ensure even distribution of moisture and mold development on all surfaces. Within 2-3 days, you should begin to see white fuzzy mold appearing on the surface. This is the Penicillium candidum establishing itself—exactly what you want to see.
If any mold appears in colors other than white (such as blue, green, or black spots), you can carefully wipe it away with a cloth dampened in a salt-water solution or vinegar. However, small amounts of these other molds are generally harmless and can simply be monitored.
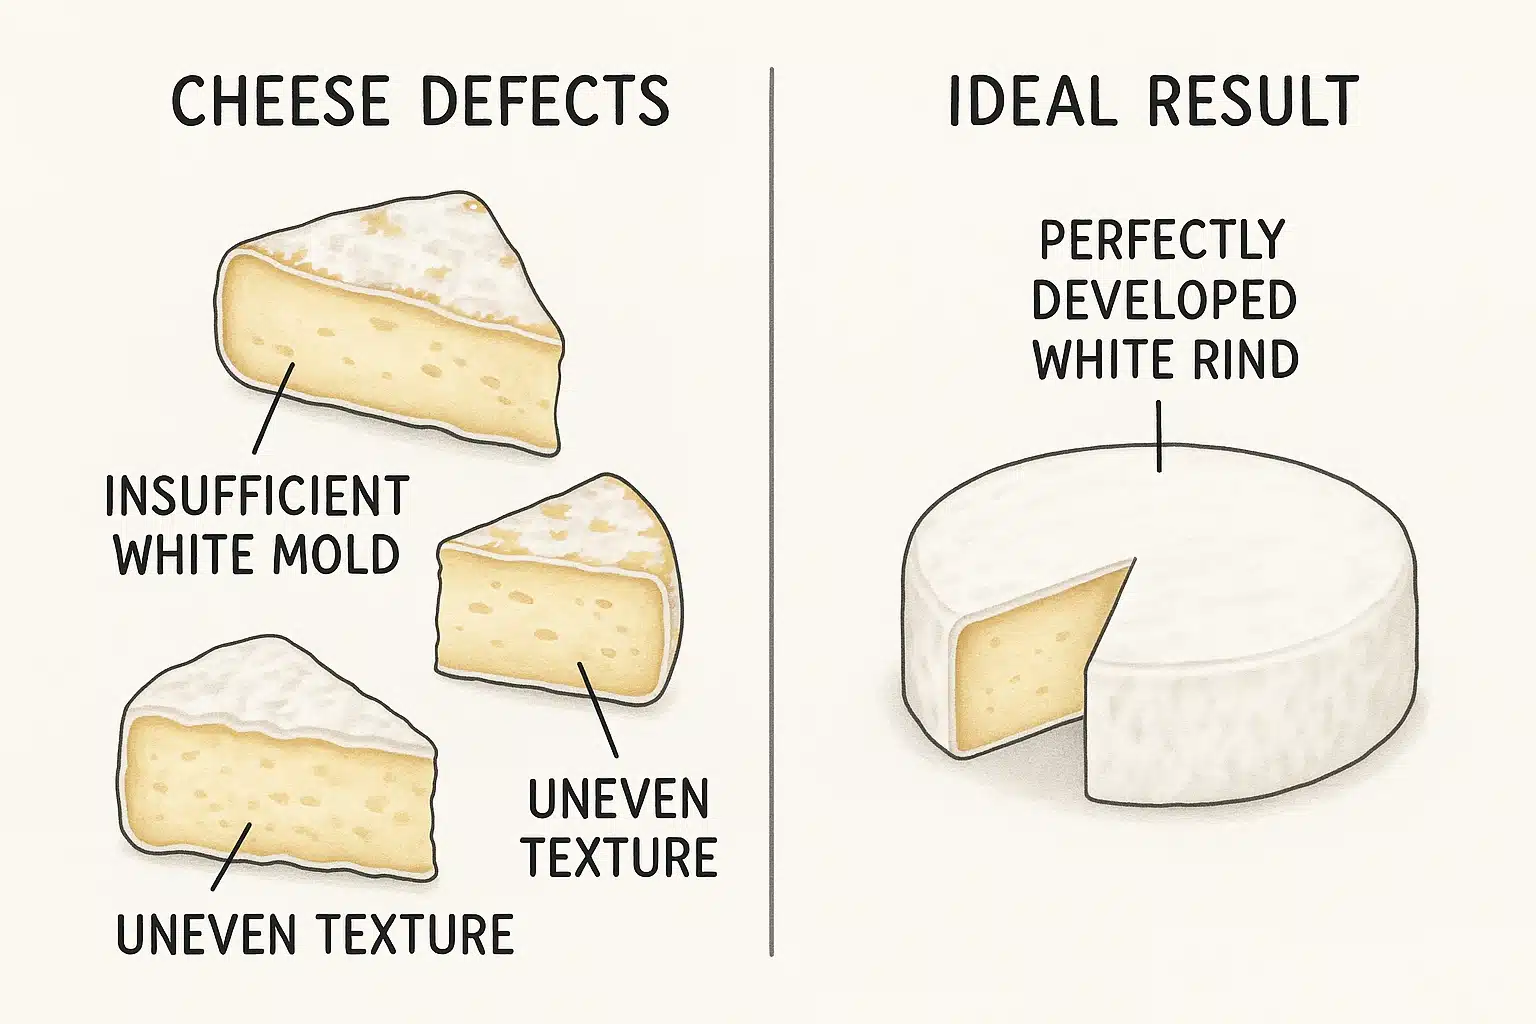
By the end of the second week, your cheese should be completely covered in a velvety white coating of Penicillium candidum. The interior will still be relatively firm at this stage, but the enzymatic breakdown process has begun.
Week 3: Ripening and Texture Development (Days 11-21)
The third week is when the most dramatic changes occur inside your cheese. While the exterior may look relatively stable, the interior undergoes significant transformation.
The Ripening Process
The Penicillium candidum mold on the surface produces enzymes that slowly work their way from the outside toward the center of the cheese. These enzymes break down proteins and fats, transforming the firm, chalky interior into a smooth, creamy texture. This process is called affinage or ripening.
During this week, continue to maintain consistent temperature and humidity conditions. Flip the cheese every 2-3 days rather than daily at this stage. The white rind may develop small wrinkles or slight browning in places—this is normal and indicates proper ripening.
Monitoring Progress
You can monitor ripening progress by gently pressing the center of the cheese with your finger. In the early stages, it will feel firm throughout. As ripening progresses, you’ll notice the outer edge beginning to soften while the center remains firmer. This gradual softening from outside to inside is exactly what you’re looking for.
The aroma of your cheese will also develop during this period, evolving from a simple milky smell to more complex notes that may include mushroom, earthy, or slightly ammonia-like scents. A moderate ammonia smell is normal for ripening Camembert, though if it becomes overwhelming, the cheese may need more air circulation.
Week 4: Final Ripening and “The Ooze” (Days 22-28)
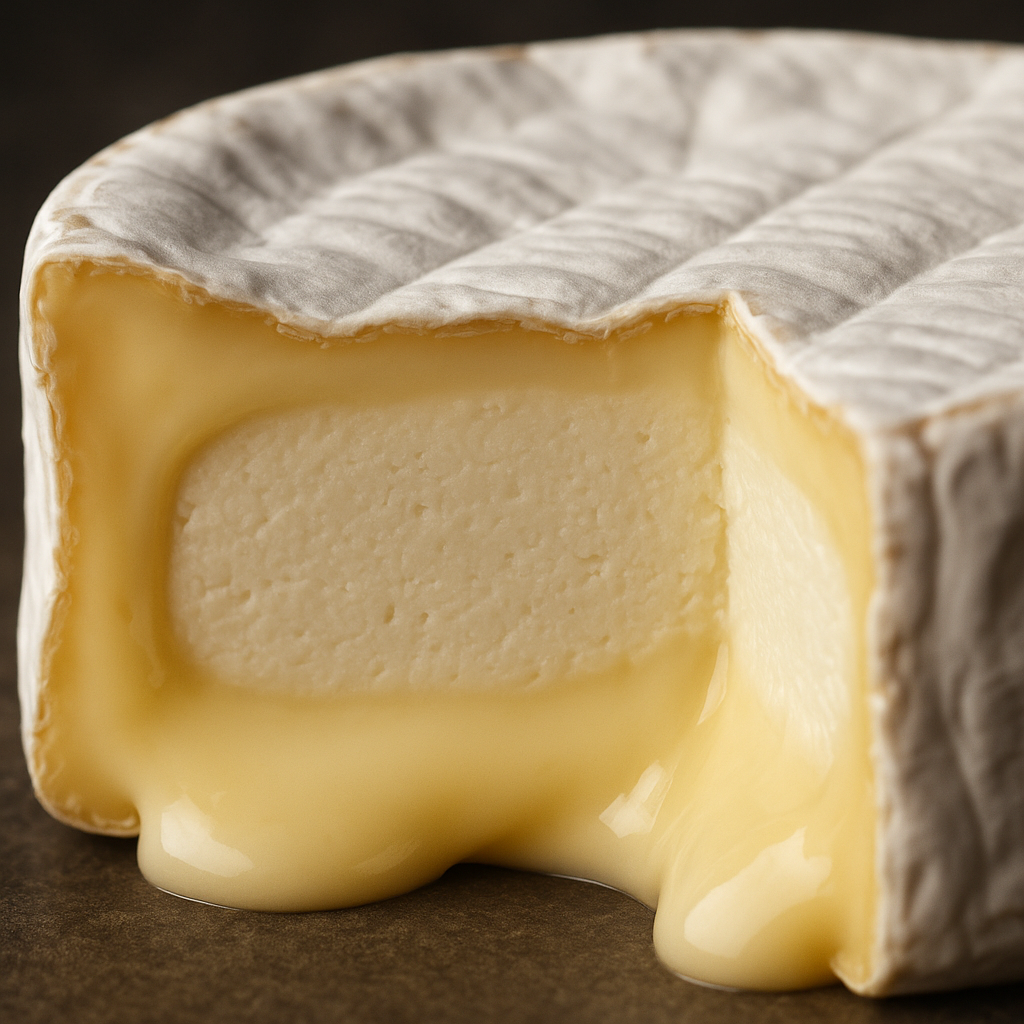
The final week brings your cheese to full maturity. This is when the characteristic “ooze” develops—that luxuriously creamy, almost liquid interior that defines perfectly ripened Camembert.
Achieving Perfect Ripeness
By day 28, your Camembert should feel soft throughout when gently pressed, with the center only slightly firmer than the edges. When cut at this stage, the cheese should bulge slightly and the interior should have a smooth, creamy consistency that flows slowly.
The exact timing can vary based on aging conditions, the milk used, and personal preference. Some prefer their Camembert younger and firmer (around 3 weeks), while others enjoy it fully ripe and oozy (4-5 weeks). There’s no single “correct” stage—it’s a matter of personal taste.
When to Enjoy Your Cheese
Once your cheese reaches your preferred level of ripeness, you can either enjoy it immediately or slow the ripening process by wrapping it in cheese paper and storing it in the main body of your refrigerator. At colder temperatures, the enzymatic activity slows significantly, though it doesn’t stop completely.
For the best flavor experience, remove your Camembert from refrigeration about an hour before serving, allowing it to come to room temperature. This softens the texture and allows the full aromatic complexity to express itself.

Troubleshooting Common Issues
Even experienced cheesemakers encounter challenges occasionally. Understanding common issues and their solutions helps you achieve better results and builds your cheesemaking expertise.
Curd Doesn’t Form Properly
Problem: The milk doesn’t coagulate or forms very weak curds that don’t achieve a clean break.
Possible causes and solutions:
- Ultra-pasteurized milk was used (the high heat damages proteins needed for coagulation; use pasteurized or raw milk instead)
- Rennet was too old or improperly stored (rennet loses potency over time; use fresh rennet and store according to instructions)
- Water used to dilute rennet contained chlorine (use distilled, filtered, or boiled and cooled water)
- Temperature was too low during coagulation (maintain proper temperature throughout the ripening and coagulation period)
White Mold Doesn’t Develop
Problem: The cheese doesn’t develop the characteristic white rind or develops it very slowly.
Possible causes and solutions:
- Humidity is too low (increase humidity in aging environment to 85-90%)
- Temperature is incorrect (maintain temperature between 10-13°C / 50-55°F)
- Too much salt was applied (excessive salt inhibits mold growth; use a light hand when salting)
- Penicillium candidum culture was old or inactive (use fresh cultures from reputable suppliers)
- Air circulation is insufficient (ensure cheese has adequate air flow on all surfaces)
Unwanted Mold Colors Appear
Problem: Blue, green, black, or other colored molds develop on the cheese surface.
Possible causes and solutions:
- Environmental molds are competing with Penicillium candidum (maintain cleaner aging environment; wipe away unwanted molds with salt water or vinegar solution)
- Small amounts of various molds are generally harmless and can be managed through regular monitoring
- If extensive colored mold develops, it may indicate problems with sanitation or aging environment cleanliness
Cheese Remains Too Firm
Problem: After four weeks, the cheese interior is still firm and chalky rather than creamy and oozy.
Possible causes and solutions:
- Aging temperature is too cold (increase temperature slightly within the optimal range)
- The cheese needs more time (some batches require 5-6 weeks to fully ripen; be patient)
- Humidity is too low (insufficient humidity can slow enzyme activity)
- The milk used had lower fat content (higher fat content produces creamier results)
Strong Ammonia Smell
Problem: The cheese develops an overpowering ammonia odor.
Possible causes and solutions:
- This is a natural byproduct of protein breakdown but indicates the aging environment may have insufficient air exchange
- Increase ventilation in the aging space
- Unwrap the cheese and allow it to air out for a few hours; the ammonia smell often dissipates
- Consider enjoying the cheese before it becomes over-ripe
Cheese Develops Cracks or Dry Surface
Problem: The surface of the cheese becomes dry, cracked, or leathery.
Possible causes and solutions:
- Humidity is too low (increase moisture in aging environment)
- Air circulation is too strong (reduce direct air flow while maintaining general ventilation)
- Temperature fluctuations are causing moisture loss (maintain more consistent conditions)
Serving and Enjoying Your Homemade Camembert
After four weeks of careful attention, your homemade Camembert deserves to be properly appreciated. The way you serve and pair your cheese can elevate the experience significantly.
Serving Temperature and Presentation
Always serve Camembert at room temperature. Remove it from refrigeration at least 60-90 minutes before serving to allow it to warm up naturally. As the cheese warms, its texture becomes softer and more fluid, and its aromatic compounds volatilize, delivering the full spectrum of flavors and aromas.
Present your cheese on a wooden board or cheese plate, leaving it whole so guests can appreciate its appearance before cutting. Provide a dedicated cheese knife—soft-ripened cheeses can benefit from a knife with holes or a wire-style cutter to prevent sticking.
The white rind of Camembert is completely edible and contributes significantly to the overall flavor experience. While some people prefer to remove it, eating the rind with the interior provides the full taste profile the cheesemaker intended.
Pairing Suggestions
Camembert pairs beautifully with a variety of accompaniments:
- Bread: Crusty artisan bread, baguette slices, or crackers provide the perfect vehicle for the creamy cheese
- Fruits: Fresh apple or pear slices, grapes, figs, or dried apricots offer sweet contrast to the savory cheese
- Nuts: Walnuts, almonds, or hazelnuts add textural variety and complementary flavors
- Preserves: Fig jam, honey, or fruit chutneys create delicious sweet-savory combinations
- Vegetables: Fresh salad greens, roasted vegetables, or pickled items balance the richness
- Beverages: Camembert pairs excellently with crisp white wines, light to medium-bodied red wines, champagne or sparkling wine, craft ciders, or even light beers
Cooking with Camembert
While delicious simply served on a board, Camembert also works wonderfully in cooked preparations:
- Baked Camembert: Score the top rind, add herbs and garlic, and bake until melted and bubbling—perfect for dipping
- Grilled cheese: Creates an luxuriously creamy sandwich filling
- Pasta: Toss with hot pasta, vegetables, and herbs for an instant creamy sauce
- Tarts and pastries: Incorporate into savory baked goods for rich, sophisticated flavor

Expanding Your Cheesemaking Skills
Once you’ve successfully created your first batch of Camembert, a world of cheesemaking possibilities opens before you. The skills and knowledge you’ve gained provide a foundation for exploring other varieties and techniques.
Related Cheese Styles to Explore
Having mastered Camembert, you might consider these related soft-ripened cheeses:
- Brie: Very similar to Camembert but typically larger in diameter and slightly milder
- Coulommiers: A French cheese falling between Camembert and Brie in size and flavor intensity
- Blue cheeses: Introduce you to internal mold development and different flavor profiles
- Washed-rind cheeses: Teach techniques for developing bacterial rinds with distinctive characteristics
- Aged hard cheeses: Expand your skills into longer-term aging and different texture development
Experimentation and Variation
As you gain confidence, consider experimenting with variations:
- Try different milk sources (cow, goat, sheep, or blends) for varied flavor profiles
- Add herbs, spices, or edible flowers to the curd before molding
- Experiment with aging times to discover your preferred ripeness level
- Adjust salt levels to suit your taste preferences
- Create flavored variations by adding ingredients to the exterior during aging
Building Your Cheesemaking Library
Invest in quality cheesemaking resources to deepen your knowledge. Comprehensive guidebooks, online courses, and connection with cheesemaking communities provide ongoing learning opportunities and support as you develop your craft.
Many regions have cheesemaking guilds, clubs, or online forums where enthusiasts share experiences, troubleshoot problems, and exchange recipes. These communities can be invaluable resources for home cheesemakers at all skill levels.

The Science Behind the Magic
Understanding the scientific principles underlying cheesemaking enhances your appreciation for the process and improves your ability to troubleshoot issues and achieve consistent results.
The Role of Bacteria and Enzymes
Cheesemaking is fundamentally a controlled fermentation process. The starter cultures you add to milk are specific strains of beneficial bacteria that consume lactose (milk sugar) and produce lactic acid as a byproduct. This acidification serves multiple purposes: it provides the characteristic tangy flavor, creates an environment inhospitable to harmful bacteria, and prepares the milk proteins for coagulation.
Rennet contains enzymes (primarily chymosin) that cause milk proteins to coagulate, transforming liquid milk into a gel-like solid. This same enzymatic activity continues during aging, gradually breaking down protein structures and contributing to texture development.
Mold and Ripening
Penicillium candidum is a carefully selected mold strain that produces powerful proteolytic and lipolytic enzymes. These enzymes break down proteins (proteolysis) and fats (lipolysis) in the cheese, transforming texture and generating the complex flavors associated with fully ripened Camembert.
The ripening process in Camembert moves from the outside toward the center because that’s where the enzyme-producing mold resides. This creates the characteristic ripening gradient, with the areas nearest the rind becoming creamy first while the center remains firmer for a longer period.
Why Temperature and Humidity Matter
Temperature affects the rate of all biological processes in cheesemaking. Warmer temperatures accelerate bacterial activity, enzyme function, and mold growth, while cooler temperatures slow these processes. The optimal range for Camembert aging balances ripening speed with flavor development—too warm and the cheese may develop off-flavors or become over-ripe quickly; too cold and ripening progresses very slowly or stalls.
Humidity prevents moisture loss from the cheese surface. Adequate moisture is necessary for mold growth and enzyme activity. If humidity is too low, the cheese will develop a dry, hard exterior that inhibits proper ripening. If too high, excessive moisture can lead to unwanted bacterial or mold growth.
Storage and Shelf Life
Properly handling your cheese after it reaches optimal ripeness ensures you can enjoy it over a period of time rather than needing to consume it immediately.
Short-Term Storage
Once your Camembert reaches your preferred ripeness level, wrap it in cheese paper (a special breathable paper that allows the cheese to respire while protecting it) or parchment paper, and store it in the refrigerator. Avoid plastic wrap, which traps moisture and prevents air exchange, potentially leading to off-flavors or unwanted mold growth.
Store cheese in the warmest part of your refrigerator, typically a vegetable drawer or a dedicated cheese compartment if your refrigerator has one. Camembert will continue to ripen slowly even under refrigeration, becoming softer and more pungent over time.
Shelf Life
Homemade Camembert typically maintains good quality for 2-3 weeks after reaching full ripeness when properly stored. The cheese won’t spoil suddenly but will continue to evolve, becoming increasingly strong in flavor and aroma. Some people enjoy these more mature characteristics, while others prefer the cheese at an earlier stage.
Always inspect your cheese before consuming. Signs that Camembert has passed its prime include an overwhelming ammonia smell that doesn’t dissipate when aired out, development of pink, brown, or dark-colored molds, or a slimy texture on the exterior. When in doubt, use your senses—if it smells or looks unappetizing, it probably is.
Can You Freeze Camembert?
While technically possible, freezing is not recommended for soft-ripened cheeses like Camembert. Freezing damages the delicate protein structure, and upon thawing, the texture becomes grainy and separated rather than smooth and creamy. The carefully developed texture that took four weeks to achieve will be compromised. If you must freeze it, use the thawed cheese only in cooked applications where texture is less critical.
Health Considerations and Safety
While cheesemaking is a time-honored traditional practice, it’s important to approach it with awareness of food safety principles, especially when working with raw or unpasteurized ingredients.
Raw vs. Pasteurized Milk
The choice between raw and pasteurized milk involves balancing flavor potential with safety considerations. Raw milk can produce cheese with more complex flavors but carries a higher risk of pathogenic bacteria. Pasteurized milk has been heat-treated to eliminate harmful bacteria, making it safer but potentially producing cheese with less flavor complexity.
For beginning cheesemakers, using pasteurized (not ultra-pasteurized) milk is recommended. As you gain experience and confidence in your technique and sanitation practices, you might choose to explore raw milk if it’s legally available in your location and you’re comfortable with the associated considerations.
Sanitation Practices
Proper sanitation is crucial for successful cheesemaking. While you’re intentionally introducing specific beneficial microorganisms, you want to exclude harmful bacteria and unwanted molds. Clean all equipment thoroughly with hot, soapy water before use, and sanitize items that will contact milk or curds with a food-grade sanitizer or by boiling when possible.
Maintain clean work surfaces, use clean towels, and wash your hands thoroughly before handling cheese. These basic hygiene practices significantly reduce the risk of contamination.
Who Should Exercise Caution
Soft-ripened cheeses made from unpasteurized milk should be avoided by pregnant women, young children, elderly individuals, and anyone with compromised immune systems. These populations are more vulnerable to foodborne pathogens that might survive in unpasteurized dairy products. If you’re making cheese for these groups, always use pasteurized milk and maintain excellent sanitation practices.
The Rewards of Patience
Creating homemade Camembert requires four weeks of patience, attention, and care. Unlike many modern cooking projects that deliver instant gratification, cheesemaking teaches the value of slow food—the satisfaction that comes from nurturing a product through multiple stages of development and witnessing its transformation over time.
Each batch you make will deepen your understanding of the process. You’ll develop an intuitive sense for how the cheese should look, feel, and smell at each stage. You’ll learn to read subtle signs that indicate proper development or potential issues. This accumulated knowledge and experience is part of what makes cheesemaking so rewarding.
Beyond the practical skills, there’s something profoundly satisfying about creating artisan food products in your own home. In an era of industrial food production and instant everything, taking the time to craft something with your own hands using traditional methods connects you to generations of food artisans and provides a tangible counterpoint to our increasingly digital lives.
When you finally slice into your perfectly ripened wheel of Camembert and watch the creamy interior ooze onto your plate, you’ll understand why dedicated home cheesemakers describe their craft not just as a hobby but as a passion. That moment of “the ooze” represents not just four weeks of waiting, but four weeks of learning, care, and connection to the ancient art of cheesemaking.

Conclusion: Begin Your Cheesemaking Journey
Making Camembert at home is an accessible yet impressive culinary accomplishment that anyone with patience and attention to detail can achieve. While it requires time and careful monitoring, the process itself is straightforward, and the results are genuinely rewarding.
The skills you develop while making Camembert transfer to countless other cheesemaking projects and fermentation endeavors. You’ll gain understanding of microbiology, fermentation, enzyme activity, and the complex interactions between temperature, humidity, time, and living cultures. These principles apply across a wide range of artisan food crafts.
More importantly, you’ll create something delicious and unique with your own hands. Each wheel of cheese you produce will be slightly different from the last, reflecting the specific conditions, timing, and ingredients of that particular batch. This natural variation is part of the beauty of artisan cheesemaking—no two batches are ever identical.
Whether you’re drawn to cheesemaking for the culinary results, the scientific learning, the satisfaction of traditional craft, or simply the pleasure of creating something from scratch, homemade Camembert offers all of these rewards. The four-week journey from liquid milk to “the ooze” is one worth taking.
Gather your equipment and ingredients, set aside the time to properly monitor and care for your cheese, and prepare to experience the satisfaction that comes from creating one of the world’s most beloved artisan foods in your own home. Your first bite of homemade Camembert, with its creamy texture, complex flavors, and the knowledge that you created it yourself, will make every moment of the journey worthwhile.
Begin your cheesemaking adventure today, and discover why thousands of home food artisans around the world have embraced the rewarding craft of creating beautiful, delicious cheese in their own kitchens.