
How to Make Fresh Chèvre: A Complete Guide to Homemade Goat Cheese
Making homemade chèvre can be one of the most rewarding culinary experiences you’ll ever undertake. This delightful fresh goat cheese is celebrated worldwide for its creamy texture, tangy flavor, and incredible versatility. Whether you’re a seasoned home cook or a complete beginner, crafting your own chèvre allows you to create restaurant-quality cheese in your own kitchen with just a handful of simple ingredients. In this comprehensive guide, we’ll walk you through every step of the cheese-making process, share expert tips, and help you discover the satisfaction of creating this luxurious dairy product from scratch.
Why Make Chèvre at Home?
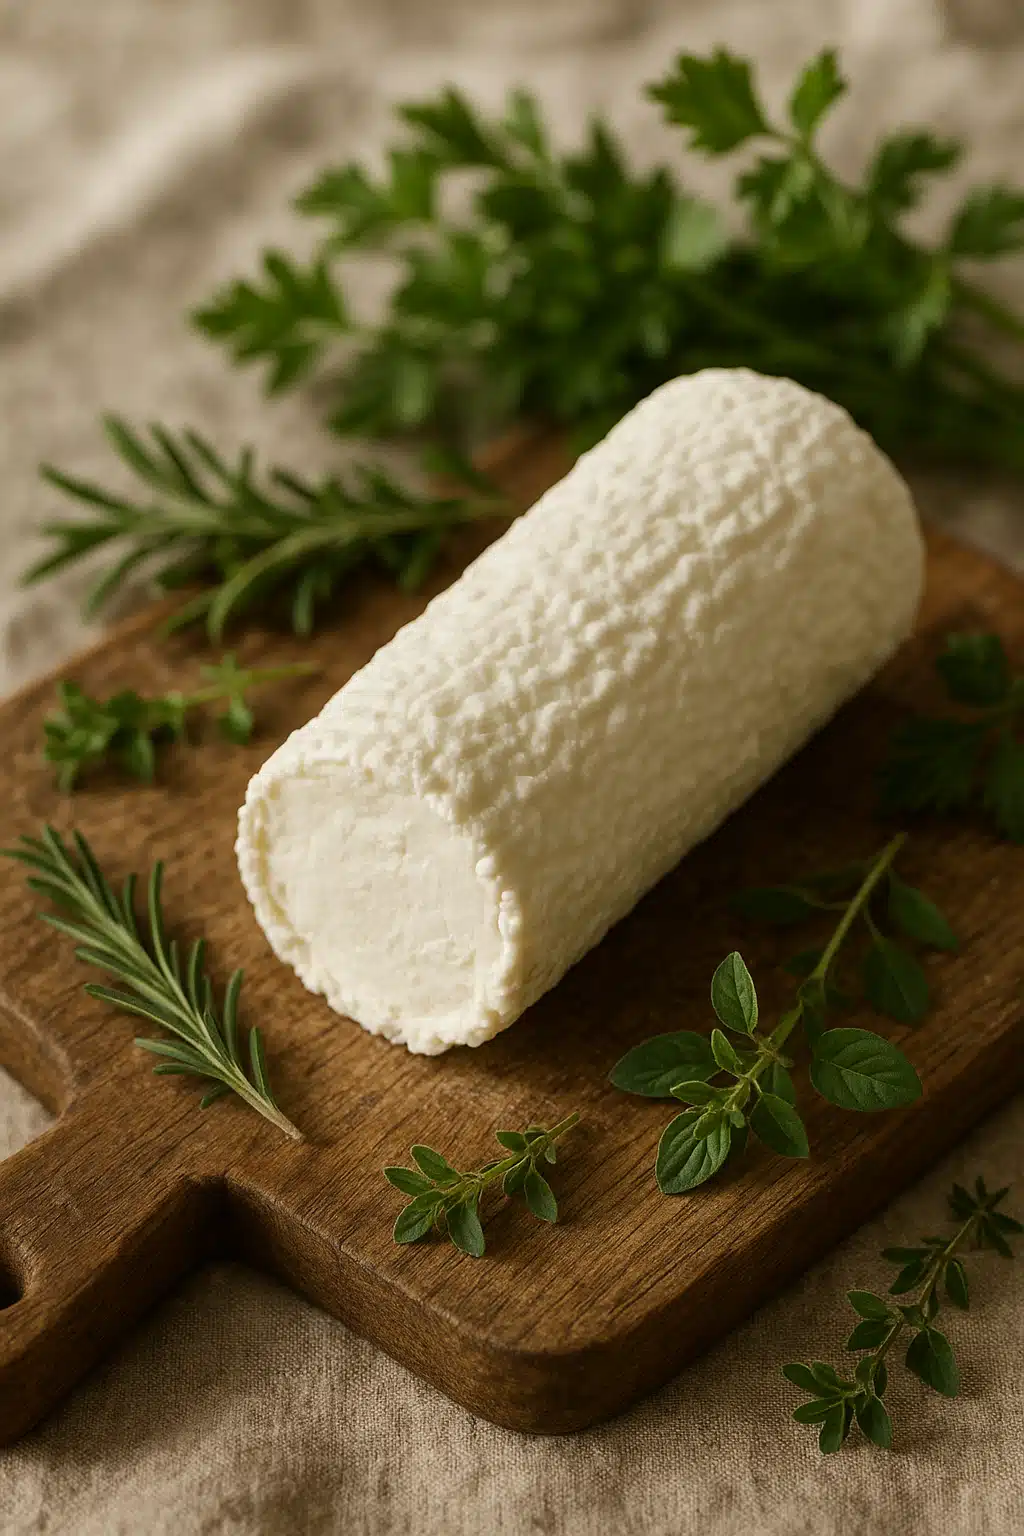
Chèvre, derived from the French word for goat, refers to any cheese made from goat’s milk. This artisanal cheese is prized globally for its distinctive tangy flavor, silky spreadable consistency, and nutritional benefits. Unlike many commercial cheeses, homemade chèvre gives you complete control over quality, freshness, and flavor customization. Whether you spread it on crusty bread, crumble it over salads, blend it into pasta dishes, or enjoy it as part of a cheese board, fresh chèvre brings an element of sophistication to any meal. Additionally, goat’s milk is naturally easier to digest than cow’s milk for many people, making chèvre an excellent choice for those with mild dairy sensitivities.
Beyond the culinary rewards, making cheese at home is a deeply satisfying process that connects you with centuries-old food traditions. The transformation from liquid milk to tangy, creamy cheese happens right before your eyes, offering a hands-on understanding of food chemistry and artisanal craftsmanship. Plus, homemade chèvre is significantly more economical than purchasing premium artisanal varieties from specialty shops.
Essential Ingredients for Homemade Chèvre
The beauty of chèvre lies in its simplicity. You only need a few basic ingredients to create this exceptional cheese:
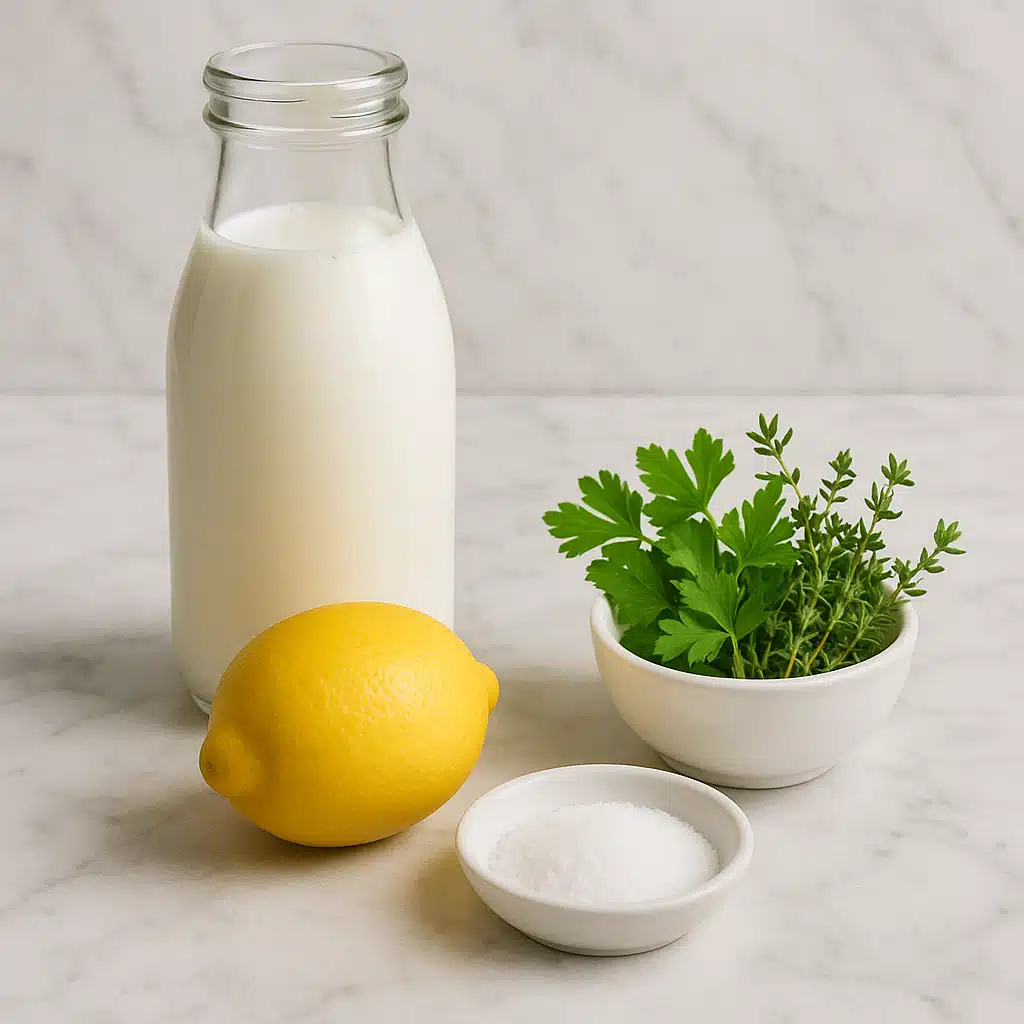
- Goat’s Milk (approximately 4 liters or 1 gallon): The foundation of your cheese. Fresh, high-quality goat’s milk produces the best flavor and texture. Look for whole milk that hasn’t been ultra-pasteurized, as this process can prevent proper curdling.
- Acid (60ml or 1/4 cup): White vinegar or fresh lemon juice serves as the coagulant that transforms liquid milk into curds. Lemon juice provides a slightly brighter, more complex flavor.
- Salt (5ml or 1 teaspoon, adjustable to taste): Essential for flavor enhancement and preservation. Fine sea salt or kosher salt works best.
- Optional Flavor Enhancers: Fresh or dried herbs like chives, dill, thyme, or basil; minced garlic; cracked black pepper; honey for sweet versions; or dried fruit for gourmet variations.
Equipment You’ll Need
Before beginning, gather these essential tools to ensure a smooth cheese-making process:
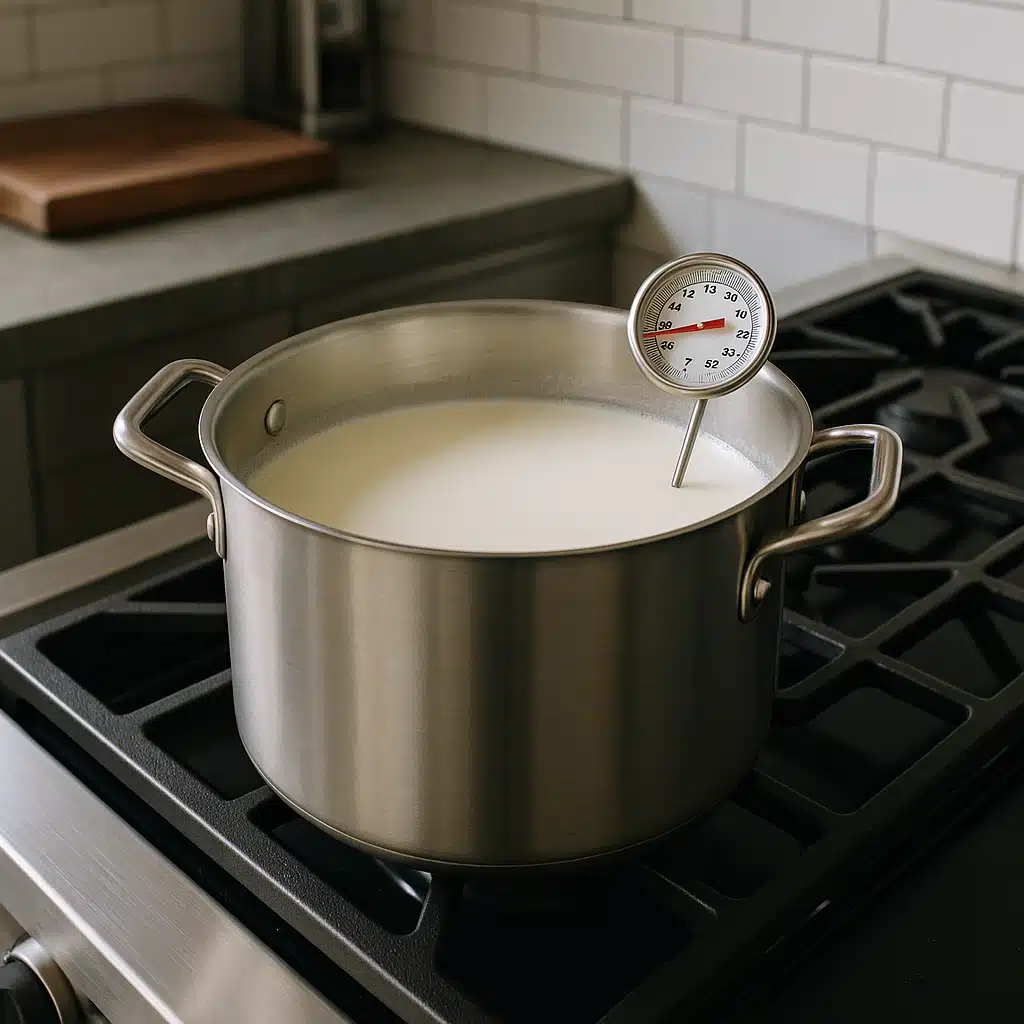
- Large heavy-bottomed pot (at least 5-liter capacity)
- Cooking thermometer (digital recommended for accuracy)
- Long-handled spoon for stirring
- Colander or strainer
- Cheesecloth or fine muslin cloth
- Mixing bowl
- Airtight storage container
Step-by-Step Chèvre Making Process
Follow these detailed steps to create perfect homemade chèvre every time:
Step 1: Heat the Milk
Pour your goat’s milk into a large, heavy-bottomed pot. Place it over medium heat and slowly warm the milk, stirring occasionally to prevent scorching on the bottom. Monitor the temperature carefully with your thermometer until it reaches approximately 85-88°C (185-190°F). This temperature is crucial—too low and the milk won’t curdle properly; too high and you’ll affect the texture of your final cheese. The heating process typically takes 15-20 minutes depending on your stove and pot size.
Step 2: Add the Acid and Curdle
Once your milk reaches the target temperature, remove the pot from heat. Slowly pour in your vinegar or lemon juice while gently stirring. You’ll immediately notice the milk beginning to separate into curds (solid white clumps) and whey (a yellowish-green liquid). This magical transformation is the coagulation process in action. After adding the acid, stop stirring and let the pot sit undisturbed for 10-15 minutes. This resting period allows the curds to fully form and firm up.
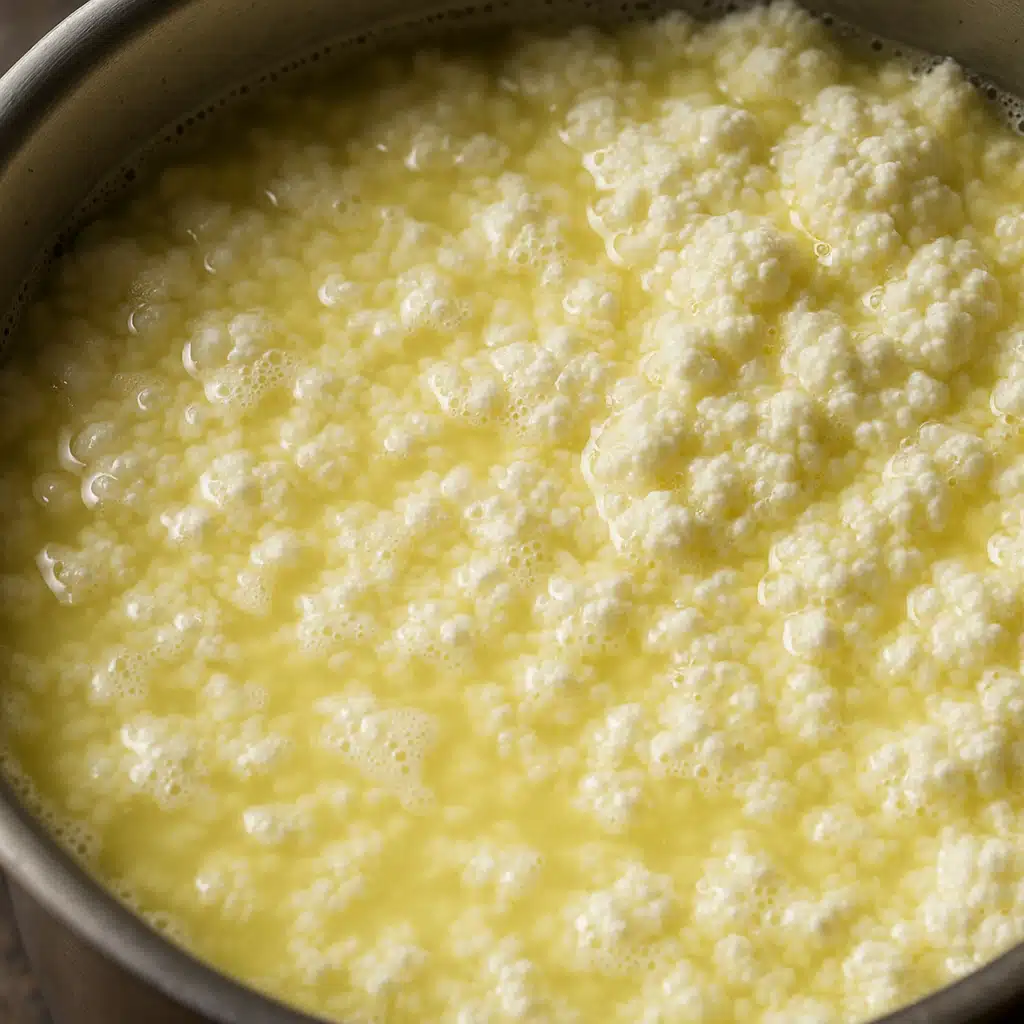
Step 3: Strain and Drain the Curds
Line your colander with several layers of cheesecloth or muslin, ensuring the cloth drapes over the sides. Place the lined colander over a bowl or in your sink. Carefully pour the curdled milk mixture into the cheesecloth-lined colander. The whey will drain through while the curds remain caught in the cloth. For a spreadable, creamy consistency, allow the curds to drain for 2-3 hours at room temperature. For a firmer, crumblier cheese suitable for slicing or grating, extend the draining time to 4-6 hours or even overnight in the refrigerator. You can gather the corners of the cheesecloth and tie them to create a bundle, hanging it over a bowl for more efficient draining.
Step 4: Season Your Cheese
Once your cheese has reached the desired consistency, transfer the curds to a clean mixing bowl. Add salt gradually, tasting as you go, until you achieve your preferred flavor balance. This is the perfect moment to incorporate any additional flavorings. For herbed chèvre, fold in finely chopped fresh herbs. For garlic chèvre, mix in minced or roasted garlic. For sweet applications, blend in honey, vanilla, or dried fruit. Use a fork or spatula to mix thoroughly but gently, maintaining the creamy texture.
Step 5: Store and Enjoy
Transfer your finished chèvre to an airtight container and refrigerate immediately. Your homemade cheese is ready to enjoy right away, though flavors will deepen and meld if allowed to rest for a few hours. Fresh chèvre will maintain optimal quality for 5-7 days when properly stored in the refrigerator. Always use clean utensils when serving to prevent contamination and extend shelf life.
Expert Tips for Perfect Chèvre Every Time
- Milk Quality Matters: The final cheese quality directly reflects your starting milk. Seek out fresh goat’s milk from reputable sources. Avoid ultra-pasteurized milk, as the intense heat treatment alters proteins and prevents proper curdling. If purchasing from stores, check the label for “pasteurized” rather than “ultra-pasteurized.”
- Temperature Precision: Invest in a reliable thermometer and use it consistently. Even small temperature variations can affect curd formation and final texture. Digital instant-read thermometers offer the most accuracy and convenience.
- Experiment with Acidity: Different acids produce subtle flavor variations. Lemon juice creates a brighter, more citrusy note, while white vinegar yields a cleaner, more neutral tang. You can also experiment with buttermilk or specialized cheese cultures for more complex flavor development.
- Drainage Time Customization: Control your cheese’s final consistency through drainage time. Short drainage (2 hours) creates spreadable, cream cheese-like texture. Medium drainage (4 hours) produces firmer, scoopable cheese. Extended drainage (6+ hours) results in crumbly, sliceable cheese perfect for grilling or baking.
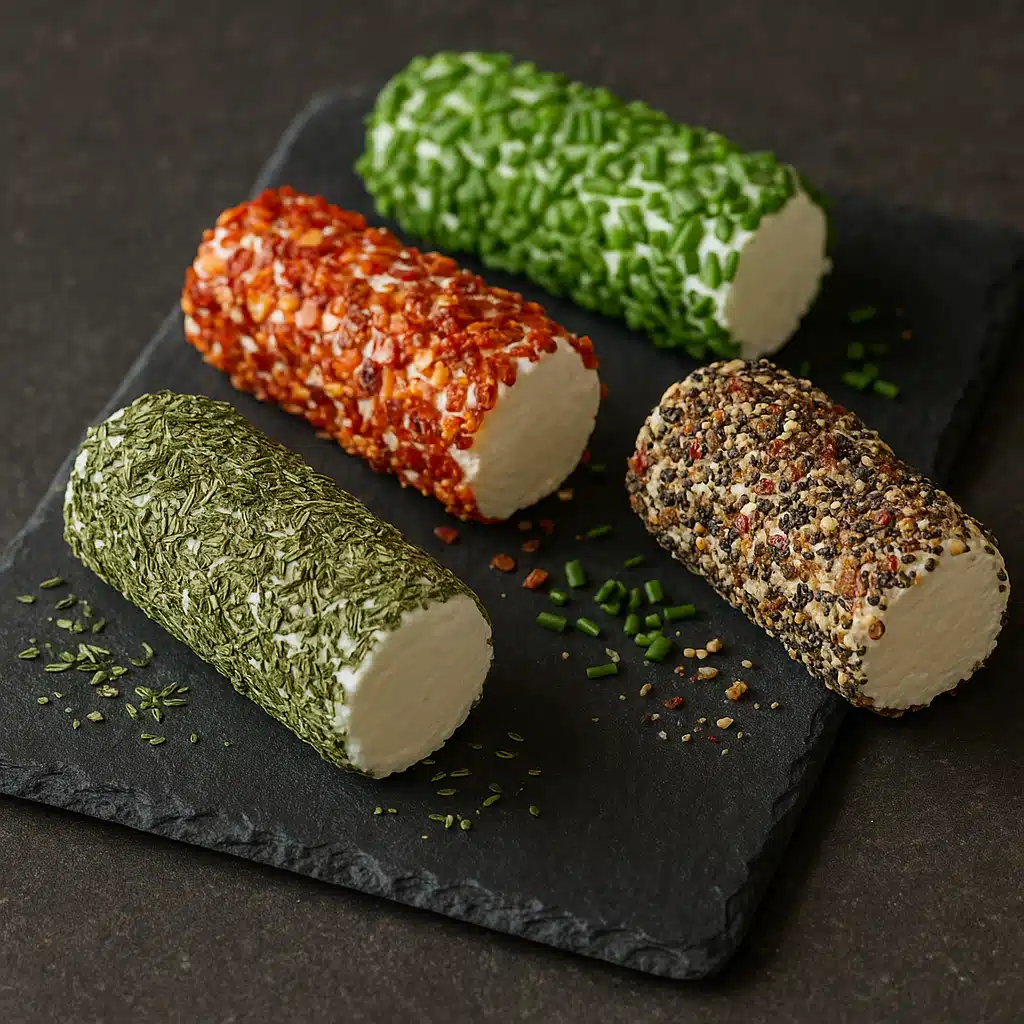
- Flavor Development: Don’t limit yourself to basic seasonings. Roll finished cheese logs in crushed nuts, coat them with spice blends, layer with sun-dried tomatoes, or create sweet versions with honey and lavender. The mild, tangy base of chèvre complements both savory and sweet additions beautifully.
- Save the Whey: Don’t discard the protein-rich whey! Use it in bread baking, smoothies, as cooking liquid for grains, or as a nutrient boost for garden plants.
Troubleshooting Common Chèvre Challenges
Issue: Milk won’t curdle properly
Solution: This usually indicates insufficient acid or incorrect temperature. Ensure your milk reached 85-88°C before adding acid. If it still won’t curdle, add another tablespoon of vinegar or lemon juice and wait 5 more minutes. Ultra-pasteurized milk will never curdle properly—check your milk label.
Issue: Cheese tastes too sour or acidic
Solution: You may have added too much acid or allowed the curds to sit in the whey too long. Next time, use slightly less vinegar or lemon juice, and drain the curds more promptly after curdling.
Issue: Final cheese is too firm or dry
Solution: The curds drained for too long. Reduce drainage time in your next batch. You can also rescue overly dry cheese by mixing in a small amount of cream or milk to restore creaminess.
Issue: Cheese is too soft or wet
Solution: Allow more drainage time. You can also return the cheese to the cheesecloth and refrigerate it while draining overnight for maximum firmness.
Issue: Grainy texture instead of smooth
Solution: This often results from overheating the milk or stirring too vigorously after adding acid. Use gentler heat and minimal stirring after coagulation begins.
Creative Ways to Use Your Homemade Chèvre

Once you’ve mastered basic chèvre, explore these delicious applications:
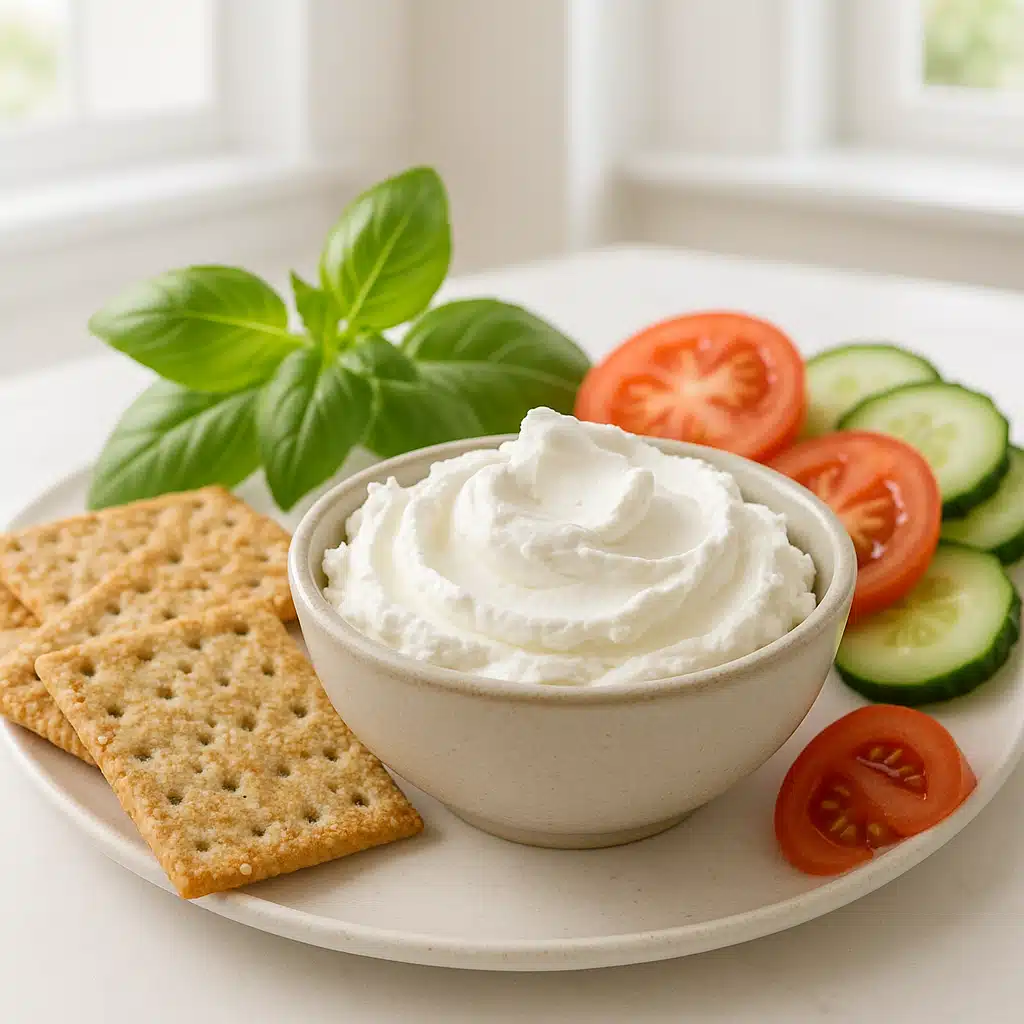
- Classic Spreads: Serve on crackers, toasted baguette slices, or fresh vegetables as an elegant appetizer
- Salad Enhancement: Crumble over mixed greens with nuts, dried fruit, and balsamic vinaigrette
- Pasta Perfection: Stir into hot pasta with olive oil, garlic, and fresh herbs for instant creaminess
- Stuffed Vegetables: Fill bell peppers, tomatoes, or mushrooms with herbed chèvre before baking
- Breakfast Upgrade: Spread on toast with honey and fresh fruit, or fold into omelets
- Pizza Topping: Dollop on pizza with caramelized onions, figs, or roasted vegetables
- Baked Goods: Incorporate into savory scones, muffins, or tarts
- Grilled Cheese: Create firm medallions, coat in breadcrumbs, and pan-fry until golden
Nutritional Benefits of Goat Cheese
Beyond its exceptional flavor, chèvre offers several nutritional advantages. Goat’s milk naturally contains smaller fat globules and different protein structures than cow’s milk, making it easier to digest for many people. It’s rich in beneficial nutrients including calcium for bone health, protein for muscle maintenance, vitamin A for vision and immunity, and probiotics that support digestive health when made with live cultures. Goat cheese also typically contains less lactose than cow’s milk cheese, making it a potential option for those with mild lactose sensitivity (though not suitable for those with severe intolerance or allergies).
Taking Your Cheese Making Further
Once you’ve mastered basic fresh chèvre, you can explore more advanced techniques. Try aging your cheese for development of complex flavors, experimenting with different cheese cultures for varied taste profiles, creating marinated chèvre by preserving it in herb-infused olive oil, making chèvre logs rolled in various coatings, or attempting other fresh cheeses like ricotta, paneer, or queso fresco using similar techniques. The fundamental skills you develop making chèvre translate directly to many other cheese-making adventures.
Conclusion: Your Journey to Artisanal Cheese Making
Making homemade chèvre is far more than simply producing cheese—it’s about embracing an artisanal craft, understanding food transformation, and creating something genuinely special with your own hands. This simple yet elegant fresh goat cheese requires minimal ingredients, basic equipment, and just a few hours of your time, yet delivers restaurant-quality results that will impress family and friends alike. By following this comprehensive guide, you’ll develop not only a delicious treat but also valuable kitchen skills and confidence in home food production.
Whether you’re seeking a rewarding culinary project, hoping to create healthier homemade alternatives to commercial products, or simply love the exceptional taste of fresh artisanal cheese, chèvre-making offers endless possibilities for creativity and satisfaction. So gather your ingredients, prepare your equipment, and embark on this delightful cheese-making journey. Your first batch of creamy, tangy, homemade chèvre awaits!