Understanding Cheese Waxing: A Complete Preservation Guide
Cheese waxing is a time-honored preservation technique that has been used for centuries to protect and age cheese properly. Whether you’re an artisan cheesemaker, a homesteading enthusiast, or simply someone who appreciates quality cheese and wants to preserve it effectively, mastering the art of cheese waxing opens up new possibilities for storage, aging, and enjoyment. This comprehensive guide will walk you through everything you need to know about waxing cheese wheels, from understanding the benefits to executing the process with confidence.
The Benefits of Waxing Cheese
Waxing cheese provides multiple advantages that make it a preferred preservation method for hard and semi-hard cheeses worldwide. Understanding these benefits will help you appreciate why this traditional technique remains popular among cheese enthusiasts and professional cheesemakers alike.
Preservation and Extended Shelf Life
The primary function of cheese wax is to create a protective barrier that regulates moisture levels within the cheese. By sealing the surface, wax prevents excessive moisture loss that would otherwise cause the cheese to dry out and crack. Simultaneously, it blocks external moisture and contaminants from penetrating the cheese, significantly reducing the risk of mold growth and spoilage. Properly waxed cheese can be stored for several months or even years, depending on the variety and storage conditions.
Flavor Protection and Development
Cheese is remarkably absorbent and can easily pick up flavors and odors from its environment. A wax coating acts as an effective barrier against these unwanted influences, ensuring your cheese maintains its intended flavor profile. Additionally, the controlled environment created by the wax allows the cheese to age gracefully, developing complex flavors and textures over time without deterioration.
Visual Appeal and Gift-Worthiness
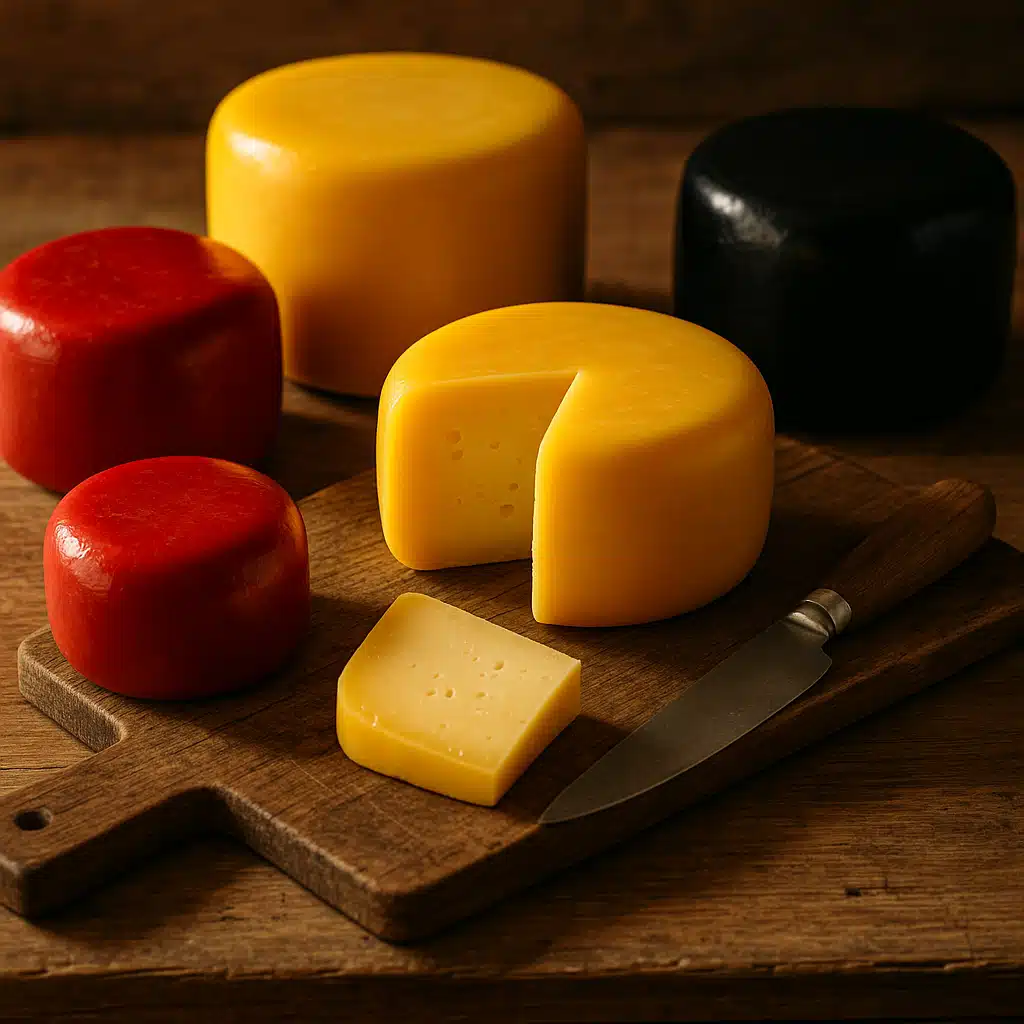
Beyond functionality, a beautifully waxed cheese wheel presents an attractive appearance that enhances any cheese board or makes an impressive homemade gift. The smooth, colorful coating—available in traditional red, yellow, black, or other colors—adds a professional touch that reflects the care taken in its preparation.
Essential Materials and Equipment
Before beginning the waxing process, it’s important to gather all necessary materials and equipment. Having everything prepared in advance ensures a smooth workflow and better results.
Selecting the Right Cheese
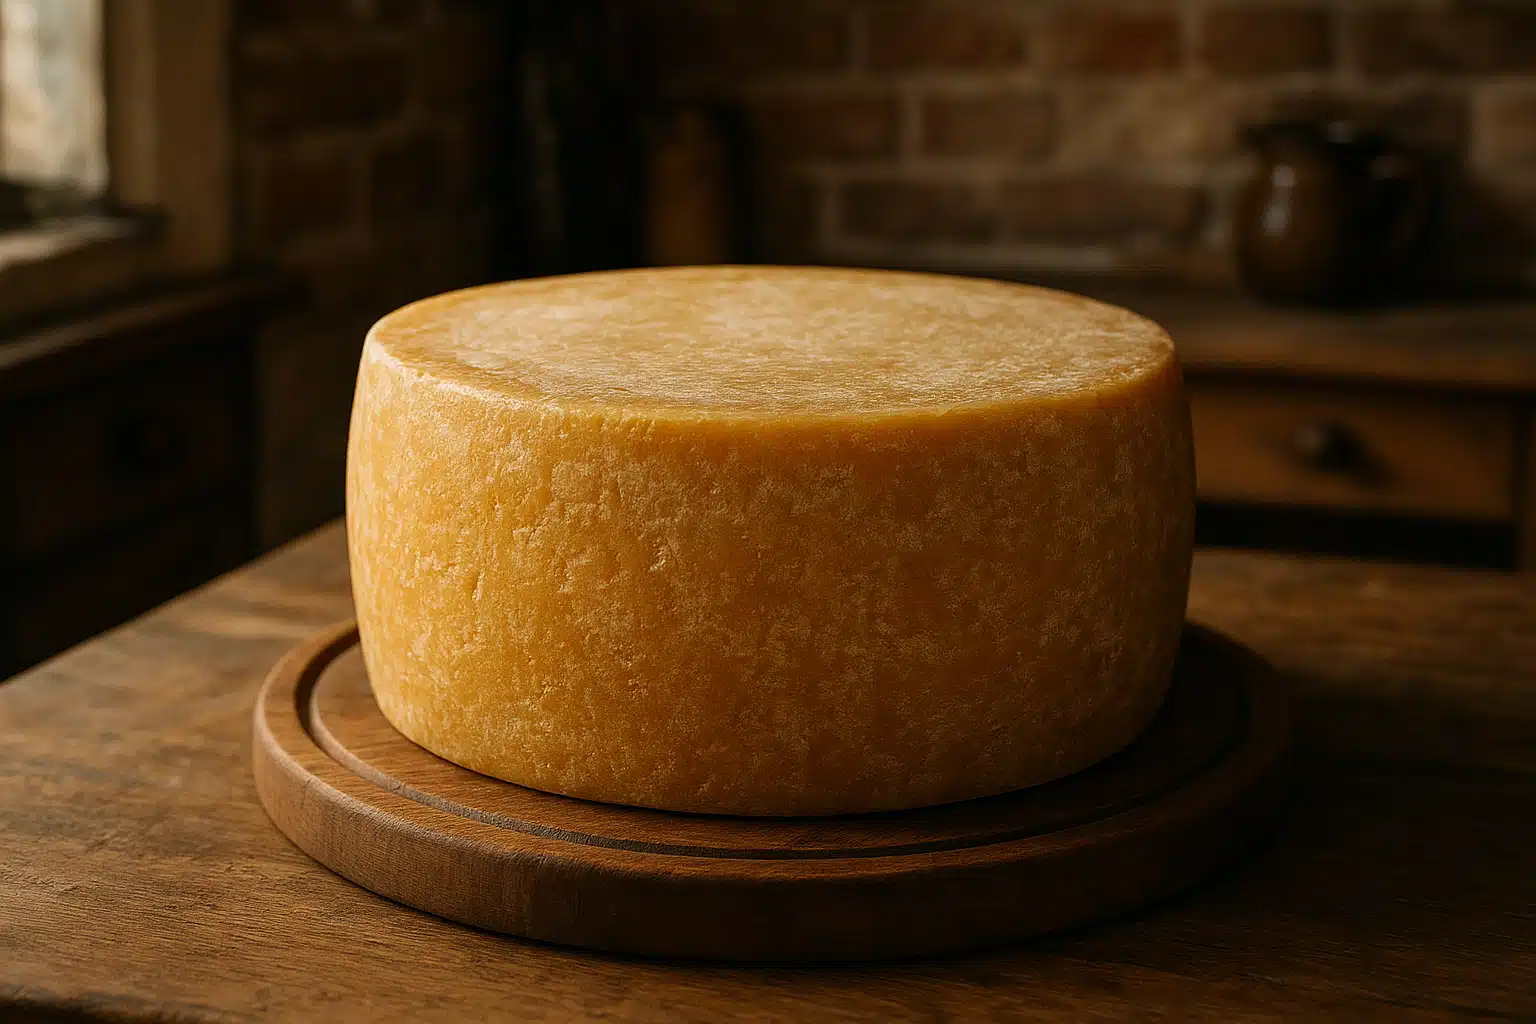
Not all cheeses are suitable for waxing. Hard and semi-hard cheeses such as cheddar, gouda, edam, and similar varieties work best with this preservation method. These cheeses have lower moisture content and benefit most from the protective barrier wax provides. Soft cheeses, fresh cheeses, and very high-moisture varieties are not appropriate candidates for waxing as they require different preservation approaches.
Cheese Wax
Specialized cheese wax is essential for this process. Unlike regular paraffin or other waxes, cheese wax is specifically formulated to be food-safe, flexible, and adhesive to cheese surfaces. It typically consists of a blend of paraffin and microcrystalline wax that remains pliable even when hardened, preventing cracking as the cheese ages and changes slightly in size. Cheese wax is available in various colors, allowing you to choose based on aesthetic preference or to color-code different cheese varieties.
Wax Melting Equipment
You’ll need a reliable method to melt the wax safely and maintain it at the proper temperature. A double boiler is the traditional and safest option, providing gentle, even heat that prevents the wax from overheating or scorching. Alternatively, a dedicated wax melter or electric melting pot designed for craft or cheese-making purposes offers precise temperature control. While a microwave can be used in a pinch, it requires careful attention and frequent stirring to ensure even melting and avoid hot spots.
Application Tools
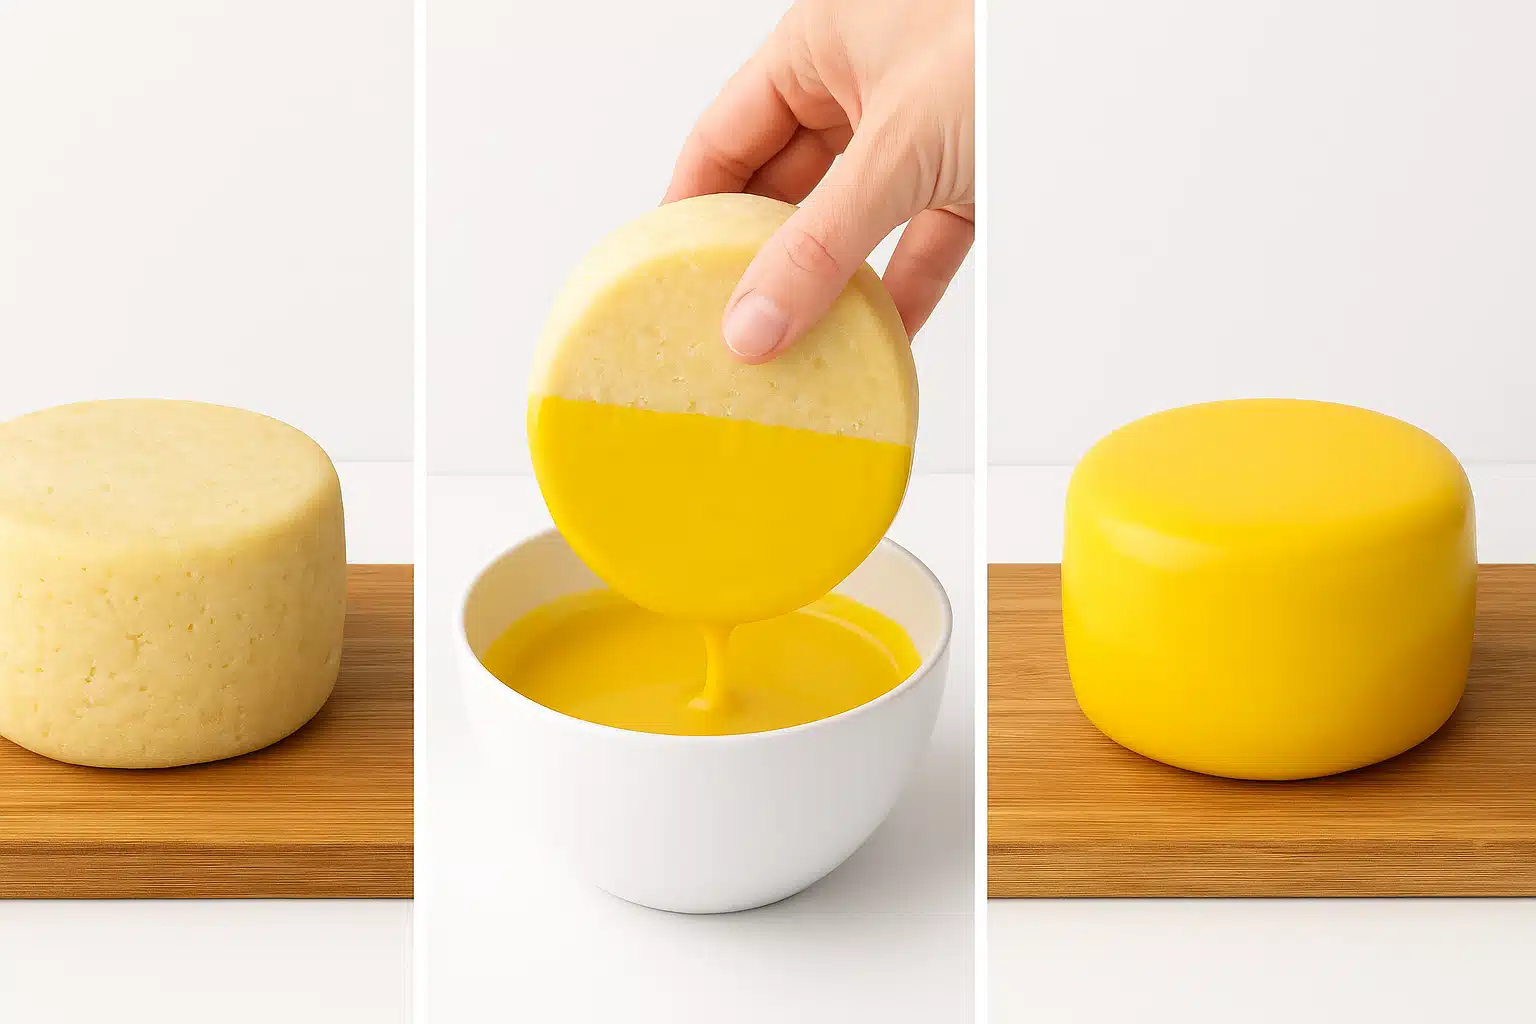
For applying the wax, you’ll need either a natural bristle brush (food-grade silicone brushes also work well) or the option to dip smaller cheese wheels directly into the melted wax. Brushes should be dedicated solely to cheese waxing and cleaned immediately after use while the wax is still warm. Having multiple brushes allows you to continue working while one cools and can be cleaned.
Workspace Protection
Protect your work surface with parchment paper, silicone mats, or disposable coverings. Wax can be difficult to remove from surfaces once hardened, so adequate protection saves cleanup time and prevents damage to countertops or tables.

Detailed Step-by-Step Waxing Process
Follow these comprehensive steps to successfully wax your cheese wheel. Taking time with each stage ensures optimal coverage and long-term preservation.
Step 1: Prepare Your Workspace
Begin by setting up a clean, organized workspace in a well-ventilated area. Lay down your parchment paper or protective covering on a flat, stable surface. Arrange all your materials within easy reach: the cheese, melted wax, brushes, and any additional tools. Ensure there are no drafts that might cause the wax to cool too quickly or unevenly. Good lighting is essential for seeing coverage clearly and avoiding missed spots.
Step 2: Melt the Cheese Wax Properly
Place your cheese wax in the double boiler or melting pot and heat it gently over medium-low heat. The ideal temperature for cheese wax is typically between 110-130°C (230-266°F), though specific products may have different recommendations—always check the manufacturer’s instructions. Stir occasionally as the wax melts to ensure even consistency. The wax should be completely liquid and smooth, without any solid chunks remaining. Avoid overheating, as excessively hot wax can damage the cheese surface or create an uneven coating.
Step 3: Prepare the Cheese Wheel
Ensure your cheese wheel is at the proper temperature and condition for waxing. The cheese should be cool (room temperature or slightly below) and completely dry on the surface. If the cheese has been refrigerated, allow it to come to a moderate temperature first—waxing cold cheese can cause the wax to harden too quickly and not adhere properly. Gently wipe the cheese with a clean, dry cloth to remove any moisture, oil, or debris. If your cheese has a natural rind that you wish to preserve, ensure it’s firm and dry. For cheeses without rinds, the surface should be smooth and even.
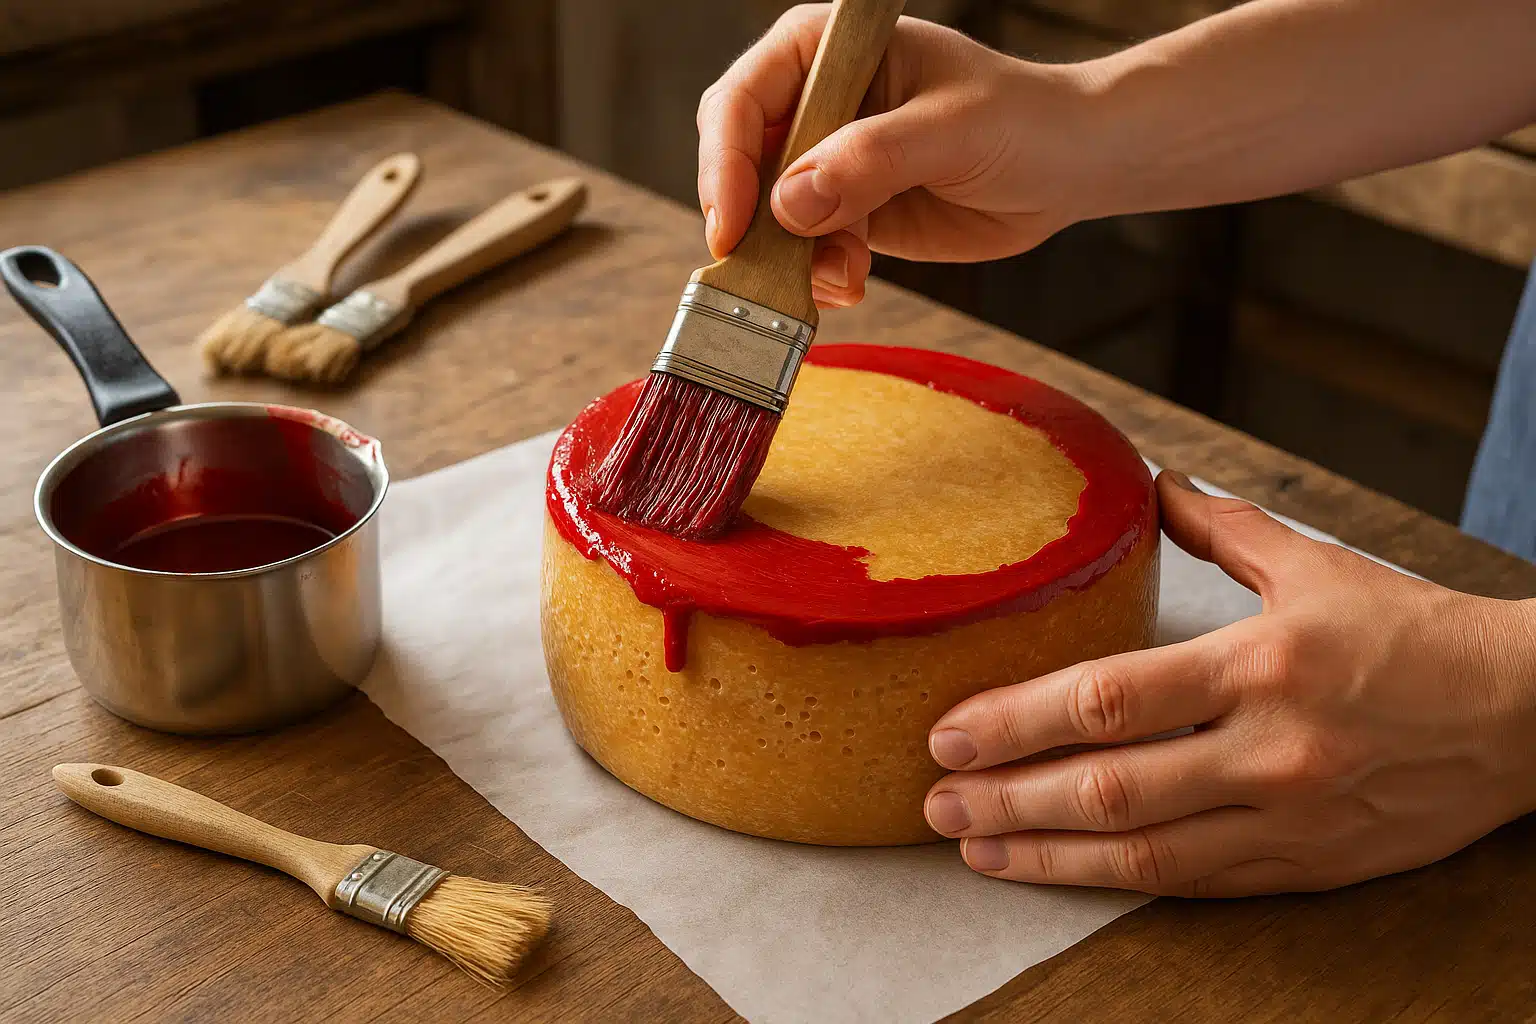
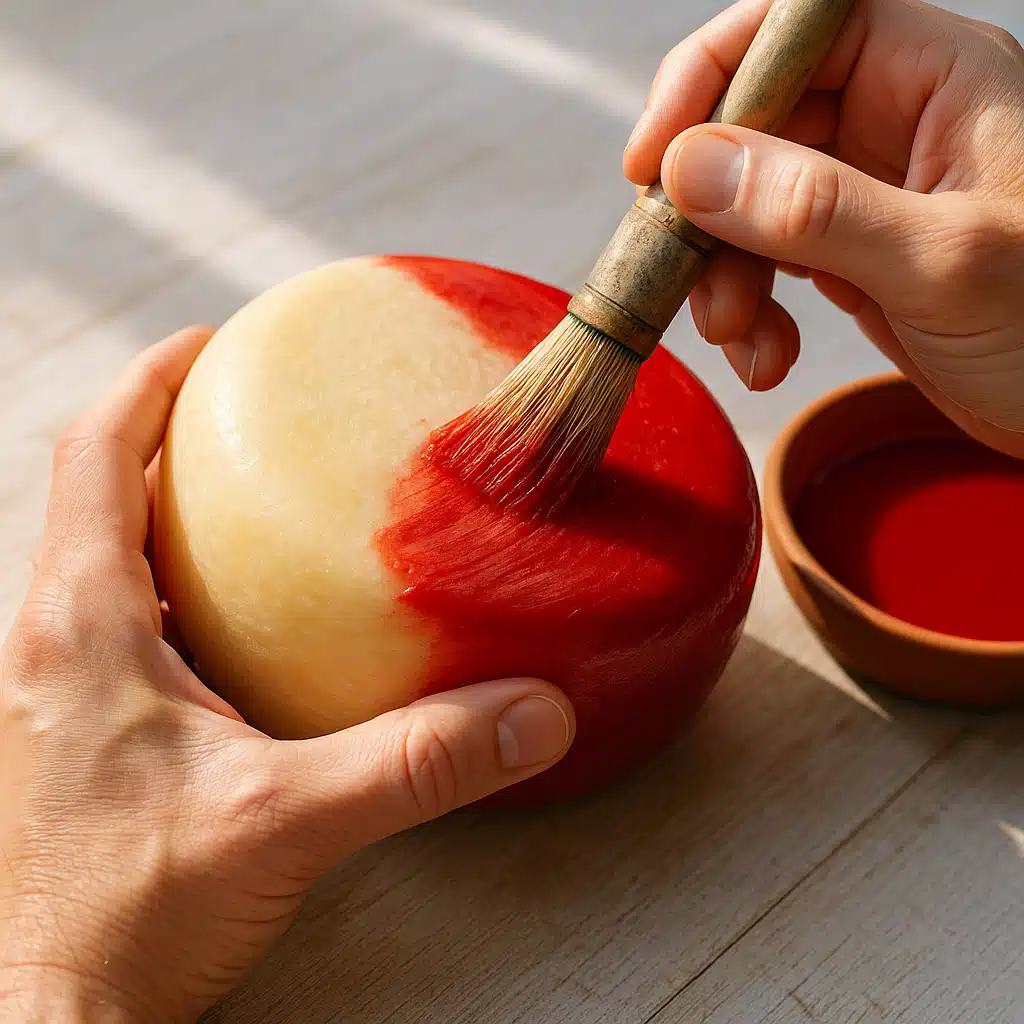
Step 4: Apply the First Wax Layer
Begin applying wax to your cheese wheel using smooth, even strokes with your brush, or by carefully dipping the cheese if it’s small enough. Start with one of the flat sides (top or bottom), coating it completely before moving to the sides. Work methodically around the wheel, maintaining even coverage without leaving thick puddles or thin, transparent areas. The first coat should be thin but complete, with no gaps in coverage. Pay special attention to the edges where the flat surface meets the curved side, as these areas are prone to cracking if not properly sealed.
Step 5: Allow Proper Drying Time
After applying the first layer, allow the wax to cool and harden completely before adding subsequent layers. This typically takes 5-15 minutes depending on room temperature and wax thickness. The wax should feel firm to a light touch and appear matte rather than glossy when ready. Rushing this step can result in layers mixing together or the brush pulling up the previous layer during application.
Step 6: Build Up Multiple Protective Layers
Repeat the application process for a total of two to four layers, depending on how long you plan to age the cheese and your storage conditions. Each additional layer strengthens the protective barrier and helps ensure there are no microscopic gaps where air or moisture could penetrate. Allow each layer to dry completely before applying the next. For long-term aging (six months or more), three to four layers provide optimal protection. The final layer should be smooth and even, with a uniform appearance across the entire cheese wheel.
Step 7: Final Inspection and Touch-Ups
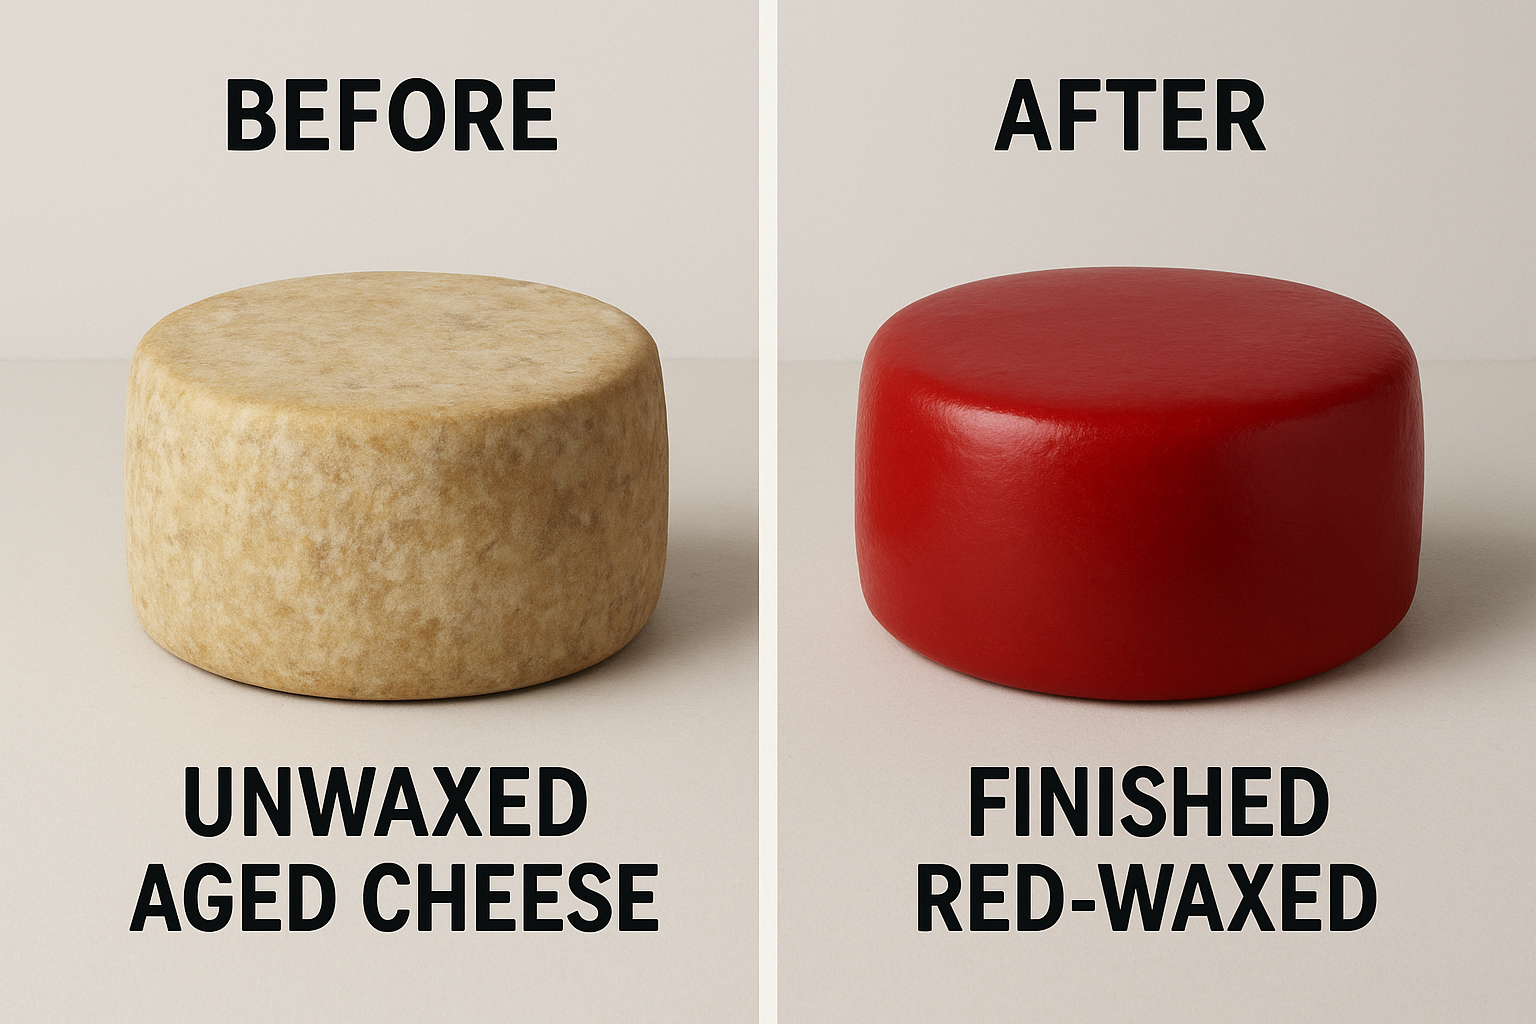
Once all layers have been applied and dried, carefully inspect the entire cheese wheel for any thin spots, gaps, or areas where the cheese might be visible through the wax. Hold the cheese up to a light source if necessary to identify any weak spots. Apply additional wax to any areas that need reinforcement. A properly waxed cheese should have a uniform, opaque coating with no visible cheese showing through.
Step 8: Proper Storage of Waxed Cheese
After the final layer has completely hardened (allow at least 24 hours for full curing), your cheese is ready for storage. Place the waxed cheese in a cool, dark environment with stable temperature and moderate humidity. Ideal storage conditions are typically 10-13°C (50-55°F) with 80-85% relative humidity, though specific requirements vary by cheese type. A dedicated cheese cave, wine cellar, or even a well-regulated refrigerator can work. Turn the cheese occasionally (every week or two) to ensure even aging. Check periodically for any cracks in the wax or signs of mold, addressing issues promptly if they arise.

Common Questions and Troubleshooting
As you develop your cheese waxing skills, you may encounter various questions or challenges. Here are solutions to the most common issues faced by both beginners and experienced cheese enthusiasts.
Can I Use Regular Paraffin or Other Waxes?
It’s essential to use wax specifically formulated for cheese. While pure paraffin wax is food-safe, it tends to be too brittle for cheese applications and may crack as the cheese ages and changes slightly in size. Cheese wax contains additives that keep it flexible and ensure proper adhesion to the cheese surface. Other waxes, such as beeswax or candle wax, may contain fragrances, dyes, or other additives not intended for food contact and should be avoided.
Why Is My Cheese Sweating Under the Wax?
Moisture appearing between the cheese and wax typically indicates that the cheese was too warm or not sufficiently dry when waxed. Cheese naturally contains moisture that can be released if the internal temperature is too high during waxing. To prevent this, ensure the cheese is cool and completely dry before applying wax. If sweating occurs, you may need to remove the wax, allow the cheese to dry thoroughly, and reapply fresh wax. Additionally, ensure your storage environment isn’t too warm, as temperature fluctuations can cause condensation.
How Long Can I Store Waxed Cheese?
Storage duration depends on the cheese variety, waxing quality, and storage conditions. Hard cheeses like aged cheddar or gouda can be stored for six months to several years when properly waxed and kept in ideal conditions. Semi-hard cheeses typically last three to six months. Always inspect waxed cheese regularly for signs of spoilage, including off odors, visible mold, unusual texture changes, or wax degradation. When in doubt, err on the side of caution and dispose of questionable cheese.
What If the Wax Cracks During Storage?
Small cracks can develop due to temperature fluctuations, rough handling, or if the cheese changes size during aging. Minor cracks should be repaired promptly by remelting wax and brushing it over the damaged area, extending slightly beyond the crack on all sides. For larger cracks or if mold has begun growing in the crack, you may need to remove the wax from that section, cut away any affected cheese, and rewax the area. This is why regular inspection of stored cheese is important.
Is Wax Safe to Eat?
Cheese wax is food-safe but not intended to be consumed. Before eating your cheese, you should remove and discard the wax coating. It can be cut away with a knife or peeled off in sections. While accidentally ingesting small amounts won’t cause harm, the wax doesn’t digest and provides no nutritional value. Some people save and clean used cheese wax to remelt and reuse for future cheese waxing projects.
Can I Wax Cheese That Already Has a Natural Rind?
Yes, many cheeses are waxed over their natural rinds. Ensure the rind is completely dry and firm before waxing. The wax will seal and preserve the rind along with the cheese. Some artisan cheesemakers intentionally develop rinds before waxing to add complexity to the aging process and final flavor profile.
Why Isn’t the Wax Sticking to My Cheese?
Poor wax adhesion usually results from one of several issues: the cheese surface may be oily or moist, the wax may be too cool and beginning to solidify before reaching the cheese, or the cheese itself might be too cold. Ensure the cheese is dry and at room temperature, and maintain the wax at the proper temperature throughout the application process. Wiping the cheese with a clean cloth or very lightly with vinegar (then drying completely) can help with particularly oily cheese surfaces.
Advanced Tips for Perfect Results
Once you’ve mastered the basics, these advanced techniques will help you achieve professional-quality results and troubleshoot specific situations.
Temperature Management
Maintaining consistent wax temperature throughout the process is crucial. Wax that’s too hot can penetrate too deeply into the cheese or cause surface damage, while wax that’s too cool will be thick and difficult to apply evenly. Consider using a thermometer to monitor wax temperature, especially when working with larger batches. If the wax begins to thicken during application, reheat it gently before continuing.
Color Coding Your Collection
If you’re waxing multiple cheese varieties, using different colored waxes helps identify them without unwrapping. Develop a personal color system—for example, red for sharp varieties, yellow for mild, black for aged cheeses. Keep a written record of your color codes and the dates each cheese was waxed for easy reference.
Dealing with Irregular Shapes
While traditional wheels are easiest to wax, irregularly shaped cheeses require extra attention. For cheeses with corners or irregular surfaces, use smaller brushes to reach crevices and ensure complete coverage. Multiple thin layers work better than attempting to fill gaps with thick applications. Consider rotating the cheese between layers to approach difficult areas from different angles.
Creating a Personalized Touch
For gift-giving or personal satisfaction, you can add labels or decorative elements to waxed cheese. Apply printed labels or create embossed designs in the final wax layer while it’s still slightly warm. Some enthusiasts use stamps or stencils to add dates, cheese varieties, or decorative patterns. Ensure any added elements are food-safe if they’ll be in contact with the cheese.
Environmental and Safety Considerations
Working with melted wax requires attention to safety and proper handling to prevent accidents and ensure food safety.
Fire Safety
Never heat wax over direct high heat or leave it unattended on the stove. Wax is flammable at high temperatures. Always use a double boiler or dedicated melting pot with temperature control. Keep a lid nearby to smother any flames if wax were to ignite. Never use water to extinguish burning wax, as this can cause dangerous splashing and spread the fire.
Proper Ventilation
While cheese wax is generally low-odor, melting any wax produces vapors that should not be inhaled in concentration. Work in a well-ventilated area with windows open or exhaust fans running. This is particularly important if you’re waxing multiple cheeses in one session.
Cleanup and Disposal
Clean brushes and tools while wax is still warm by wiping with paper towels, then washing with very hot water and dish soap. Hardened wax can be more challenging to remove. Never pour liquid wax down drains, as it will solidify and cause clogs. Instead, allow waste wax to harden in a disposable container before discarding in regular trash. Used wax from cheese can be saved, cleaned, remelted, and reused for future projects.
Conclusion: Preserving Tradition and Flavor
Waxing cheese is a rewarding practice that connects modern enthusiasts with traditional food preservation methods used for generations. By creating a protective barrier around your cheese, you’re not only extending its shelf life but also controlling its aging environment to develop optimal flavor and texture. Whether you’re preserving homemade cheese, protecting purchased wheels for long-term storage, or creating thoughtful handcrafted gifts, the skills outlined in this guide will serve you well.
With proper materials, careful technique, and attention to detail, anyone can successfully wax cheese at home. The initial investment in specialized wax and equipment pays dividends through reduced waste, better flavor preservation, and the satisfaction of mastering a traditional craft. As you gain experience, you’ll develop your own preferences and techniques, perhaps eventually experimenting with different cheese varieties, aging times, and wax applications.
Start with a single wheel to practice the process, then expand your efforts as your confidence grows. Soon you’ll have a collection of beautifully preserved cheeses aging gracefully in your storage space, ready to enjoy at their peak or share with appreciative friends and family. The art of cheese waxing opens doors to deeper appreciation of artisan cheese-making and the time-honored traditions of food preservation that continue to enrich our culinary experiences today.