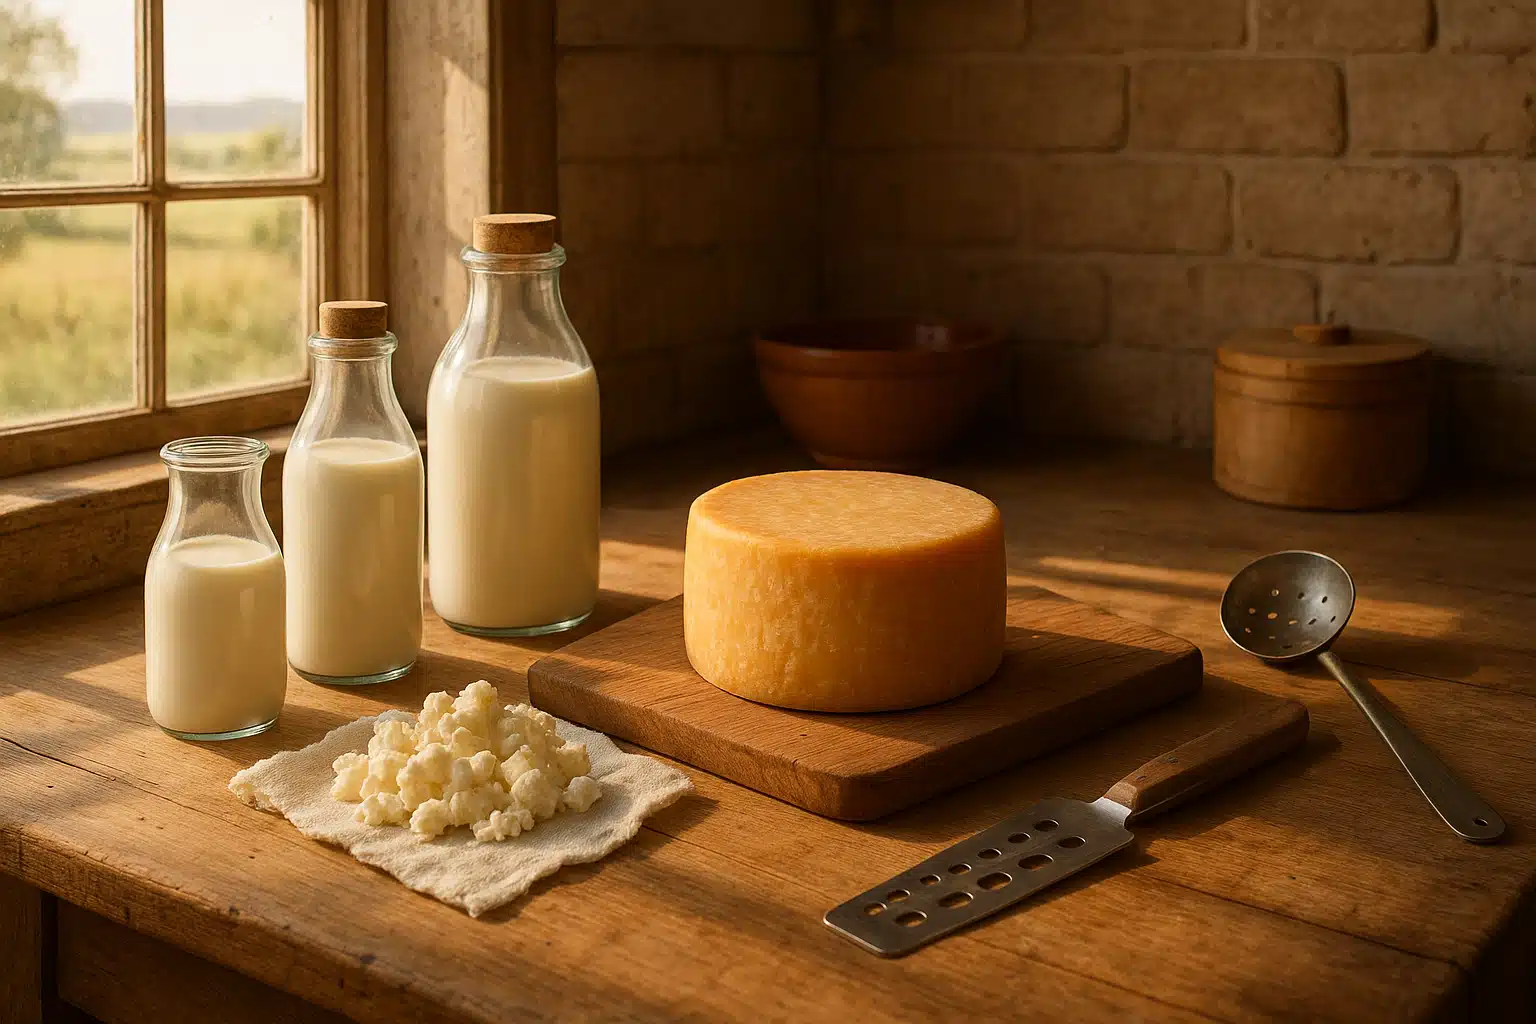
Introduction to Homemade Cheese Making
The art of cheese making has captivated food enthusiasts for centuries, offering a unique blend of science, tradition, and culinary creativity. While many believe that crafting quality cheese requires industrial equipment or professional training, the reality is far more accessible. Homemade cheddar, particularly farmhouse-style varieties, represents an ideal entry point into the world of artisan cheese making. This comprehensive guide will walk you through the entire process, from selecting your ingredients to aging your finished product, empowering you to create exceptional cheese in your own kitchen.
The Benefits of Making Your Own Cheddar Cheese
Creating cheese at home offers numerous advantages that extend beyond simple cost savings. When you make your own cheddar, you gain complete control over every ingredient that goes into your final product. This means you can choose organic milk, adjust salt levels to your preference, and avoid unnecessary additives or preservatives commonly found in commercial varieties.
The educational value of cheese making cannot be overstated. Understanding the transformation of liquid milk into solid cheese through controlled bacterial cultures and enzymatic reactions provides fascinating insights into food science. This knowledge deepens your appreciation for artisan cheese producers and enhances your overall culinary expertise.
Perhaps most importantly, homemade cheese making allows for creative experimentation. Once you master the basic technique, you can develop signature flavors by incorporating herbs, spices, or aging variations. The satisfaction of serving guests cheese you’ve crafted yourself creates memorable experiences and conversation opportunities.
Understanding Farmhouse Cheddar
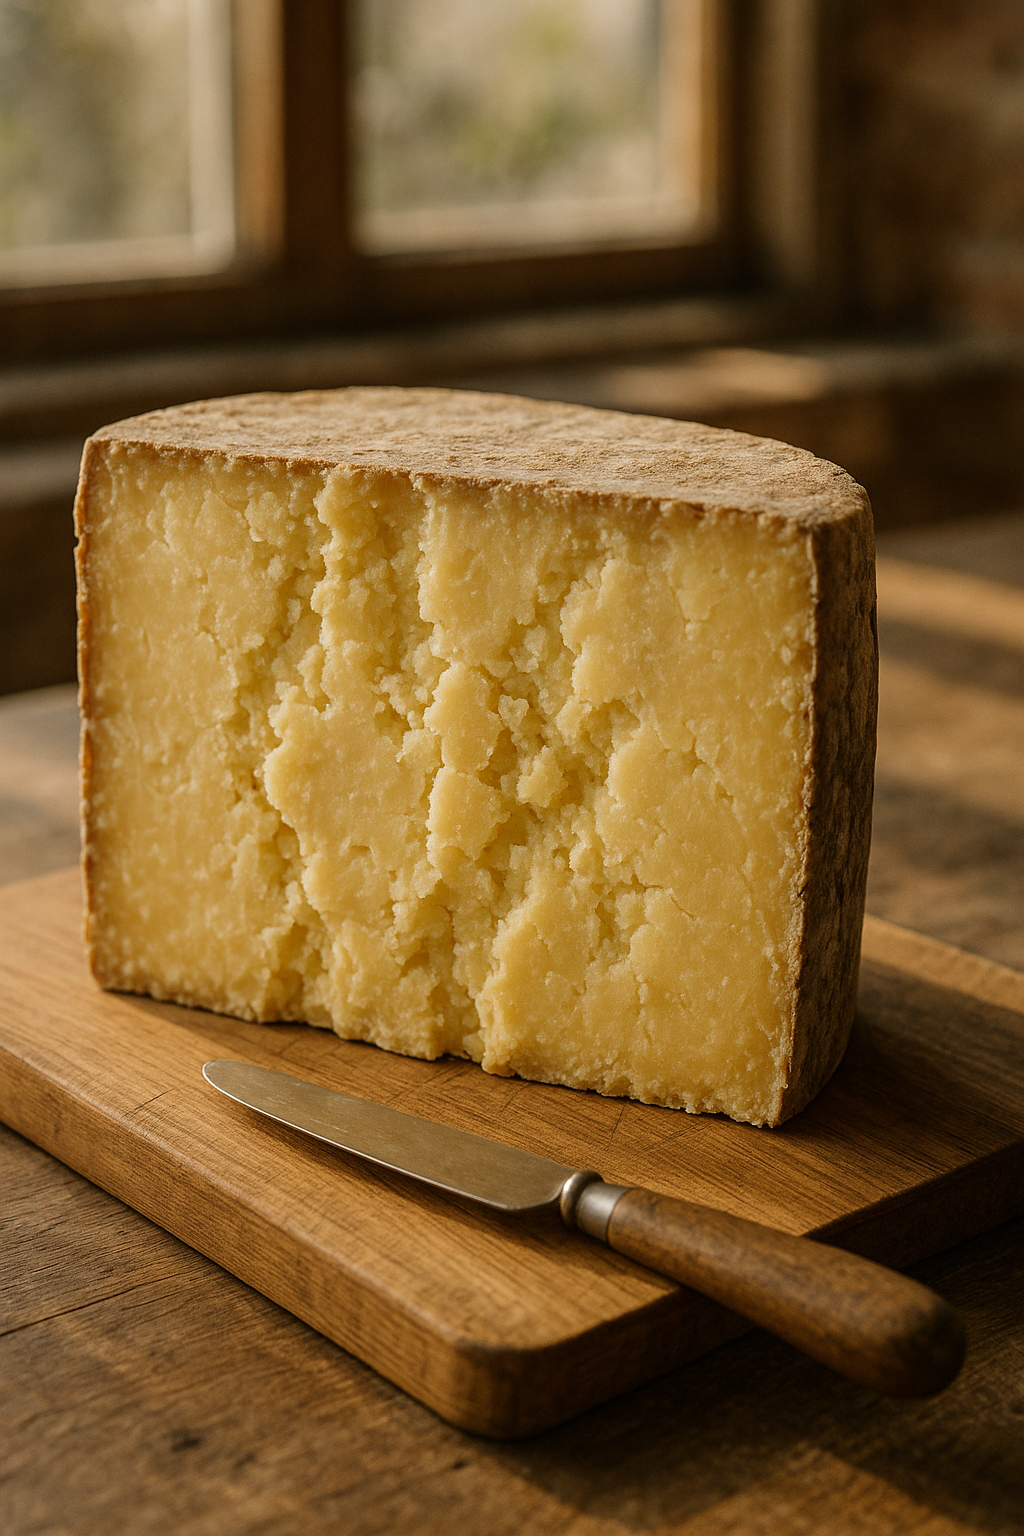
Farmhouse cheddar differs from commercial cheddar in several important ways. Traditional farmhouse methods prioritize simplicity and accessibility, making them perfect for home cheese makers. Unlike factory-produced cheddar that may age for months or years in climate-controlled facilities, farmhouse cheddar can develop excellent flavor in shorter aging periods, sometimes as little as three to four weeks.
The texture of farmhouse cheddar tends to be slightly more crumbly and less uniform than mass-produced varieties, but this characteristic is part of its rustic charm. The flavor profile develops complexity quickly, offering sharp, tangy notes that intensify with age. This accelerated maturation makes farmhouse cheddar ideal for beginners who want to taste results without waiting extended periods.
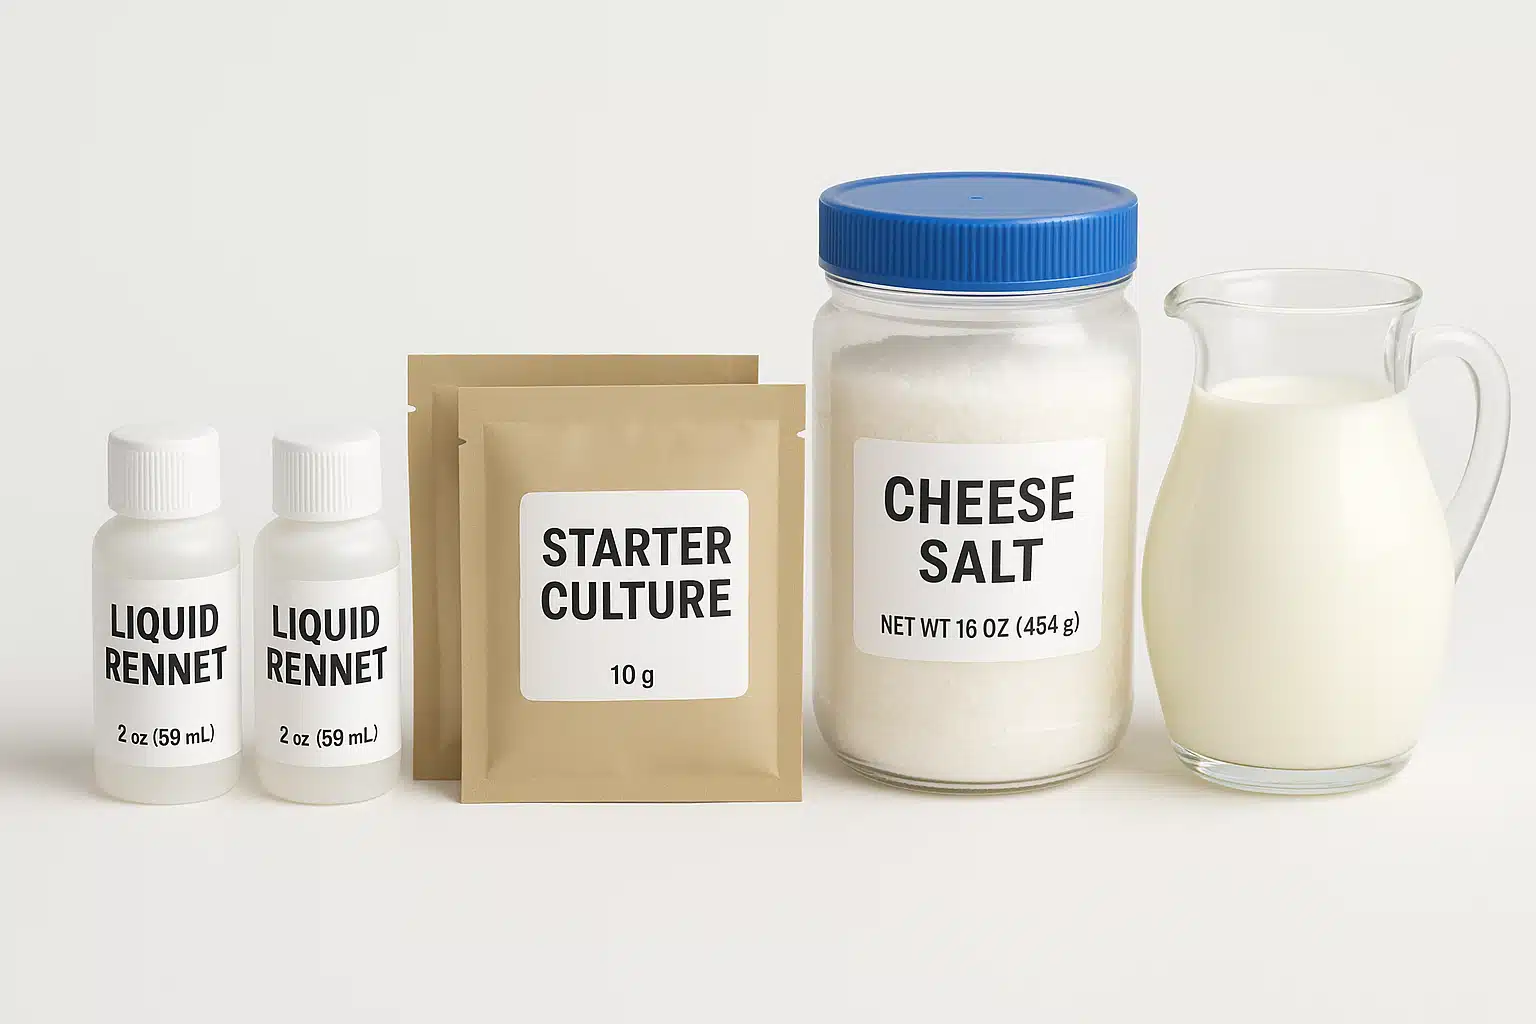
Essential Ingredients for Homemade Cheddar
Success in cheese making begins with quality ingredients. Each component plays a specific role in the transformation process, and understanding these roles helps you make informed choices when sourcing supplies.
Milk Selection
The foundation of any cheese is milk, and quality matters significantly. Whole milk provides the fat content necessary for rich, flavorful cheddar. Approximately 3.8 liters (1 gallon) of milk will yield roughly 450 grams (1 pound) of finished cheese. Avoid ultra-pasteurized milk when possible, as the high-heat treatment can affect protein structure and reduce curd formation. Fresh, pasteurized whole milk from local dairies often produces the best results.
Starter Culture
Mesophilic starter culture contains beneficial bacteria that acidify the milk and contribute to flavor development. These cultures work at moderate temperatures, making them suitable for cheddar production. The bacteria convert lactose (milk sugar) into lactic acid, which lowers the pH and creates the proper environment for curd formation. Approximately 1/4 teaspoon is sufficient for one gallon of milk.
Rennet
Rennet is an enzyme that causes milk proteins to coagulate, forming the solid curd structure. Available in tablet, liquid, or powder form, rennet works most effectively when diluted in cool, non-chlorinated water before addition to milk. A quarter tablet is typically adequate for home cheese making batches. Vegetarian rennet alternatives are available for those avoiding animal-derived enzymes.
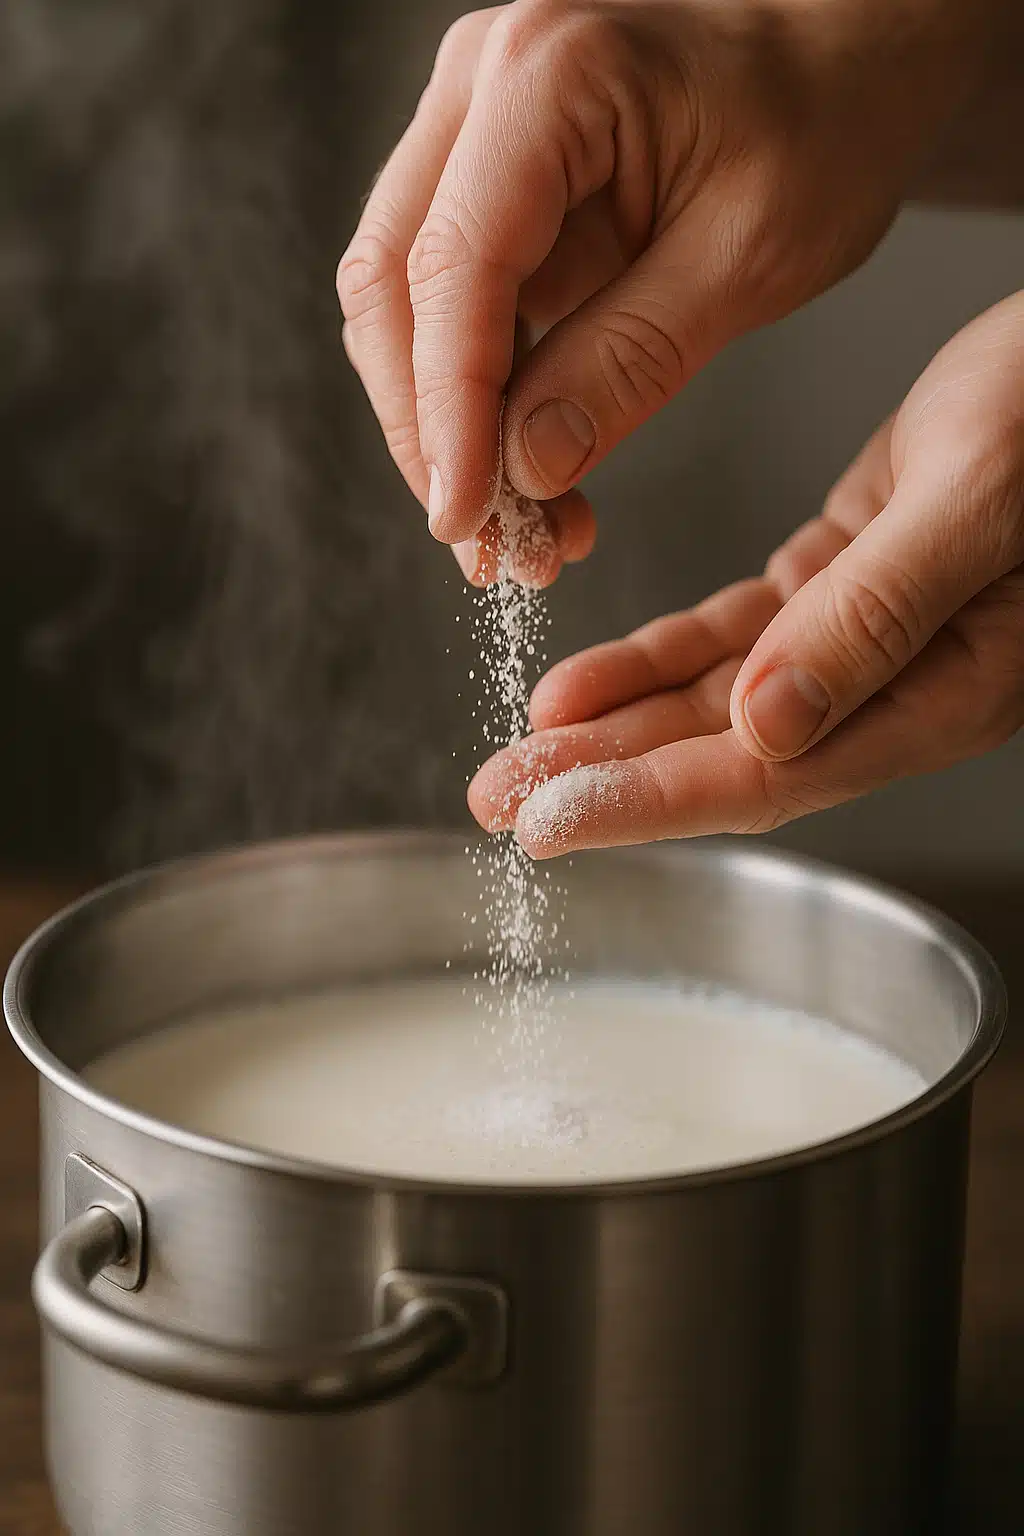
Cheese Salt
Cheese salt, also called flake salt or non-iodized salt, serves multiple purposes. It seasons the cheese, controls moisture content, and inhibits unwanted bacterial growth during aging. Unlike table salt, cheese salt contains no iodine or anti-caking agents that could interfere with bacterial cultures. Use approximately one teaspoon per pound of curd.
Optional Flavor Additions
Once you’ve mastered the basic recipe, consider enhancing your cheddar with complementary ingredients. Dried herbs like thyme or rosemary, cracked black pepper, smoked paprika, or even jalapeño peppers can create unique flavor profiles. Add these during the final mixing stage before pressing.
Equipment and Tools Needed
Before beginning your cheese-making journey, gather the necessary equipment. While specialized tools exist, most items are standard kitchen supplies or affordable purchases.
- Large stainless steel pot: A 6-8 liter (6-8 quart) pot with heavy bottom for even heat distribution
- Accurate thermometer: Digital or analog thermometer reading between 20-100°C (68-212°F)
- Long knife: For cutting curds, a blade at least 25cm (10 inches) long
- Slotted spoon or skimmer: For stirring curds gently
- Cheesecloth: Fine-weave cloth for draining whey
- Colander: Large enough to hold all curds
- Cheese mold: Cylindrical mold with drainage holes, approximately 450g (1 pound) capacity
- Cheese press: Can be purchased or improvised using weights and plates
- Measuring spoons: For accurate culture and salt measurement
Detailed Step-by-Step Cheese Making Process
Follow this comprehensive guide to create your first batch of farmhouse cheddar. Take your time with each step, as patience and attention to detail significantly impact the final product.
Step 1: Sanitization and Preparation
Before touching any ingredients, thoroughly sanitize all equipment and work surfaces. Use a solution of one tablespoon bleach per gallon of water, or a commercial food-safe sanitizer. Rinse everything with hot water and allow to air dry. Proper sanitation prevents contamination that could spoil your cheese or produce off-flavors.
Step 2: Heating the Milk
Pour your milk into the large pot and place over medium-low heat. Warm the milk slowly to 29-30°C (85-86°F), stirring occasionally to ensure even heating. Use your thermometer frequently to monitor temperature. Avoid rapid heating, which can cause scorching at the bottom of the pot. This gentle warming typically takes 10-15 minutes.
Step 3: Adding Starter Culture
Once the milk reaches target temperature, remove from heat. Sprinkle the mesophilic starter culture evenly across the milk surface. Let it sit undisturbed for 2 minutes to rehydrate, then stir gently using up-and-down motions for 20 strokes. Cover the pot and maintain the temperature for 45-60 minutes, allowing the culture to ripen the milk. The milk will develop a slightly tangy aroma as acidification occurs.
Step 4: Adding Rennet
Dilute your rennet according to package directions, typically crushing 1/4 tablet in 60ml (1/4 cup) of cool, non-chlorinated water. Add the rennet solution to the ripened milk, stirring gently with up-and-down motions for one minute. Stop all movement and cover the pot. Allow the milk to sit completely undisturbed for 30-45 minutes at the same temperature. During this period, the rennet causes proteins to coagulate, forming a gel-like mass.
Step 5: Testing the Curd
After the resting period, test for a “clean break.” Insert a clean finger or knife at an angle into the curd, then lift gently. If the curd breaks cleanly with smooth edges and clear whey fills the gap, coagulation is complete. If the break is soft or milky, allow 10-15 more minutes of setting time.
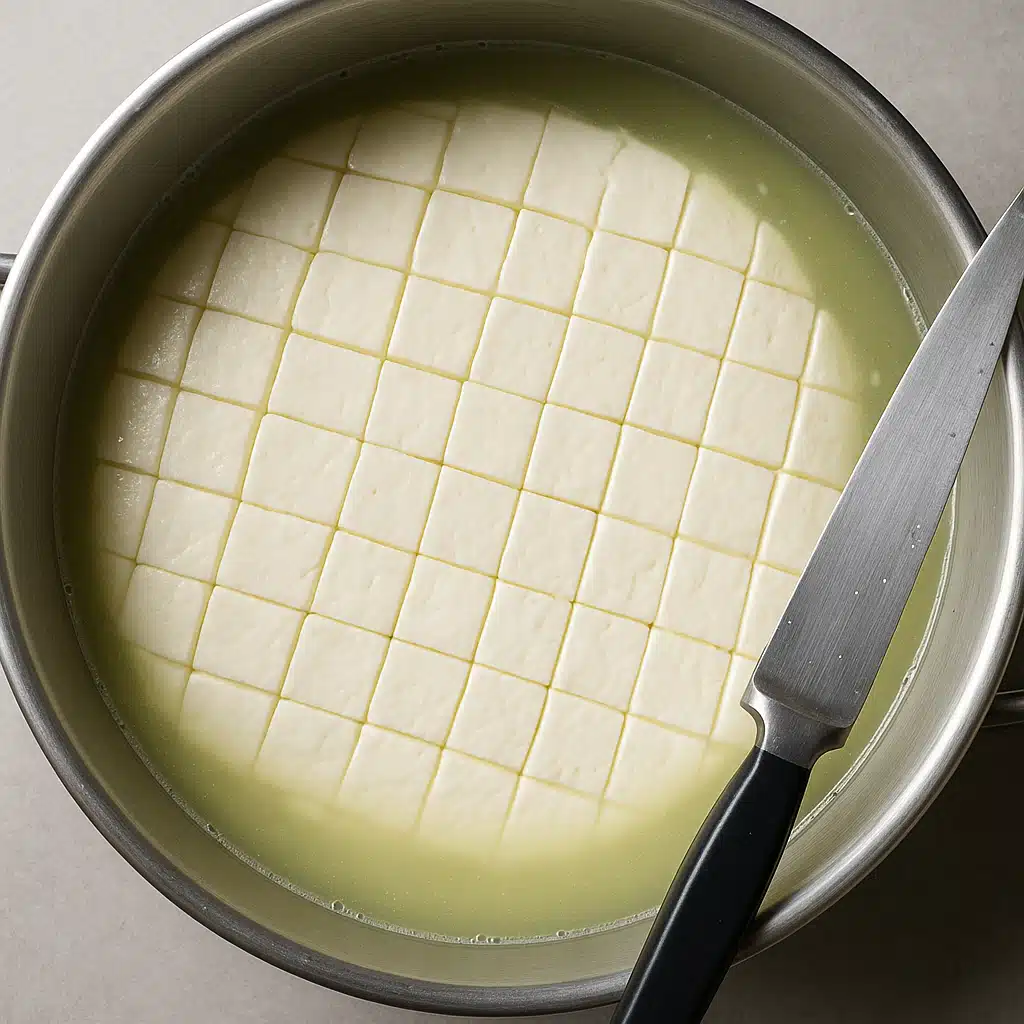
Step 6: Cutting the Curd
Using your long knife, cut the curd into 1.5cm (1/2 inch) cubes. Make parallel cuts across the pot in one direction, then perpendicular cuts, creating a grid pattern. Finally, angle the knife to cut horizontally through the curd mass. These cuts increase surface area, allowing whey to separate from the curds. Let the cut curds rest for 5 minutes.
Step 7: Cooking the Curds
Return the pot to low heat and slowly raise the temperature to 38-39°C (100-102°F) over 30 minutes. Stir gently every few minutes to prevent curds from matting together. This gradual heating firms the curds by expelling additional whey. The curds will shrink noticeably and become firmer to touch. Maintain this temperature for another 30 minutes while continuing gentle stirring.
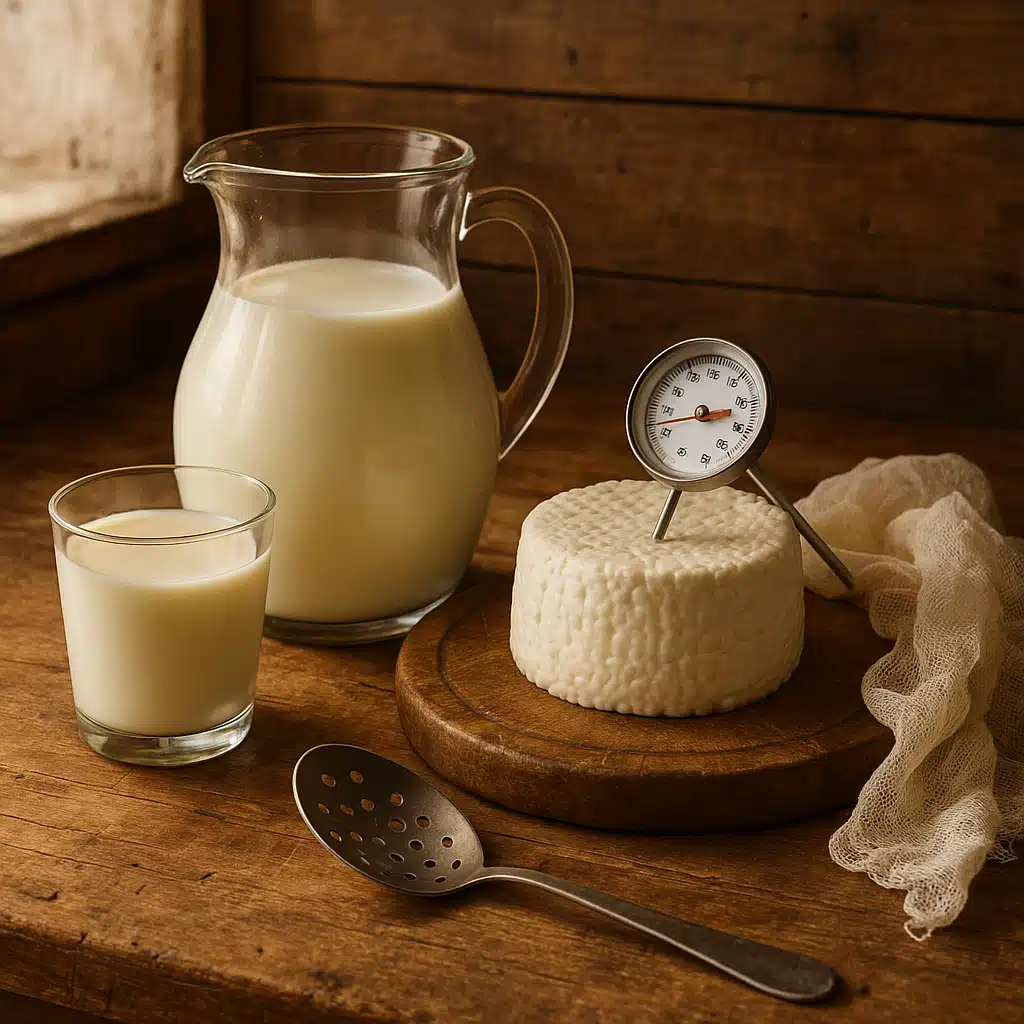
Step 8: Draining the Whey
Line your colander with cheesecloth and place it over a large bowl to catch the whey (which can be saved for other culinary uses). Pour the curds and whey into the lined colander, allowing the liquid to drain for 5 minutes. The curds should form a cohesive mass. Reserve some whey for later use if the curds need moisture adjustment.
Step 9: Cheddaring (Optional Traditional Method)
For a more traditional approach, you can perform the cheddaring process. Cut the drained curd mass into slabs approximately 2.5cm (1 inch) thick. Stack these slabs in the colander, flip the stack every 15 minutes for an hour, keeping them warm. This process further expels whey and creates the characteristic texture. For simplified farmhouse cheddar, this step can be shortened or skipped.
Step 10: Milling and Salting
Break the curd into small, finger-sized pieces. Sprinkle the cheese salt evenly over the curds and mix gently but thoroughly. The salt will dissolve slightly and coat each piece. If adding herbs or spices, incorporate them at this stage. Let the salted curds rest for 5 minutes to allow salt absorption.
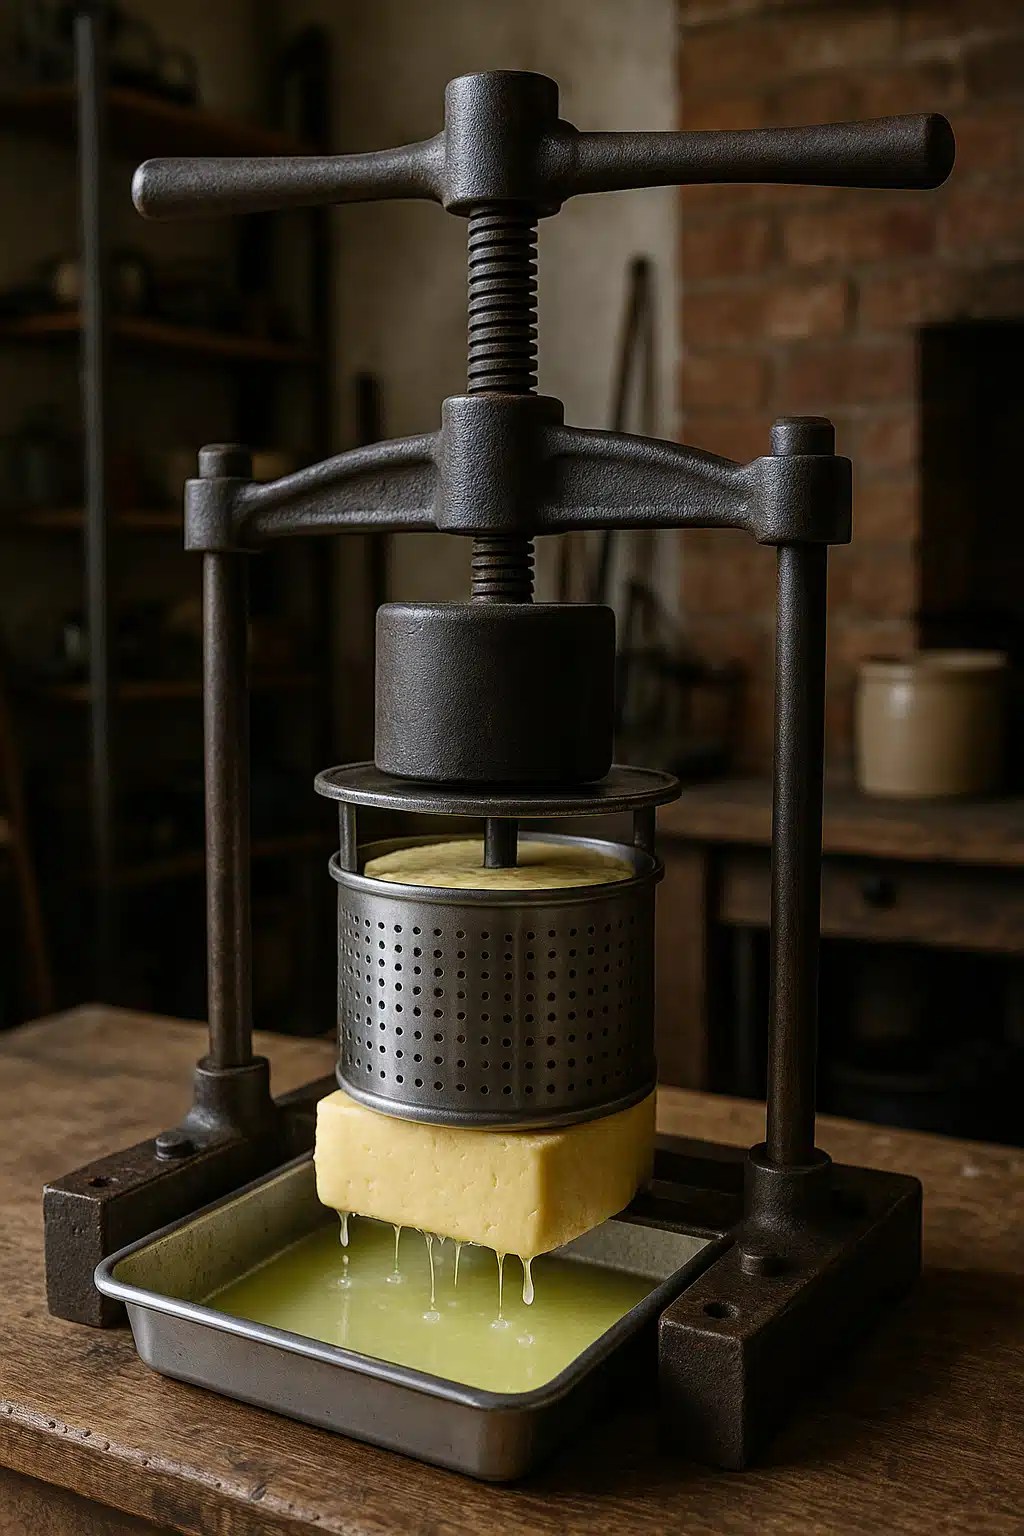
Step 11: Pressing the Cheese
Pack the salted curds firmly into your cheese mold, eliminating air pockets. Place the follower (the disk that fits inside the mold) on top and apply pressure. Begin with approximately 2.5kg (5 pounds) of weight for 15 minutes. Remove the cheese, unwrap it, flip it over, rewrap in fresh cheesecloth, and press again with 5kg (10 pounds) for 12 hours. This pressing expels remaining whey and bonds the curds into a solid wheel.
Step 12: Air Drying
After pressing, remove the cheese from the mold and unwrap the cheesecloth. Place the cheese on a clean mat or board in a cool location with good air circulation. Allow the surface to air dry for 1-3 days at room temperature, turning twice daily. The exterior should develop a dry rind that will protect the cheese during aging.
Step 13: Waxing or Wrapping
Once the surface is completely dry, protect your cheese from contamination and excessive moisture loss. Apply food-grade cheese wax in 2-3 thin coats, allowing each layer to harden before applying the next. Alternatively, wrap the cheese tightly in cheese paper or vacuum-seal it. Waxing allows the cheese to breathe slightly while protecting it, resulting in better flavor development.
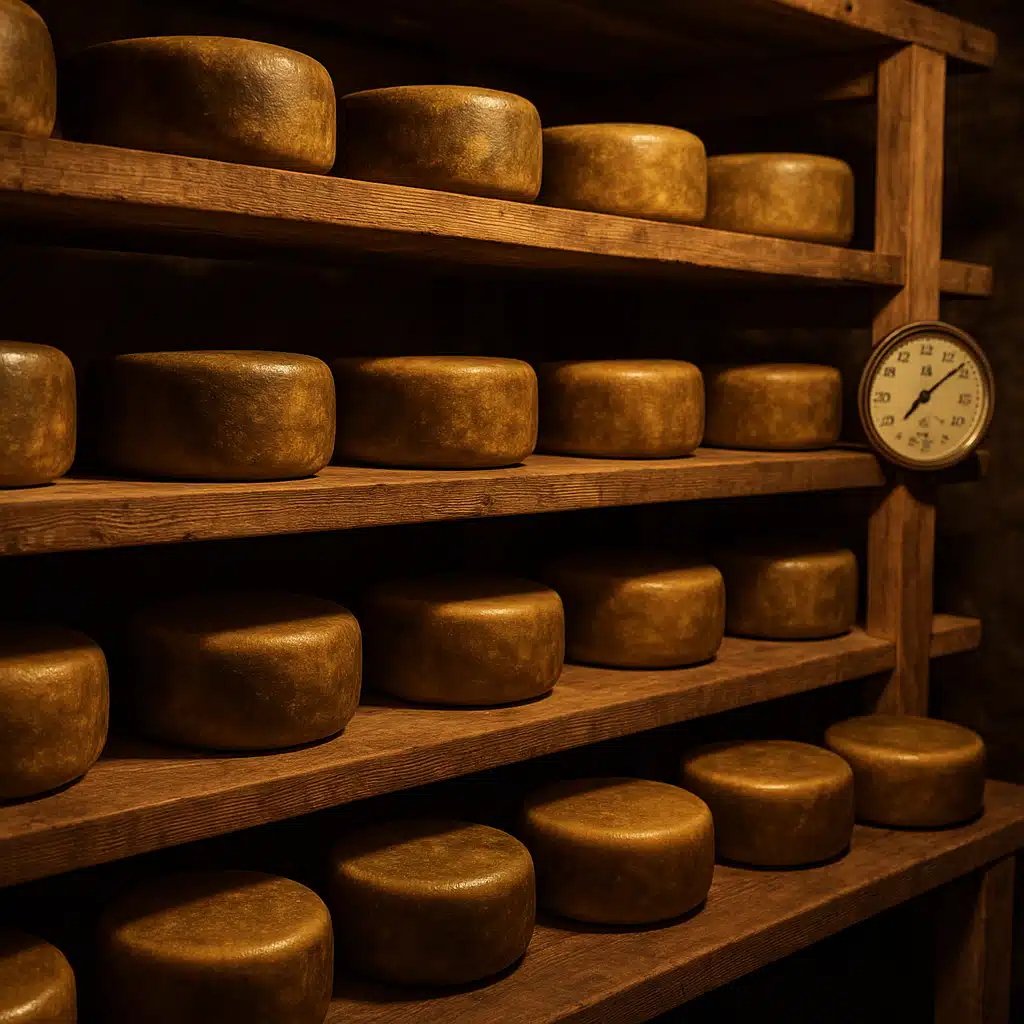
Step 14: Aging Your Cheddar
Store your waxed or wrapped cheese in a cool, dark location with consistent temperature between 10-13°C (50-55°F) and humidity around 80-85%. A dedicated cheese cave, wine refrigerator, or cool basement works well. Age for a minimum of 3-4 weeks for mild cheddar, or up to 3-6 months for sharper flavor. Turn the cheese weekly to ensure even aging.
Understanding the Aging Process
Aging transforms mild, fresh cheese into complex, flavorful cheddar through biochemical changes. During this period, enzymes break down proteins and fats into smaller, more flavorful compounds. This process, called proteolysis and lipolysis respectively, creates the sharp, tangy characteristics associated with aged cheddar.
Moisture content decreases gradually during aging, concentrating flavors and creating firmer texture. The longer cheese ages, the more pronounced these changes become. Young cheddar (3-4 weeks) tastes mild and creamy. Medium cheddar (2-3 months) develops noticeable sharpness. Sharp cheddar (6+ months) exhibits intense, complex flavors with crystalline texture from amino acid concentration.
Temperature and humidity control are critical for successful aging. Too warm, and the cheese may develop off-flavors or unwanted mold. Too cold, and aging slows dramatically. Too dry, and the cheese becomes overly hard. Too humid, and excessive mold growth occurs. Consistent conditions produce the best results.
Common Mistakes and Troubleshooting
Even experienced cheese makers encounter occasional challenges. Understanding common problems helps you identify and correct issues quickly.
Weak Curd Formation
If your milk doesn’t form a firm curd, several factors may be responsible. Ultra-pasteurized milk lacks the protein structure necessary for proper coagulation. Old or improperly stored rennet loses potency over time. Insufficient ripening time prevents proper acidification. Solution: Use fresh pasteurized milk, verify rennet freshness, and allow adequate ripening time before adding rennet.
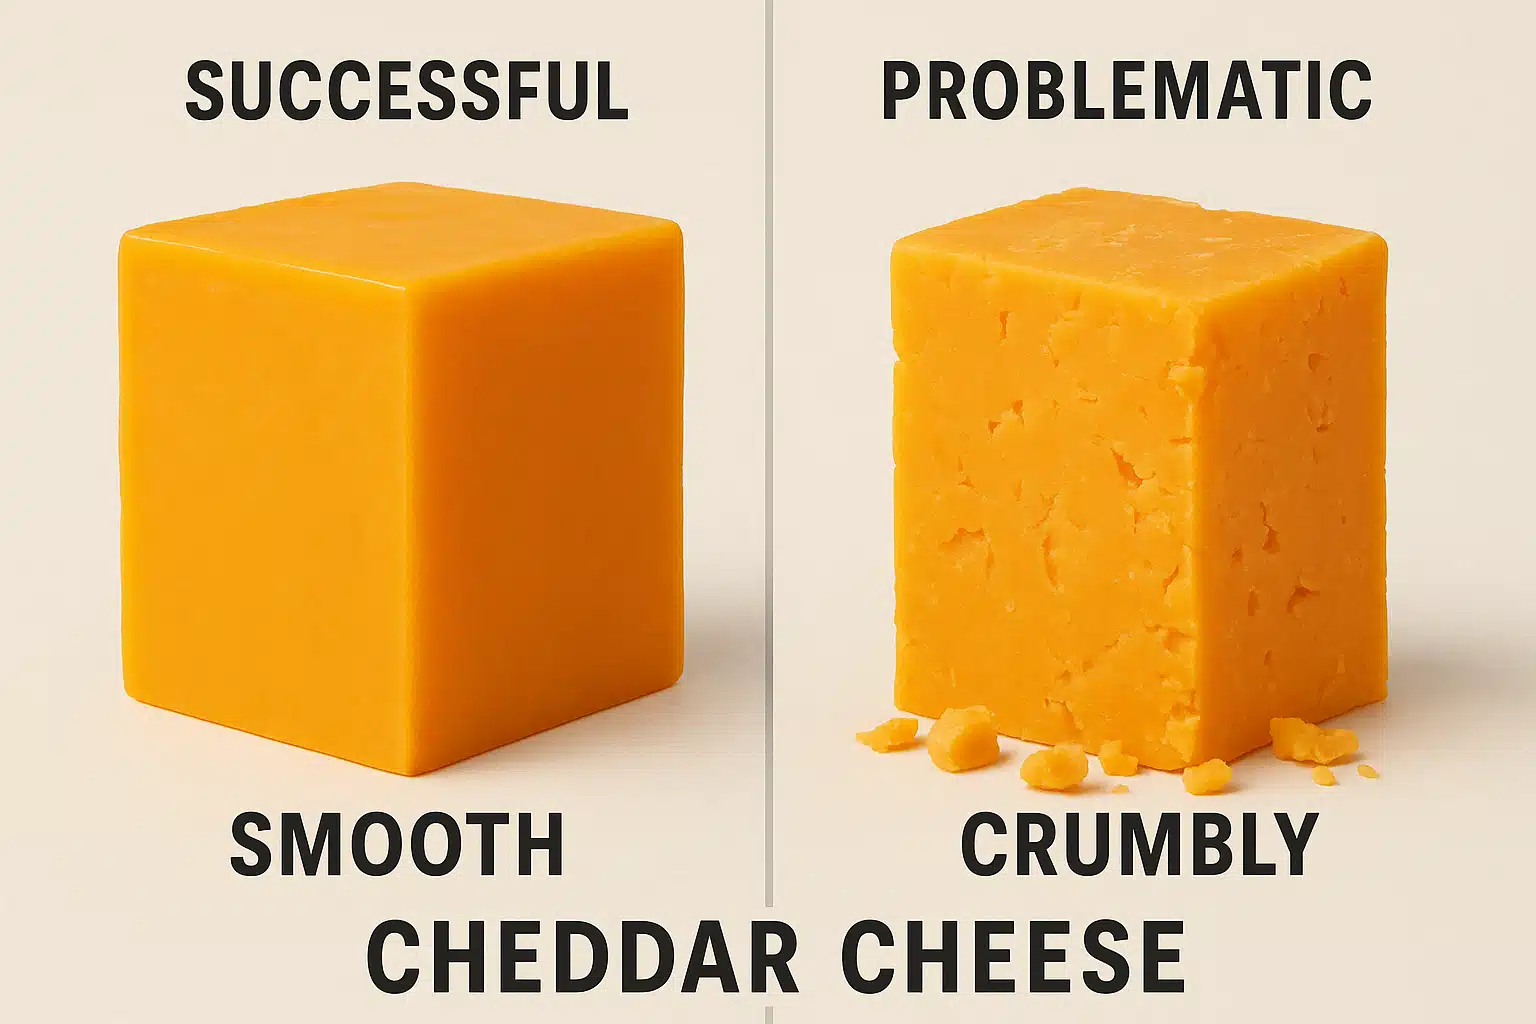
Crumbly or Dry Texture
Overly dry cheese results from excessive whey expulsion or too much pressing weight. Cooking curds too hot or too long drives out excess moisture. Using too much salt also draws out moisture. Solution: Monitor temperatures carefully, press gently initially, and measure salt accurately.
Bitter Flavor
Bitterness typically indicates contamination by unwanted bacteria or excessive protein breakdown. Poor sanitation is the most common cause. Solution: Meticulously clean all equipment, use fresh ingredients, and maintain proper aging temperatures.
Surface Mold
Some mold growth during aging is normal and can be wiped away with cloth dampened in vinegar. Excessive or fuzzy mold indicates humidity problems. Black, pink, or slimy mold suggests serious contamination. Solution: Maintain proper humidity levels, turn cheese regularly, and discard heavily contaminated wheels.
Uneven Texture
Holes or uneven texture stem from trapped air pockets during pressing or gas production by unwanted bacteria. Solution: Pack curds firmly into molds, eliminating air spaces, and ensure proper sanitation.
Variations and Creative Experimentation
Once you’ve mastered basic farmhouse cheddar, endless variations await exploration. Each modification creates unique flavor profiles and textures.
Smoked Cheddar
After initial aging (4-6 weeks), place your unwaxed cheese in a cold smoker for 2-4 hours using fruit wood chips. Re-wax and age for additional weeks. The smoke penetrates the cheese, adding depth and complexity.
Herb and Spice Variations
Mix dried herbs, crushed garlic, cracked peppercorns, or chili flakes into curds during salting. Popular combinations include rosemary and garlic, jalapeño and cilantro, or Mediterranean herb blends.
Colored Cheddar
Traditional orange cheddar gets its color from annatto, a natural food coloring. Add a few drops of liquid annatto or 1/8 teaspoon powder to milk before adding cultures for vibrant color without flavor change.
Sharp Extra-Aged Cheddar
For truly sharp cheddar, age your cheese 9-12 months or longer. Monitor regularly for quality, and maintain consistent storage conditions. The extended aging creates intense, complex flavors prized by cheddar enthusiasts.
Storing and Serving Your Homemade Cheddar
After patiently aging your cheese, proper storage maintains quality until consumption. Waxed cheese can remain at cool temperatures for extended periods. Once cut, wrap exposed surfaces tightly in cheese paper or wax paper, then place in a plastic container. Avoid plastic wrap directly on cheese, as it prevents breathing and can cause off-flavors.
Store opened cheese in the refrigerator’s vegetable drawer, where humidity is slightly higher. Properly stored, cut cheddar remains fresh for 3-4 weeks. Small amounts of white surface mold can be trimmed away; the remaining cheese is safe to eat.
For optimal flavor, remove cheese from refrigeration 30-60 minutes before serving, allowing it to reach room temperature. This warming period enhances aroma and flavor perception. Pair your homemade cheddar with fresh bread, crackers, fruits like apples or pears, and complementary beverages such as wine or craft beer.

The Economics of Homemade Cheese
Understanding the cost-benefit analysis helps justify the time investment in cheese making. Initial equipment purchases represent the primary expense, but these tools last for years with proper care. Per-batch costs primarily involve milk and cultures, which are relatively inexpensive compared to purchasing artisan cheese.
One gallon of milk typically costs less than premium cheese by weight, yet yields comparable quality. The more batches you make, the better the economics become as equipment costs amortize. Beyond financial considerations, the educational value, creative satisfaction, and superior freshness provide intangible benefits that commercial cheese cannot match.
Building Your Cheese Making Skills
Farmhouse cheddar serves as an excellent foundation for expanding your cheese repertoire. The techniques you’ve learned transfer directly to other cheese varieties. Mozzarella, gouda, colby, and monterey jack all share similar processes with variations in temperature, cultures, or aging methods.
Consider keeping a cheese making journal documenting each batch. Record dates, temperatures, ingredient brands, aging duration, and tasting notes. This record helps you replicate successes and troubleshoot problems. Many cheese makers find that subtle adjustments to technique or timing create significant flavor differences.
Join online cheese making communities where enthusiasts share experiences, recipes, and advice. These groups provide valuable support, especially when encountering challenges. Many regions also offer cheese making workshops or classes that provide hands-on instruction and the opportunity to ask questions in real-time.
Sustainability and Using Byproducts
Cheese making generates whey as a byproduct, and this nutritious liquid deserves better than disposal. Whey contains protein, lactose, minerals, and vitamins. Use it in bread baking as a liquid replacement, add it to smoothies for protein boost, feed it to garden plants as fertilizer, or use it in place of water when cooking grains like rice or quinoa.
Some cheese makers use whey to make ricotta cheese through a secondary heating and acid addition process. This maximizes yield from your original milk investment and reduces waste. Sustainability-minded cheese makers appreciate these opportunities to use every component of their raw materials.
Safety Considerations
While cheese making is generally safe, following basic food safety principles ensures quality results without health risks. Always start with pasteurized milk unless you’re experienced with raw milk cheese making, which requires specialized knowledge and aging protocols. Maintain cleanliness throughout the process, sanitizing equipment before each use.
Monitor aging cheese regularly for signs of contamination. Normal aging produces characteristic aromas, but strong ammonia smells, slimy textures, or unusual colors indicate problems. When in doubt, discard questionable cheese rather than risk foodborne illness.
Use non-reactive materials like stainless steel, food-grade plastic, or glass for all equipment that contacts milk or cheese. Avoid aluminum, copper, or cast iron, which can react with acids in cheese and create off-flavors or potentially harmful compounds.
Conclusion: Your Cheese Making Journey Begins
Creating farmhouse cheddar at home represents more than simply producing food—it connects you to ancient traditions while providing modern satisfaction. The process teaches patience, precision, and the rewards of delayed gratification. Each wheel of cheese tells a story of careful attention, thoughtful ingredient selection, and time’s transformative power.
Your first batch may not achieve perfection, but it will teach valuable lessons. Each subsequent attempt builds skills and confidence. Before long, you’ll develop intuition for how curds should feel, what proper consistency looks like, and how to adjust techniques for optimal results.
The cheese you create will surpass commercial varieties in freshness and personal significance. Sharing homemade cheese with family and friends creates memorable experiences and often inspires others to begin their own cheese making adventures. Welcome to the rewarding world of artisan cheese making—your journey has just begun.
