What is Labneh and Why You Should Try Making It at Home
Labneh is a creamy, tangy strained yogurt cheese that has been enjoyed for centuries across Mediterranean and Middle Eastern regions, and is now gaining popularity worldwide. This versatile dairy product offers a unique combination of rich flavor, smooth texture, and impressive nutritional benefits. What makes labneh especially appealing is how simple it is to prepare at home with minimal ingredients and equipment. Whether you’re looking to expand your culinary skills, explore new flavors, or add a healthier dairy option to your diet, labneh is an excellent choice. In this comprehensive guide, we’ll walk you through everything you need to know about making labneh at home, from understanding what it is to mastering the straining technique and discovering creative ways to enjoy it.

Understanding Labneh: The Yogurt Cheese
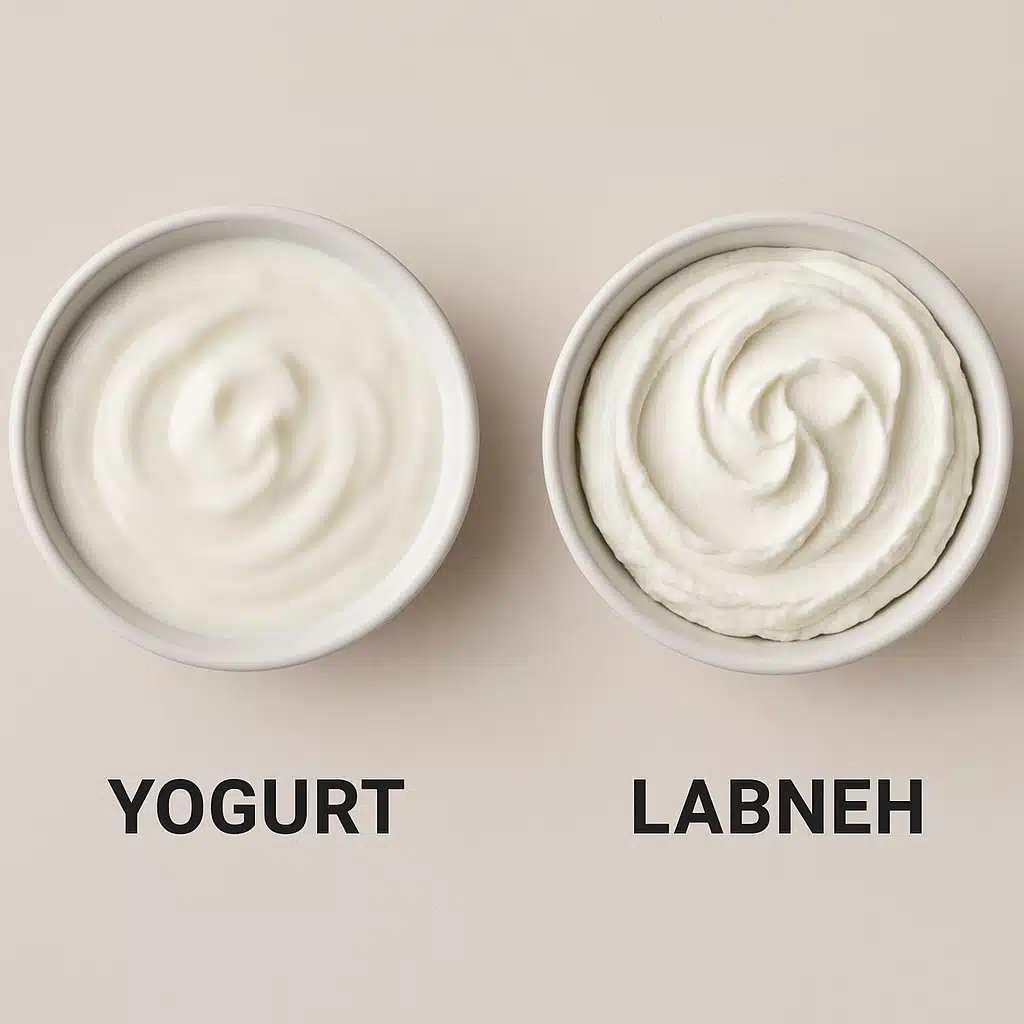
Labneh, sometimes spelled labaneh or labne, is essentially yogurt that has been strained to remove most of its liquid whey content. This straining process transforms regular yogurt into a thick, spreadable cheese with a consistency somewhere between Greek yogurt and cream cheese. The result is a product with concentrated flavor—pleasantly tangy with a slight acidity—and a luxuriously smooth, creamy texture that melts on your tongue.
Unlike fresh cheeses that require specialized cultures or rennet, labneh relies solely on the natural fermentation already present in yogurt. This makes it one of the most accessible homemade cheese options for beginners. The straining process not only thickens the yogurt but also intensifies its probiotic content per volume, potentially offering enhanced digestive benefits. Traditionally prepared in many households around the world, labneh has been a staple ingredient for generations, valued for its ability to be preserved longer than fresh yogurt and its incredible versatility in both savory and sweet applications.
The Health and Culinary Benefits of Homemade Labneh
Making labneh at home offers numerous advantages that go beyond simply having a delicious ingredient on hand. Understanding these benefits can help you appreciate why this traditional food has remained popular for so long and why it deserves a place in your modern kitchen.
Nutritional Advantages
- Rich in Protein: The straining process concentrates the protein content, making labneh an excellent source of this essential macronutrient that supports muscle health and keeps you feeling satisfied longer.
- Probiotic Power: Labneh retains the beneficial live cultures found in yogurt, which support digestive health, immune function, and may contribute to overall gut wellness.
- Lower in Lactose: Much of the lactose is removed with the whey during straining, making labneh potentially easier to digest for those with mild lactose sensitivity compared to regular yogurt or milk.
- Calcium and Minerals: Labneh provides significant amounts of calcium for bone health, along with phosphorus, potassium, and other essential minerals.
- Healthier Fat Profile: When made with whole milk yogurt, labneh contains beneficial fats that help with nutrient absorption, while still being lower in fat than many traditional cheeses and spreads.
Practical and Culinary Benefits
- Ultimate Freshness: Homemade labneh offers incomparable freshness with flavors that are bright and clean, without preservatives or additives found in some commercial versions.
- Complete Customization: You control the thickness by adjusting straining time, the saltiness level, and can easily infuse flavors with herbs, spices, garlic, or citrus zest to match your preferences or specific recipes.
- Cost-Effective: Making labneh at home from yogurt is significantly more economical than purchasing specialty cheese products, especially when made in larger quantities.
- Reduced Waste: The whey byproduct can be used in smoothies, baking, or as a nutritious addition to soups rather than being discarded.
- Longer Shelf Life: Properly stored labneh lasts longer than regular yogurt, and when preserved in olive oil, can keep for several weeks in the refrigerator.
- Culinary Versatility: Labneh works beautifully in breakfast dishes, appetizers, main courses, and even desserts, functioning as a spread, dip, sauce base, or ingredient.
How to Make Labneh: Step-by-Step Straining Method
Creating labneh at home requires minimal effort and just a few simple ingredients. The process is forgiving and flexible, making it perfect for both beginners and experienced home cooks. Here’s everything you need to know to make perfect labneh every time.
Ingredients You’ll Need
- Yogurt: 4 cups (approximately 1 liter) of plain yogurt—whole milk yogurt produces the creamiest, richest results, though you can use low-fat versions for a lighter product. Ensure the yogurt contains live active cultures and has no added gelatin or thickeners, which can interfere with straining.
- Salt: 1/2 to 1 teaspoon of fine sea salt or kosher salt (adjust to taste)—salt enhances flavor, aids preservation, and helps draw out moisture during straining.
- Optional flavorings: Fresh or dried herbs, minced garlic, lemon zest, spices like cumin or za’atar, or a drizzle of honey for sweet variations.
Equipment Required
- Straining cloth: Cheesecloth (multiple layers), butter muslin, a clean thin kitchen towel, or a specialized nut milk bag—avoid terrycloth or heavily textured fabrics.
- Fine-mesh strainer or colander: To support the cloth and provide structure during the straining process.
- Deep bowl: Large enough to catch the whey that drains from the yogurt, with enough clearance so the strainer doesn’t touch the liquid.
- Mixing bowl and spoon: For combining yogurt with salt before straining.
- Storage container: An airtight container for storing your finished labneh in the refrigerator.
Detailed Instructions
Step 1: Prepare the Yogurt Mixture
In a mixing bowl, combine your yogurt with salt, stirring gently but thoroughly to ensure the salt is evenly distributed throughout. This is also the time to add any flavoring ingredients if you’re making a savored or herbed version, though many people prefer to make plain labneh and add toppings later for more versatility.
Step 2: Set Up Your Straining System
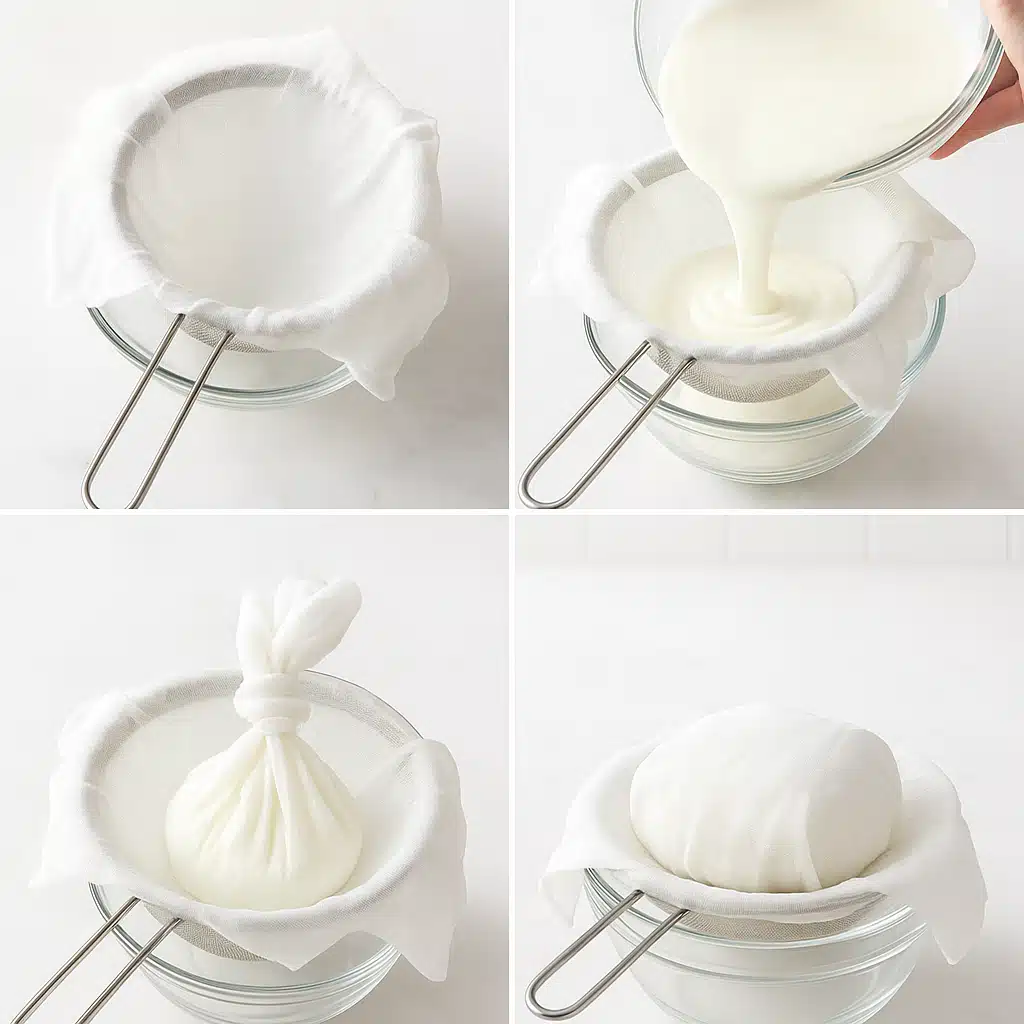
Line your fine-mesh strainer or colander with cheesecloth, using enough layers (typically 3-4) to prevent any yogurt solids from passing through. If using a kitchen towel or nut milk bag, ensure it’s thoroughly clean. Position the lined strainer over a deep bowl, making sure there’s at least 2-3 inches of clearance between the bottom of the strainer and the bowl—this space will collect the whey that drains away.
Step 3: Transfer and Cover
Pour or spoon the salted yogurt mixture into the prepared strainer, spreading it evenly. Gather the edges of the cloth and twist gently to form a bundle, or simply fold the cloth over the top. Cover the entire setup loosely with plastic wrap or a clean kitchen towel to protect it from absorbing refrigerator odors while allowing air circulation.
Step 4: Refrigerate and Wait
Place the entire setup in your refrigerator. The straining time determines your final texture: 12 hours produces a thick Greek yogurt consistency; 24 hours creates a spreadable labneh similar to soft cream cheese; 36-48 hours results in a firm labneh that can be shaped into balls. Check occasionally and drain the accumulated whey from the bowl if it gets close to touching the strainer.
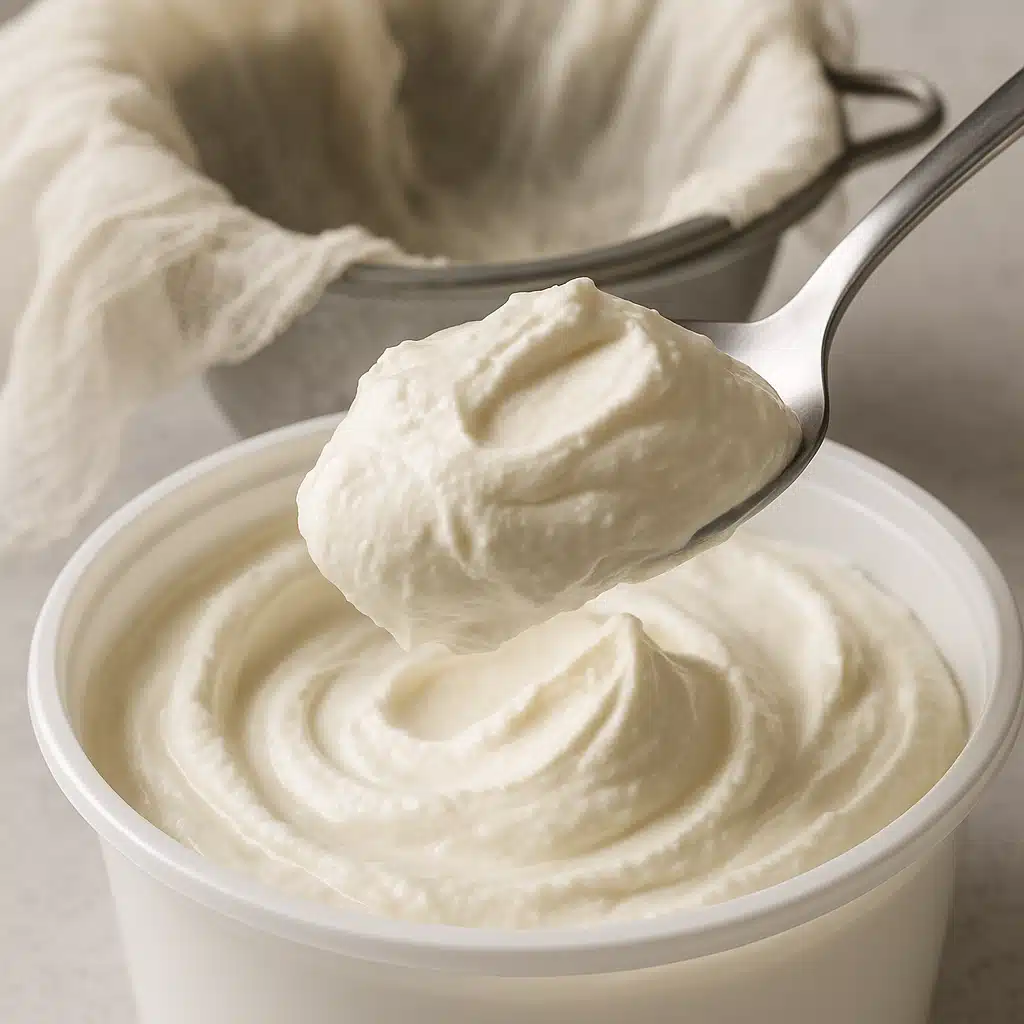
Step 5: Harvest Your Labneh
Once your desired consistency is reached, unwrap the cloth and transfer your labneh to a storage container. The volume will have reduced by approximately half—4 cups of yogurt typically yields about 2 cups of labneh. Use immediately or store covered in the refrigerator for up to two weeks.
Pro Tips for Perfect Labneh
- Temperature matters: Always strain in the refrigerator, never at room temperature, to prevent bacterial growth and maintain food safety.
- Don’t discard the whey: The liquid that drains away is nutrient-rich and can be used in smoothies, as a cooking liquid for grains, in baked goods as a buttermilk substitute, or even as a facial toner.
- Batch preparation: Labneh freezes reasonably well for up to three months, though the texture may be slightly grainy after thawing—best used in cooked dishes rather than as a fresh spread.
- Consistency check: If you’re unsure about timing, check after 18-20 hours and continue straining if needed; you can always strain longer but can’t reverse the process.
Creative and Delicious Ways to Enjoy Labneh
One of labneh’s greatest attributes is its incredible versatility. Its tangy, creamy character works beautifully across all meal occasions and can be adapted to suit numerous cuisines and dietary preferences. Here are some inspiring ways to incorporate labneh into your daily cooking.
Breakfast and Brunch Applications
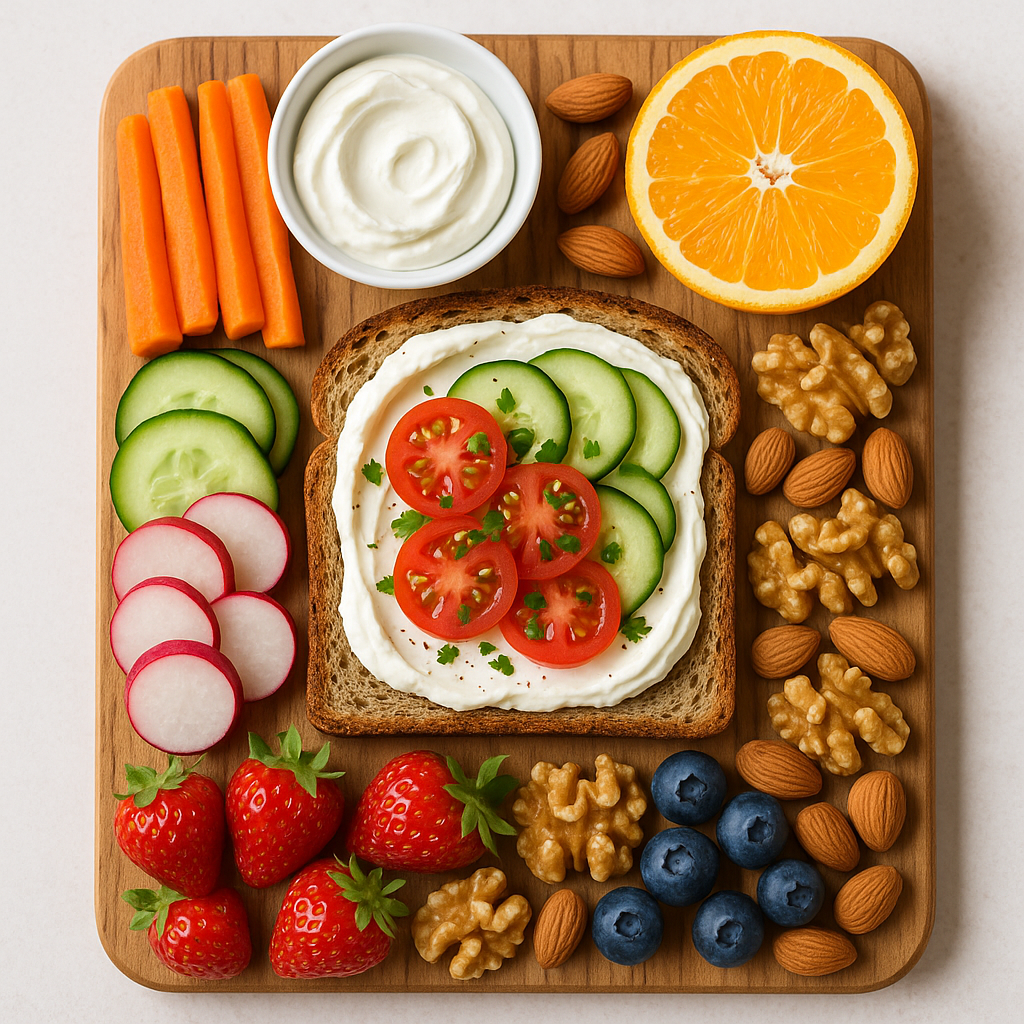
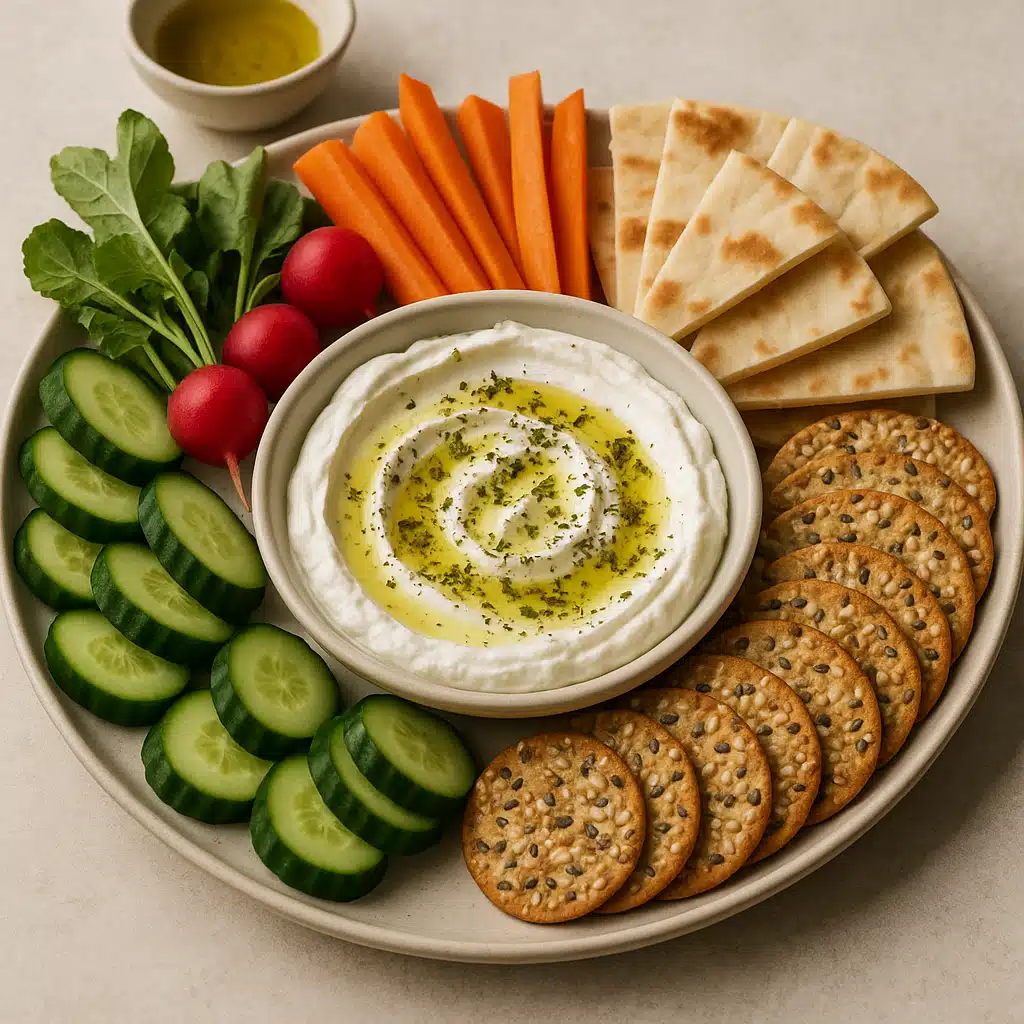
- Toast topper: Spread generously on toasted bread, bagels, or English muffins, then add toppings like sliced tomatoes, cucumber, radishes, smoked salmon, or avocado for a protein-rich breakfast.
- Pancake or waffle accompaniment: Use as a tangy alternative to sour cream or whipped cream, especially delicious with berry compote or honey drizzle.
- Smoothie bowl base: Swirl into smoothie bowls for added creaminess and protein, creating beautiful presentations with colorful fruits and granola.
- Egg dish enhancement: Dollop onto scrambled eggs, serve alongside omelets, or spread on the plate beneath poached eggs for added richness.
Appetizers and Dips
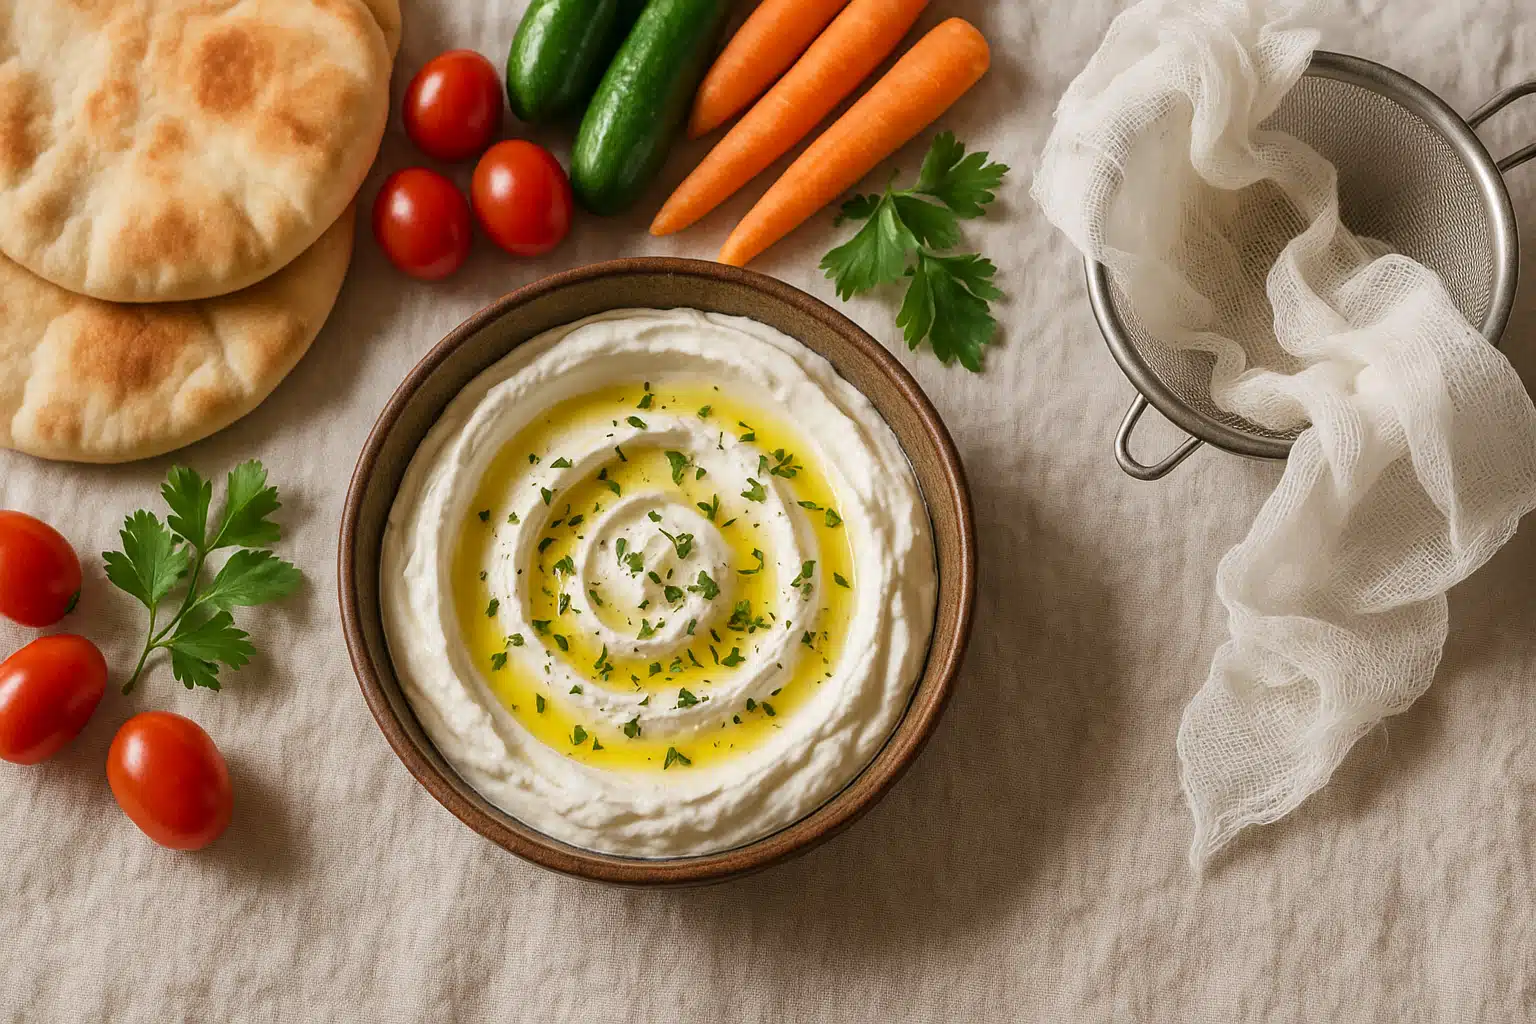
- Classic mezze spread: Serve in a shallow bowl, create a well in the center, drizzle with high-quality extra virgin olive oil, and sprinkle with za’atar, sumac, or red pepper flakes. Accompany with warm pita bread, crackers, or vegetable crudités.
- Herbed spread: Mix with fresh chopped herbs like dill, mint, parsley, or chives, plus minced garlic and lemon zest for a flavorful party dip.
- Labneh balls: Roll firmly strained labneh into small balls, coat with herbs, spices, or crushed nuts, and preserve in olive oil—these keep for weeks and make impressive gifts or additions to cheese boards.
- Stuffed vegetables: Use as a filling for hollowed cherry tomatoes, mini bell peppers, or cucumber cups for elegant finger food.
Main Course Integrations
- Sauce base: Thin labneh with a little water, lemon juice, or olive oil to create creamy sauces for grilled meats, roasted vegetables, or grain bowls.
- Pasta enhancement: Toss with hot pasta, reserved pasta water, olive oil, and fresh herbs for a quick, protein-rich sauce that rivals Alfredo but with more tang and less heaviness.
- Pizza foundation: Spread on pizza dough as an alternative to tomato sauce, then top with vegetables, herbs, and cheese for a white pizza variation.
- Sandwich spread: Use instead of mayonnaise or mustard in sandwiches and wraps for added protein and a tangy flavor that complements both meat and vegetarian fillings.
- Soup garnish: Swirl into hot soups just before serving, particularly good with lentil, tomato, or vegetable soups for added richness and visual appeal.
Salads and Sides
- Creamy salad dressing: Whisk with olive oil, lemon juice, garlic, and herbs to create a probiotic-rich dressing that’s healthier than cream-based options.
- Potato topper: Use as a topping for baked or roasted potatoes instead of sour cream, adding herbs and a drizzle of olive oil.
- Grain bowl component: Add a generous dollop to grain bowls with quinoa, bulgur, or rice, along with roasted vegetables and proteins for a complete meal.
- Coleslaw binder: Mix with a little vinegar and honey to create a tangy, creamy dressing for cabbage slaw that’s lighter than mayo-based versions.
Desserts and Sweet Applications
- Fruit accompaniment: Serve alongside fresh or roasted fruit with a drizzle of honey and chopped nuts for a simple yet elegant dessert.
- Cheesecake alternative: Use as a base for no-bake cheesecakes or as a lightened filling for traditional baked versions.
- Frosting component: Blend with powdered sugar and vanilla for a tangy frosting that works beautifully on carrot cake or spice cakes.
- Parfait layer: Alternate with granola, honey, and fruit for a healthy breakfast parfait or dessert.

Common Mistakes and How to Avoid Them
While making labneh is straightforward, understanding common pitfalls can help ensure success every time. Here are the most frequent mistakes and how to prevent them.
Yogurt Selection Errors
- Using yogurt with additives: Yogurt containing gelatin, pectin, or other thickeners won’t strain properly because these ingredients are designed to hold moisture. Always check ingredient labels and choose yogurt with only milk and cultures listed.
- Choosing low-fat or non-fat varieties: While these will technically work, they produce significantly less creamy results with a somewhat chalky texture. For the best experience, especially when learning, use whole milk yogurt.
- Starting with Greek yogurt: Since Greek yogurt is already strained, using it as a base means you’ll get very little additional straining and may end up with an overly firm product. Start with regular yogurt for proper labneh texture.
Straining Process Mistakes
- Insufficient straining time: Impatience is the enemy of good labneh. If you stop straining too early, you’ll have thick yogurt rather than true labneh. Plan for at least 24 hours for authentic texture.
- Room temperature straining: Never strain yogurt at room temperature, as this creates an ideal environment for harmful bacteria growth. Always refrigerate during the entire straining process.
- Using too few layers of cheesecloth: A single layer may allow yogurt solids through, resulting in loss of product and a watery mess. Use 3-4 layers for best results.
- Not allowing whey drainage: If whey accumulates and touches the bottom of your strainer, it prevents further draining. Check periodically and pour off collected liquid.
Seasoning Missteps
- Skipping salt entirely: Salt isn’t just for flavor—it helps draw moisture from the yogurt and acts as a preservative. Omitting it results in blander flavor and potentially shorter shelf life.
- Adding salt after straining: While you can adjust seasoning later, salt works more effectively when mixed in before straining, as it helps with moisture extraction throughout the process.
- Over-seasoning initially: Remember that straining concentrates all flavors, including salt and any spices. Start conservatively—you can always add more later.
Storage and Preservation Issues
- Improper storage containers: Always use clean, airtight containers to prevent your labneh from absorbing refrigerator odors and to maximize freshness.
- Not smoothing the surface: Before storing, smooth the top of your labneh and drizzle with a thin layer of olive oil to create a protective barrier that extends shelf life.
- Storing at wrong temperature: Keep labneh in the coldest part of your refrigerator (typically the back of a lower shelf), not in the door where temperature fluctuates.
Troubleshooting Common Issues
Problem: Labneh is too runny after 24 hours
Solution: Continue straining for another 12-24 hours, or check that your yogurt doesn’t contain stabilizers that prevent proper draining.
Problem: Labneh tastes too sour
Solution: This usually indicates the yogurt was too mature when you started. Use fresher yogurt, or balance the sourness by mixing in a small amount of honey or serving with sweet accompaniments.
Problem: Grainy texture
Solution: This can result from over-straining or from yogurt that was previously frozen. Whip the labneh vigorously with a spoon or in a food processor to smooth it out.
Problem: Labneh develops mold
Solution: Ensure all equipment is thoroughly clean, always use clean utensils when serving, and store properly covered. The olive oil preservation method significantly extends shelf life.
Frequently Asked Questions About Making Labneh
Can I use plant-based yogurt to make labneh?
Yes, though results vary by brand and type. Coconut milk yogurt tends to work best among plant-based options, producing a reasonably creamy result. Almond and soy yogurts can also be strained but may yield less volume and a different flavor profile. Look for plant-based yogurts without stabilizers for best straining results, and expect a slightly different texture than dairy-based labneh.
How long does homemade labneh last?
Properly stored in an airtight container in the refrigerator, plain labneh typically lasts 10-14 days. For extended preservation, cover the surface with olive oil, which can extend shelf life to 3-4 weeks. Labneh balls preserved completely submerged in olive oil in sterilized jars can last even longer—up to several months when kept refrigerated. Always check for signs of spoilage (off smell, mold, or discoloration) before consuming.
What’s the difference between labneh and Greek yogurt?
Both are strained yogurt products, but labneh is strained much longer, resulting in a significantly thicker, more cheese-like consistency. Greek yogurt is typically strained for a few hours, while labneh strains for 24-48 hours. This extended straining removes more whey, creating a product that’s spreadable rather than spoonable, with more concentrated flavor and higher protein density per volume.
Do I need to use whole milk yogurt?
While not absolutely necessary, whole milk yogurt produces the creamiest, most luxurious texture with the best flavor. Low-fat yogurt will work but yields a tangier, less rich result with a slightly grainy texture. If you’re watching fat intake, low-fat yogurt is a reasonable compromise, but avoid non-fat yogurt, which produces a chalky, less appealing product.
Can I speed up the straining process?
While you can’t truly speed it up significantly while maintaining quality, you can create slight improvements: use a finer weave cloth, apply very gentle pressure by placing a small plate with a light weight on top of the yogurt, or increase salt slightly (which draws out moisture faster). However, patience truly is key—rushing the process compromises texture. If you need “instant” labneh, start with Greek yogurt and strain for just 6-8 hours for a close approximation.
Conclusion: Embrace the Art of Homemade Labneh
Making labneh at home is a rewarding culinary practice that connects you with ancient food traditions while providing a delicious, nutritious ingredient for modern cooking. With just yogurt, salt, and patience, you can create a versatile cheese that elevates everything from simple toast to elaborate dinner party spreads. The process is forgiving enough for complete beginners yet offers room for experimentation and personalization as you develop your skills.
The beauty of labneh lies not only in its creamy texture and tangy flavor but also in its adaptability to your dietary needs and culinary preferences. Whether you’re seeking a protein-rich breakfast option, a healthier alternative to cream cheese or sour cream, or simply want to explore new flavors and techniques, labneh delivers on all counts. The cost savings compared to specialty store-bought versions, combined with the satisfaction of creating something wholesome from scratch, make this a worthwhile addition to your kitchen repertoire.
As you begin your labneh-making journey, remember that each batch teaches you something new about texture preferences, straining times, and flavor combinations. Don’t be discouraged if your first attempt isn’t perfect—the process is remarkably forgiving, and even slightly over- or under-strained results are still delicious. Start with the basic recipe, master the technique, and then let your creativity guide you toward flavored versions, preservation methods, and innovative uses.
Your homemade labneh will undoubtedly impress family and friends while opening up a world of culinary possibilities. From simple weekday meals to special occasion entertaining, this Middle Eastern staple has earned its place in global cuisine. So gather your ingredients, set up your straining system, and discover why generations of home cooks have treasured this simple yet extraordinary transformation of yogurt into creamy, tangy cheese. Your kitchen—and your taste buds—will thank you.